
Been lurking for a while and planning my first smoker build. I sold my reverse flow trailer a few months ago because it was just too big for my purposes. Got my hands a 6' section of 3/16" plate rolled into a 24" cylinder. It is not welded, just rolled. My plan is for a 48" chamber and a 24" firebox. Reverse flow, one door, two grates. I have run the pitcalculator and that firebox is 150% of recommended, but I would rather have more than not enough.
I have never worked with rolled plate before. I was contemplating how best to approach it. Would y'all suggest welding the cylinder closed before I do anything else? For a fleeting moment I thought that I could just do my door layout before I weld it closed and use that seam as the bottom of my door opening (only welding on each side between the ends of the cylinder and where the door is), but thought that it is probably best to have a full weld across that seam to make sure it is strong. If I am thinking about that wrong, please let me know.
My original plan was to do an octagonal chamber out of 3/16" plate with a square firebox. The deal on got on this rolled plate was too good to pass up, so thus the change of plan. Any input y'all might have on working with the rolled plate is greatly appreciated.
First Build. Looking for guidance

-
dacolson
Re: First Build. Looking for guidance
How big is the gap at the seam? A lot of door related issues could be solved right here for you. Since it’s not welded, there is not stress on the metal so your door wont spring out of shape when you cut it. If your gap is tight right now, I don’t see why you wouldn’t use the seam as part of your door cut, other than looks. Personally, I’d probably put that seam at the back.
-
Dirtytires

- Expert

- Posts: 3845
- Joined: November 24th, 2015, 12:36 am
- Title: It ain't broke...yet
- BBQ Comp Team Name: Dont compete...cook for events once in a while
- Location: Phoenix, Az
Re: First Build. Looking for guidance
First off, welcome.
Secondly, a firebox that is at 150% is a BIG red flag. The numbers on the calculator are pretty stringent and ignoring them will lead to problems. Cut it down to 100-105%.
Most rolled steel has a certain amount of spring to it as well as “flats” at the beginning and end of the roll as the machine usually does not roll perfectly to the edge. Is your roll sitting with the edges perfectly aligned and touching at the edges? If not, you are going to introduce some energy when you pull the edges together to weld them. Secondly, how big are the flats? They might be better hidden on the bottom of the cook chamber.
Either way, put your ends on and weld (at least part of) your seam before you cut the door.
Re: First Build. Looking for guidance
dacolson wrote: ↑August 5th, 2020, 12:21 amHow big is the gap at the seam? A lot of door related issues could be solved right here for you. Since it’s not welded, there is not stress on the metal so your door wont spring out of shape when you cut it. If your gap is tight right now, I don’t see why you wouldn’t use the seam as part of your door cut, other than looks. Personally, I’d probably put that seam at the back.
The gap is about 1.5". I threw a few straps around it and pulled it tight to see how it matches up. It comes up pretty flush and doesn't have a flat spot really. If I use that seam as the bottom of my door and my door is 40" wide, that would give me 4" of weld on each side to hold the cylinder together. Do you feel like that would be an issue on a 48" long cylinder? I can get handy with a grinder and pretty it up and it shouldn't be an issue asthetically. I am planning on doing a raw finish with boiled linseed oil.
-
dacolson
Re: First Build. Looking for guidance
In my opinion, the more I think about it, I’d position the seam in the back. 1st, you avoid the possibility of structural strength. 2nd, even if you weld it well and grind it flat so you can’t see the welds, you’ll have bare spots w no mill scale that will still show up a lot w boiled linseed compared to the rest of the tank. I’m sure 8” of weld plus the endcaps welded on and holding the shape would give you enough structural rigidity, but you never know.
Another idea that has come up in recent write ups is instead of closing that 1.5” gap by strapping them together and welding, just put a 1.5” piece of 1/4” flat stock in the gap and weld that on both sides. That way there will be no stress on your welds at all.
Whatever you do, cut the door before you weld the seams. You’ll avoid any possible warping.
Re: First Build. Looking for guidance
Help me understand why the firebox needs to be downsized? If I size my vent, opening, and stack according the calculator, I shouldn't have a flow issue, right? 24x16 would give me a firebox that is 100%. My thought is that at that size I am going to be challenged to get a burn basket in it that will really function. I would like to have room to put in a burn basket that I can have some room to move back and forth to really "tune" how I heat the chamber. I am only going off my previous experience with pits that I have bought. My trailer pit had an undersized firebox and it drove me nuts.Dirtytires wrote: ↑August 5th, 2020, 12:49 pmFirst off, welcome.
Secondly, a firebox that is at 150% is a BIG red flag. The numbers on the calculator are pretty stringent and ignoring them will lead to problems. Cut it down to 100-105%.
Most rolled steel has a certain amount of spring to it as well as “flats” at the beginning and end of the roll as the machine usually does not roll perfectly to the edge. Is your roll sitting with the edges perfectly aligned and touching at the edges? If not, you are going to introduce some energy when you pull the edges together to weld them. Secondly, how big are the flats? They might be better hidden on the bottom of the cook chamber.
Either way, put your ends on and weld (at least part of) your seam before you cut the door.
As for the flats, it appears that they rolled the plate and then cut out the flats to make the 24" cylinder. It is dang near perfectly round when I put straps on it and pull the seam flush.
-
dacolson
Re: First Build. Looking for guidance
My FB is 24x18x18 on a similar CC size. That comes Out to 107%. I have a very usable fire basket and ash pan.
-
Big T

- Moderator

- Posts: 6897
- Joined: September 1st, 2013, 2:40 pm
- Title: Go Getter
- BBQ Comp Team Name: Backyard Boys
- Location: Lower Alabama
Re: First Build. Looking for guidance
The ratio of the components are all based on volume. The cook chamber requires X amount of heated air to achieve the desired temperature range. Normally the FB is 1/3 the size of the CC and then you have the ratio's of the throat, baffle plate gap and exhaust stack. If you check out the pit calculator you'll notice that any time you change any single dimension, it changes all of the rest of the dimensions. If you're heating too much or too little air in the FB then it can lead to temp issues in the CC. Most pits that are designed with a calculator all run very similar, usually once you have a good bed of coals you add 2 small splits of wood every 45-60 minutes to maintain temperatures. With that being said, I have seen many pits with huge FB to CC ratio's and the pit master seems to manage just fine once they get a few cooks on it. I'm not an engineer or a scientist so I can't explain it in great detail but I hope this helps you to understand the thought process behind designing/building a pit. I've read that the first pit calculators were designed by a group of guys that were scientist and engineers, however I wasn't there so who knows. lol
Measure Twice.....Cut Three Times.
Re: First Build. Looking for guidance
Thank you, Big T. I am a sales engineer in the commercial HVAC business so heat exchange and air flow is what I do for a living. I also don't believe in needing to recreate the wheel. If there is empirical evidence to support why something is done a certain way, that is good enough for me. Now I might just for fun break out the calculator and do some figuring to see if I can by my own means get to the same answers that the pit calculator does.Big T wrote: ↑August 5th, 2020, 8:15 pmThe ratio of the components are all based on volume. The cook chamber requires X amount of heated air to achieve the desired temperature range. Normally the FB is 1/3 the size of the CC and then you have the ratio's of the throat, baffle plate gap and exhaust stack. If you check out the pit calculator you'll notice that any time you change any single dimension, it changes all of the rest of the dimensions. If you're heating too much or too little air in the FB then it can lead to temp issues in the CC. Most pits that are designed with a calculator all run very similar, usually once you have a good bed of coals you add 2 small splits of wood every 45-60 minutes to maintain temperatures. With that being said, I have seen many pits with huge FB to CC ratio's and the pit master seems to manage just fine once they get a few cooks on it. I'm not an engineer or a scientist so I can't explain it in great detail but I hope this helps you to understand the thought process behind designing/building a pit. I've read that the first pit calculators were designed by a group of guys that were scientist and engineers, however I wasn't there so who knows. lol
Re: First Build. Looking for guidance
So I came up with a plan for the firebox that I wanted to run by y'all for input. My idea is to build a box inside a cylinder for the firebox. I am going to take the 24x24 cylinder, cut it down to 20" long, and build a box inside it using 1/4" plate. The box will be 20x20x20. The areas between the box and the cylinder will be insulated with ceramic or some other high temp insulation. This accomplishes 2 things....takes my FB dimensions down to ~110%, and is insulated. That would be the best use of the materials I have. Being able to have an insulated FB without having to buy the plate steel for both walls.
My plan is to mount the FB so that the top of the inside box is level with the top of the throat. If that makes sense. Would I then cut my baffle to be at that same height or do I need to have the baffle higher than that? Say 1" above the top of the throat?
My plan is to mount the FB so that the top of the inside box is level with the top of the throat. If that makes sense. Would I then cut my baffle to be at that same height or do I need to have the baffle higher than that? Say 1" above the top of the throat?
-
dacolson
Re: First Build. Looking for guidance
Sounds like a solid plan to me. It’ll be a bit more work with the round outer tank getting it all welded together but it should be fine. If you have the room below your cooking racks, I would put a 12” shadow plate at the same height as your throat. It’s basically a mini baffle plate meant to keep the FB end of your baffle plate from over heating. Then put your baffle plate a few inches or so above that. I’d shoot for 3” below your cooking racks.
Re: First Build. Looking for guidance
Thanks for the suggestion. I think I should have plenty of space for that. If I am understanding correctly, it is just a 12" long baffle that is under the main baffle?
-
dacolson
Re: First Build. Looking for guidance
Wish I had a pic. Basically I put a 12” plate the width of my throat extending out from the FB into the CC. My baffle plate sits about 2 or 3” above that. The only purpose is as a heat shield to keep the temps down directly above the throat.
-
Big T
- Moderator
- Posts: 6897
- Joined: September 1st, 2013, 2:40 pm
- Title: Go Getter
- BBQ Comp Team Name: Backyard Boys
- Location: Lower Alabama
Re: First Build. Looking for guidance
That's correct, usually about 1'' between the shadow plate and baffle plate.
Measure Twice.....Cut Three Times.
-
Dirtytires
- Expert
- Posts: 3845
- Joined: November 24th, 2015, 12:36 am
- Title: It ain't broke...yet
- BBQ Comp Team Name: Dont compete...cook for events once in a while
- Location: Phoenix, Az
Re: First Build. Looking for guidance
Your firebox is gonna be heavy. Don’t think I would just hang it off the end...probably want a support under it tying it into the cart.
Re: First Build. Looking for guidance
That is an excellent point. I will come up with a support to tie into the cart.Dirtytires wrote: ↑August 12th, 2020, 10:18 amYour firebox is gonna be heavy. Don’t think I would just hang it off the end...probably want a support under it tying it into the cart.
Re: First Build. Looking for guidance
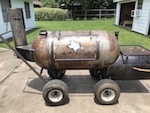
So I am bad at taking pictures and updating. So here is all of it at once....


The firebox and CC started as a single 72" long piece of 3/16" plate rolled into a roughly 24" cylinder that had an open seam. I cut it into a 50" section and a 22" section. We, my son and I, welded the 24" end caps on. Took some prying it open to make it completely round. Made the stand out of 2" 14ga square tubing. Put 8" casters on the frame. Did a smokestack collector that is 20" wide and 4" tall. I still have to weld that in. Made my baffle 46" long. It rests just above the throat. Considering not welding the baffle in. Any thoughts on that? It fits really well and I am thinking that my "leaks" would be minimal. I was going to put in a 1.25" drain and if I left the baffle unwelded, I could better do a clean out. I welcome y'all's input. I know my welding sucks. It is a work in process.
The firebox and CC started as a single 72" long piece of 3/16" plate rolled into a roughly 24" cylinder that had an open seam. I cut it into a 50" section and a 22" section. We, my son and I, welded the 24" end caps on. Took some prying it open to make it completely round. Made the stand out of 2" 14ga square tubing. Put 8" casters on the frame. Did a smokestack collector that is 20" wide and 4" tall. I still have to weld that in. Made my baffle 46" long. It rests just above the throat. Considering not welding the baffle in. Any thoughts on that? It fits really well and I am thinking that my "leaks" would be minimal. I was going to put in a 1.25" drain and if I left the baffle unwelded, I could better do a clean out. I welcome y'all's input. I know my welding sucks. It is a work in process.
Last edited by USMC1995 on October 4th, 2020, 1:01 am, edited 1 time in total.
Re: First Build. Looking for guidance
So here is the problem I am having.....the door sprung, but not how doors usually spring. It sprung in. Below are some pictures for reference. Any ideas on how to deal with that?


Re: First Build. Looking for guidance
I have not looked at all the pics yet but you will want to get two casters that are fixed...having all four swivel is a wild ride.
As far as the door....just put it on the floor and stand on it to bend it...probably the best kind of deal to fix!!! If you welded it in place you can still roll the whole smoker over to get the open door on the floor.
As far as the door....just put it on the floor and stand on it to bend it...probably the best kind of deal to fix!!! If you welded it in place you can still roll the whole smoker over to get the open door on the floor.
-
Dirtytires
- Expert
- Posts: 3845
- Joined: November 24th, 2015, 12:36 am
- Title: It ain't broke...yet
- BBQ Comp Team Name: Dont compete...cook for events once in a while
- Location: Phoenix, Az
Re: First Build. Looking for guidance
Weld the baffle plate. A loose baffle plate means a grease fore is just waiting to ruin a cook. So much easier to cleanup if it’s trapped above the plate.
The door can easily be fixed with a chain and a bottle jack. The process is described on this site but you basically wrap a heavy chain around the door and slowly apply pressure to massage it back to shape with a bottle jack. Bad news is the door has to come off.On the bright side, your door needs to come off anyway to properly align it for a gasket so you have nothing to loose.
And I won’t pick on your welding, but point out that you are getting what looks like poor penetration. Probably time to try adjusting the machine to improve. Another tip is to try cleaning off your metal with a quick hit from a flap disk as shiny metal always welds better (and the ground works better on shiny metal too.). To be honest tho, the absolute biggest improvement to my welding over the years was when I bought a mid-end auto-darkening hood. The improvement came from actually being able to see the weld and therefore control it.
Keep at it! You guys are making good progress!
-
hogaboomer
- Expert
- Posts: 919
- Joined: July 15th, 2019, 9:47 am
- Title: old pipe welder
- BBQ Comp Team Name: Not competing yet...
- Location: Groves, TX.
Re: First Build. Looking for guidance
I can tell you from my own experience that you're not going to like those tires.
I live on Hogaboom Road.
-
dacolson
Re: First Build. Looking for guidance
You may be able to keep the door attached if you prop if open with some 2x4s. The bottle jack is going to be your friend here. Think of it like a reverse press brake. With the jack sitting on the top of your curve in the door, run a chain hooked to the edge of the door over the top of the jack and start jacking it up. You’ll have to work your way down the length of the door to get the whole warp out. Or, cut the hinges and put it on your work bench. Put the jack on top and attach you chain to the bench. It will be like standing on it except you can put 20 tons of pressure on it. Lots of ways to do it if you get creative. Good luck!
Re: First Build. Looking for guidance
Thank y'all for the feedback. I am thinking that I will take the door off and try to address it that way. I will also do the flat bar on it while it is off.
One of the biggest issues I am having is when I am welding something thinner to the tank. The tubing that I used for the hinges is at most 14ga. If I had enough heat to weld the 3/16 tank, it would just blow through the tubing. Any suggestions? Ultimately I would like to have some thicker walled tubing. What do y'all use?
Hogaboomer, is it the tires or the whole caster assembly? And I do have to admit that I did have two fixed casters, but in true moron style I welded the plate to the frame the wrong way. So I said screw it and put four swivel casters on it. Probably need to address that.
Re: First Build. Looking for guidance
Does anyone have a good picture of their drain setup? I seem to recall someone saying that they had the drain going from the baffle plate through the bottom of the CC. My assumption there is that they also have another drain under the baffle. Otherwise how would they address cleaning out under the baffle?
-
dacolson
Re: First Build. Looking for guidance
On the welding, you need to start your weld on the thicker material and only hit the thinner tubing briefly. I use a motion like a string of small circles or cursive letter e’s. Go slowly over the thick stuff the speed up over the tin. Good luck!USMC1995 wrote: ↑October 5th, 2020, 8:23 pmThank y'all for the feedback. I am thinking that I will take the door off and try to address it that way. I will also do the flat bar on it while it is off.
One of the biggest issues I am having is when I am welding something thinner to the tank. The tubing that I used for the hinges is at most 14ga. If I had enough heat to weld the 3/16 tank, it would just blow through the tubing. Any suggestions? Ultimately I would like to have some thicker walled tubing. What do y'all use?
Hogaboomer, is it the tires or the whole caster assembly? And I do have to admit that I did have two fixed casters, but in true moron style I welded the plate to the frame the wrong way. So I said screw it and put four swivel casters on it. Probably need to address that.
-
- Similar Topics
- Replies
- Views
- Last post
-
- 13 Replies
- 6558 Views
-
Last post by Dirtytires
-
- 56 Replies
- 15355 Views
-
Last post by Barrion2018
-
- 52 Replies
- 16334 Views
-
Last post by SeenRed
-
- 5 Replies
- 2475 Views
-
Last post by Beagle Bones
-
- 2 Replies
- 2522 Views
-
Last post by sfarbic