Just thinking out loud...but you guys have some amazing fabricating skills and equipment, could you not make a swing away handle for each side with a couple of back stops inside the cooker like they used to have on those old Franklin stoves?
You would be able to just flip the handles 90 degrees or so and lift the lid. On this beauty, those clamps would not look as cool.
80 Gallon Bid for Excellence
-
Puff

- Expert

- Posts: 2352
- Joined: May 29th, 2013, 11:16 pm
- Title: Always All In !
- Location: New Jersey...Southern New Jersey
Re: 80 Gallon Bid for Excellence
Make no mistake, there ain't no powder in this Puff ! And... I'm not really a crazy person but I play one in real life

-
huntfishgrill
- Smokerbuilder

- Posts: 53
- Joined: August 20th, 2013, 9:18 pm
- Title: Southern dude.
- BBQ Comp Team Name: Not competing just yet...
- Location: Chattanooga, Tennessee
Re: 80 Gallon Bid for Excellence
yeah puff! that's what i'm talking about! i said almost the same thing last weekend. This thing is turning out so good, i hate to just throw some chinese toggle clamps on it if we can do something better and nicer looking. I can't work on it this weekend but maybe next weekend is go time for the final push. the door clamps might could be worked on before then. I'm going to go back to the drawing board on that one for sure!
The early bird gets the worm, but the second mouse gets the cheese.
-
The Czar

- Expert
- Posts: 8334
- Joined: May 22nd, 2011, 9:30 am
- Title: Spam Hammerer
- BBQ Comp Team Name: Team SmokerBuilder- Competition BBQ Team
I'm Certifiable - Location: Missouri
Re: 80 Gallon Bid for Excellence
 .....can't focus enough to envision your dream....
 If you can't fix it by sheer force or cursing......then it can't be fixed.....
AKA= The Czar
AKA= The Czar
-
swamperjmb
- beginner

- Posts: 9
- Joined: September 28th, 2013, 3:09 pm
Re: 80 Gallon Bid for Excellence
Thought about using a design close to this a few years ago. It's nice to see great minds think alike...
-
huntfishgrill
- Smokerbuilder
- Posts: 53
- Joined: August 20th, 2013, 9:18 pm
- Title: Southern dude.
- BBQ Comp Team Name: Not competing just yet...
- Location: Chattanooga, Tennessee
Re: 80 Gallon Bid for Excellence
OK guys, I finally got another day to work on this project. We hit it hard all day Saturday and nearly finished save paint, trailer wiring and a few small things. We started off the day with cooking grate. Nothing fancy, just a simple removable frame with end brackets inside the CC to hold it up.
- We decided to make the grate the same width as the door (after much debate on whether the few extra inches of cooking space was needed. Simplicity won that argument.
- Closer view of the XM grate.
The early bird gets the worm, but the second mouse gets the cheese.
-
huntfishgrill
- Smokerbuilder
- Posts: 53
- Joined: August 20th, 2013, 9:18 pm
- Title: Southern dude.
- BBQ Comp Team Name: Not competing just yet...
- Location: Chattanooga, Tennessee
Re: 80 Gallon Bid for Excellence
One of my favorite ideas that Ben came up with, was a bent round tube shelf. I'm real happy with how it turned out, too. It looks even better than I'd hoped.
- Out comes the pipe bender again!
- We basically made the shelf a little bit shorter than the trailer tires to maximize the space.
- As usual Ben wants to prove the quality of his welded tubing. This thing is plenty stiff, in case I drop it off a cliff.
- Last minute add by me, and probably the most talked about feature of the build. Cup holders.
- I mean, why not? I told them I'd spend the rest of my life wishing we'd done that, if we hadn't.
The early bird gets the worm, but the second mouse gets the cheese.
-
huntfishgrill
- Smokerbuilder
- Posts: 53
- Joined: August 20th, 2013, 9:18 pm
- Title: Southern dude.
- BBQ Comp Team Name: Not competing just yet...
- Location: Chattanooga, Tennessee
Re: 80 Gallon Bid for Excellence
Sealing this thing up properly was important. All the attention to detail along the way has tolerances pretty tight to begin with, but we added flanges to "seal" the deal. We sheared these from scrap 10 gauge with enough overlap for the Nomex seal material. We rolled the side strips to get them close to the CC and FB diameter curves.
- Flange materials ready to tack into place.
- Because of our hinge design, the top flanges were placed on the inside. We didn't weld it in completely due to the crazy angle.
- The other three side of flange were welding on completely.
- After some discussion, the old Harbor Freight toggle clamps ended up being the winners. They just plain work.
- The CC flanges from the inside. You can also see the cooking grate brackets here. Nothing fancy.
- Outside view of CC with door flanges welded in place.
- FB door flanges and toggle clamp welded in. The FB door flanges were only half welded in which should be plenty good.
The early bird gets the worm, but the second mouse gets the cheese.
-
huntfishgrill
- Smokerbuilder
- Posts: 53
- Joined: August 20th, 2013, 9:18 pm
- Title: Southern dude.
- BBQ Comp Team Name: Not competing just yet...
- Location: Chattanooga, Tennessee
Re: 80 Gallon Bid for Excellence
We had two pieces of 3.75" inside diameter tubing that was going to be the smoker stack all along. The only issue was offset enough for the door to rest open. We had to build an entirely-too-complicated piece to move the stack several inches away from the CC to properly clear the door and its handle. I'm not 100% sure this doesn't affect the flow distance/length required. We made it still be the recommended length even though technically it moves a few inched laterally before turning vertical.
- Now's the time you're happy to have access to a band saw like this!
- You can't see it well, but there's a crazy elbow piece being welded onto the stack.
- Unanimous votes for "slash cut" tip.
- 800 miles of wire fed into welding this heavy stack onto this thing.
- And why didn't I realize how freakin' tall this would make it? 8' 3" to the top.
- Here's a view of the offset elbow required to let the door rest properly. It looks easier than it was.
The early bird gets the worm, but the second mouse gets the cheese.
-
huntfishgrill
- Smokerbuilder
- Posts: 53
- Joined: August 20th, 2013, 9:18 pm
- Title: Southern dude.
- BBQ Comp Team Name: Not competing just yet...
- Location: Chattanooga, Tennessee
Re: 80 Gallon Bid for Excellence
Even though we were running out of steam, I still wanted to add some useful details to finish this build. I didn't have much left in the way of metal, but we stacked up the remaining angle and came up with this simple dropped box design.
- We didn't have much angle left, so this dropped box seemed a good use of it.
- Located towards the front of the trailer.
- 10" deep was all we had enough metal for, but should work for wood or small items.
- The front seemed the safest place to drop this box down for trailering.
- We bent some scrap rod material for the FB Dampener handle.
The early bird gets the worm, but the second mouse gets the cheese.
-
huntfishgrill
- Smokerbuilder
- Posts: 53
- Joined: August 20th, 2013, 9:18 pm
- Title: Southern dude.
- BBQ Comp Team Name: Not competing just yet...
- Location: Chattanooga, Tennessee
Re: 80 Gallon Bid for Excellence
I had one sheet of expanded metal for the whole project. I knew I wanted to cover as much as possible of the trailer. It worked out nearly perfectly wit one small piece left over.
- We fitted the whole trailer first and tacked it in. It had to be trimmed to fit around the FB mounts.
- Original plans called for a rack on the tail to hold coolers, but time/money/givadamn ran out. The space is still good for coolers just a little plain looking.
- Tacking the expanded metal to the cross supports.
- First glimpse of the finished product.
The early bird gets the worm, but the second mouse gets the cheese.
-
huntfishgrill
- Smokerbuilder
- Posts: 53
- Joined: August 20th, 2013, 9:18 pm
- Title: Southern dude.
- BBQ Comp Team Name: Not competing just yet...
- Location: Chattanooga, Tennessee
Re: 80 Gallon Bid for Excellence
Well, here she is! It's been fun building this thing. I Have plenty to do to get it ready for paint. I also still have some small fenders to put on it as well as the trailer lights. I really don't like the goofy trailer jack either, but I still don't know what else I can do there. I think it turned out awesome though. If it cooks half as good as it looks, I'm in pretty good shape. I paid special attention to the numbers while we built this thing, so I expect it to hold temp just fine. I hope to have it ready to cook for Talladega in two weeks, so there's more pics to come as I get the finishing touches buttoned up.
- Did I mention it's 8 feet and change tall? Geeeeeeez
The early bird gets the worm, but the second mouse gets the cheese.
-
Big T

- Moderator

- Posts: 6897
- Joined: September 1st, 2013, 2:40 pm
- Title: Go Getter
- BBQ Comp Team Name: Backyard Boys
- Location: Lower Alabama
Re: 80 Gallon Bid for Excellence
 It looks like it should fall over, kinda messes with your mind.
Measure Twice.....Cut Three Times.
-
Gizmo

- Founder

- Posts: 6135
- Joined: July 23rd, 2011, 11:55 am
- Title: Member
- BBQ Comp Team Name: Edna's Kids Comp Team - KCBS Certified Judge
- Location: Kearney, NE
Re: 80 Gallon Bid for Excellence
Can't wait to see the finished pics! 
And on the eighth day God created barbecue …. because he DOES love us and he wants us to be happy. 
Current smokers: Egor (trailered RF) and Easybake (tabletop pellet drive)
Current smokers: Egor (trailered RF) and Easybake (tabletop pellet drive)
-
Rodcrafter

- Moderator
- Posts: 8488
- Joined: July 21st, 2012, 5:46 pm
- Title: Member
- BBQ Comp Team Name: Not competing yet...
- Location: Orlando, Florida
Re: 80 Gallon Bid for Excellence
Current Smokers: Backyard RF Offset and Hybrid RF Offset trailer rig with Cowboy cooker and fish fryer, always room for more........
-
bigbook

- Big Time SmokerBuilder

- Posts: 196
- Joined: February 5th, 2013, 1:07 pm
- Title: Member
- BBQ Comp Team Name: smoker done <nobody beats our meat>
- Location: jacksonville fl
Re: 80 Gallon Bid for Excellence
Well you can always go with a larger pipe for the stack if height is going to be a prob .. only a few more hrs of welding. Lol ....... No ..just enjoy the cooking on that nice rig my rig starts soon hope it looks a good
-
huntfishgrill
- Smokerbuilder
- Posts: 53
- Joined: August 20th, 2013, 9:18 pm
- Title: Southern dude.
- BBQ Comp Team Name: Not competing just yet...
- Location: Chattanooga, Tennessee
Re: 80 Gallon Bid for Excellence
Thanks guys! This has been a dream of mine for a while, and this site made it all the technical bits come together. The crazy design just happened. All i wanted was a nice heirloom quality smoker and it spun out from there, hahaha. Still have some work to do to get it buttoned up, but the hard part is over. Paint prep and paint is the last big step after I button up the small stuff.
Does anyone ever put a jack on the rear to keep it dead stable while cooking in place?
Does anyone ever put a jack on the rear to keep it dead stable while cooking in place?
The early bird gets the worm, but the second mouse gets the cheese.
-
Gizmo
- Founder
- Posts: 6135
- Joined: July 23rd, 2011, 11:55 am
- Title: Member
- BBQ Comp Team Name: Edna's Kids Comp Team - KCBS Certified Judge
- Location: Kearney, NE
Re: 80 Gallon Bid for Excellence
If you just put 2 jack stands under the rear and jack up the tongue jack it will get real stable real quick - especially if you add 2 more jack stands under the front.
And on the eighth day God created barbecue …. because he DOES love us and he wants us to be happy.
Current smokers: Egor (trailered RF) and Easybake (tabletop pellet drive)
Current smokers: Egor (trailered RF) and Easybake (tabletop pellet drive)
-
bluecatfish

- Expert
- Posts: 533
- Joined: May 3rd, 2013, 6:12 pm
-
Rodcrafter
- Moderator
- Posts: 8488
- Joined: July 21st, 2012, 5:46 pm
- Title: Member
- BBQ Comp Team Name: Not competing yet...
- Location: Orlando, Florida
Re: 80 Gallon Bid for Excellence
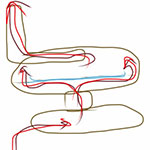
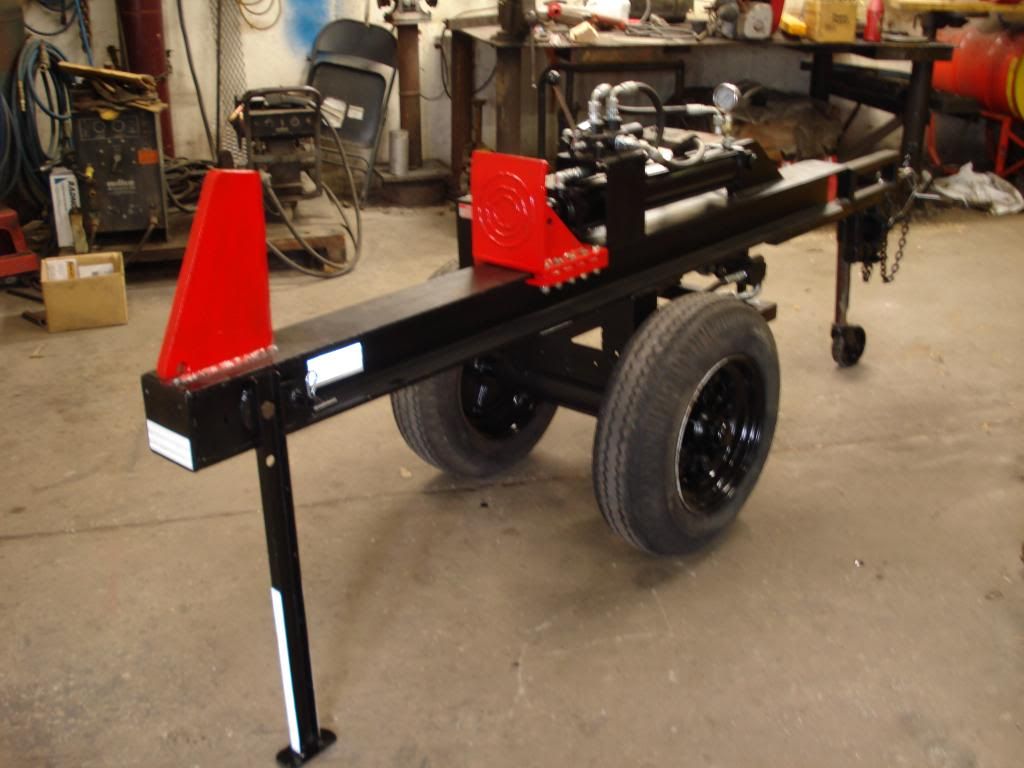
If I was going to do something like that, I would just put a stiff leg on it that pins up when not in use and down when I want to use it. This is a pic of what I did like that on my log splitter.

Current Smokers: Backyard RF Offset and Hybrid RF Offset trailer rig with Cowboy cooker and fish fryer, always room for more........
-
huntfishgrill
- Smokerbuilder
- Posts: 53
- Joined: August 20th, 2013, 9:18 pm
- Title: Southern dude.
- BBQ Comp Team Name: Not competing just yet...
- Location: Chattanooga, Tennessee
Re: 80 Gallon Bid for Excellence
yeah. something like that. I just don't want someone jumping on the back while cooking. It's pretty stable but i don't want to find out the hard way that i should have considered a stand
The early bird gets the worm, but the second mouse gets the cheese.
-
The Czar
- Expert
- Posts: 8334
- Joined: May 22nd, 2011, 9:30 am
- Title: Spam Hammerer
- BBQ Comp Team Name: Team SmokerBuilder- Competition BBQ Team
I'm Certifiable - Location: Missouri
80 Gallon Bid for Excellence
Holy Moly!!!
Sent from my iPhone using Tapatalk Pro
Sent from my iPhone using Tapatalk Pro
If you can't fix it by sheer force or cursing......then it can't be fixed.....
AKA= The Czar
AKA= The Czar
-
huntfishgrill
- Smokerbuilder
- Posts: 53
- Joined: August 20th, 2013, 9:18 pm
- Title: Southern dude.
- BBQ Comp Team Name: Not competing just yet...
- Location: Chattanooga, Tennessee
Re: 80 Gallon Bid for Excellence
Tonight is the second of the initial burns. I will burn one more time before starting to sand and grind for paint. So far it seems to burn perfectly. with an overload of dry hot burning wood it's still controllable down to 250 degrees easily and up to as far as the gauge will read. So performance-wise it seems to be spot on, but the real tests will tell that later on. It really looks like the center feed concept is going to be worth it.
- I will add expanded metal to my fire grate to retain the smaller embers that crumble and fall through right now.
It appears to be sealed really well and once i add the Nomex, it should be super sealed up. We left the flange off the firebox door that sits inside on the top edge under the hinges. We'll add that back in for a better seal.
I've ordered a spring handle for the firebox.
The bent tube handle on the CC was cool to the touch at 550 last night, so that design is good to go, as well. It's my observation that a tube bender can really speed up and class up a smoker build as well as open the door for some creativity. I think I'd consider it downright necessary after the few uses we mixed into this project.
I will immediately add housings for the tail lights, as they look like an easy break waiting to happen just sticking out there right now.
Still feel weird about the tall stack, but that's what it called for and it seems to be working well early on. It definitely dumps exhaust well above people's heads, so that's a plus.
Will probably add prop legs on the back of the trailer and a few loops for tie-down before paint.
Got a bead on a hickory supplier which should be $80 a pickup load and plenty cheap enough. Now i need to study up on primer and paint ASAP.
Last edited by huntfishgrill on October 12th, 2013, 9:16 pm, edited 1 time in total.
The early bird gets the worm, but the second mouse gets the cheese.
-
Puff
- Expert
- Posts: 2352
- Joined: May 29th, 2013, 11:16 pm
- Title: Always All In !
- Location: New Jersey...Southern New Jersey
Re: 80 Gallon Bid for Excellence
Congratulations on the fine preliminaries....at least you know you can tune the burn where you are needing it. Paint makes it shine but performance will be your personal accomplishment...very cool
Make no mistake, there ain't no powder in this Puff ! And... I'm not really a crazy person but I play one in real life
-
- Similar Topics
- Replies
- Views
- Last post
-
- 56 Replies
- 18155 Views
-
Last post by Barrion2018