

Reverse flow questions...

-
Rodcrafter

- Moderator

- Posts: 8488
- Joined: July 21st, 2012, 5:46 pm
- Title: Member
- BBQ Comp Team Name: Not competing yet...
- Location: Orlando, Florida
Re: Reverse flow questions...
Doing great
Current Smokers: Backyard RF Offset and Hybrid RF Offset trailer rig with Cowboy cooker and fish fryer, always room for more........


-
Puff

- Expert

- Posts: 2352
- Joined: May 29th, 2013, 11:16 pm
- Title: Always All In !
- Location: New Jersey...Southern New Jersey
Re: Reverse flow questions...
Hey Mmmmm,
You trailering this smoker? Just thinking out loud but I discovered that I should have added a few security tie-ins to my doors and latches around the smoker. I need to use a bunch of bungees until I get to changing those areas. I saw Gizmo did do exactly that on egor. My immediate thought was that people might try to breakin to the cooker. But heck, that sounded dumb after I said it and realized it was to prevent stuff from coming loose under travel
You trailering this smoker? Just thinking out loud but I discovered that I should have added a few security tie-ins to my doors and latches around the smoker. I need to use a bunch of bungees until I get to changing those areas. I saw Gizmo did do exactly that on egor. My immediate thought was that people might try to breakin to the cooker. But heck, that sounded dumb after I said it and realized it was to prevent stuff from coming loose under travel
Make no mistake, there ain't no powder in this Puff ! And... I'm not really a crazy person but I play one in real life
Re: Reverse flow questions...
Not sure. This one might get parked behind my shed near my woodpile and just reside there. Or, I might haul it around. Or, I might find a tiny trailer and just mount it to the trailer.
I gotta see if it works and learn how to operate it first and see what kinda luck I have finding suitable wood.
I gotta see if it works and learn how to operate it first and see what kinda luck I have finding suitable wood.
-
Puff
- Expert
- Posts: 2352
- Joined: May 29th, 2013, 11:16 pm
- Title: Always All In !
- Location: New Jersey...Southern New Jersey
Re: Reverse flow questions...
I was in Ketchum Idaho back in the 1970's. While the mountains were right on the road, I didn't see much tree coverage on them...out here right now, wood runsabout145-165 per cord. Delivered. Usually oak and mixed hardwoods. If you were buying it.one guy nearby has 50 cord shrink wrapped!
Last edited by Puff on October 23rd, 2014, 11:16 pm, edited 1 time in total.
Make no mistake, there ain't no powder in this Puff ! And... I'm not really a crazy person but I play one in real life
Re: Reverse flow questions...
We have a fair amount of orchards in the area so I shouldn't have any trouble with apple at least. I know where there are a lot of dead apple trees so I can prolly go make a cord or two of my own some Saturday.
-
Puff
- Expert
- Posts: 2352
- Joined: May 29th, 2013, 11:16 pm
- Title: Always All In !
- Location: New Jersey...Southern New Jersey
Re: Reverse flow questions...
Well worth the efforts
Make no mistake, there ain't no powder in this Puff ! And... I'm not really a crazy person but I play one in real life
-
The Czar
- Expert
- Posts: 8334
- Joined: May 22nd, 2011, 9:30 am
- Title: Spam Hammerer
- BBQ Comp Team Name: Team SmokerBuilder- Competition BBQ Team
I'm Certifiable - Location: Missouri
Re: Reverse flow questions...
Dude you are kicking in high gear....it's looking sweet!
If you can't fix it by sheer force or cursing......then it can't be fixed.....
AKA= The Czar
AKA= The Czar
Re: Reverse flow questions...
Been too busy to work on this thing lately. Got a bit more done today. I quit because I am needing to sandblast the inside of the CC out prior to installing the BP and it's rainy today so no blasting for me.
It's starting to look like a smoker now.


It's starting to look like a smoker now.
-
Grabber70Mach
- Expert
- Posts: 465
- Joined: October 18th, 2011, 7:19 pm


Re: Reverse flow questions...
I've changed my mind about the vertical WC. It may happen yet but with this thin tank I've about had my fill of readjusting the stack to vertical and refitting the door every time I spot a weld anywhere on the thing. I am going to build a large folding shelf that folds flat against the fire box. It'll be about the same dimensions as the side of the FB for aesthetic purposes. Thinking I'll have to stand it off the hinges a couple inches with flat strap to keep it from absorbing too much heat from the fire. Don't wanna burn the sauce in the bottle lol! All that's really left is building a fire basket, sandblasting the remainder of the paint inside the CC, and mounting toggle clamps, thermometers, and gasket.
-
Smokeone
- Founder

- Posts: 4094
- Joined: December 17th, 2011, 8:52 am
- Title: Builder Wannabee
- BBQ Comp Team Name: Team Smokerbuilder
KCBS Certified BBQ Judge - Location: Missouri
Re: Reverse flow questions...
I can almost smell the smoke.BBQ is just smoke and beers!
Usually more beers than smoke.
Usually more beers than smoke.
-
Clover Ridge Smokers
- Expert
- Posts: 2466
- Joined: December 1st, 2012, 4:42 pm
- Title: Driven By Passion
- BBQ Comp Team Name: Clover Ridge Smokers
- Location: Minnesota
-
Rodcrafter
- Moderator
- Posts: 8488
- Joined: July 21st, 2012, 5:46 pm
- Title: Member
- BBQ Comp Team Name: Not competing yet...
- Location: Orlando, Florida
Re: Reverse flow questions...
Yep getting close now, nice work
Making memories.
Making memories.
Current Smokers: Backyard RF Offset and Hybrid RF Offset trailer rig with Cowboy cooker and fish fryer, always room for more........


-
Clover Ridge Smokers
- Expert
- Posts: 2466
- Joined: December 1st, 2012, 4:42 pm
- Title: Driven By Passion
- BBQ Comp Team Name: Clover Ridge Smokers
- Location: Minnesota
-
Puff
- Expert
- Posts: 2352
- Joined: May 29th, 2013, 11:16 pm
- Title: Always All In !
- Location: New Jersey...Southern New Jersey
Re: Reverse flow questions...
I like that idea.... A warming shelf !
Make no mistake, there ain't no powder in this Puff ! And... I'm not really a crazy person but I play one in real life
Re: Reverse flow questions...
I'm hoping that the outer edge will be cool enough for use as a shelf, and closer in I can warm glass bowls of sauce, etc.Puff wrote:I like that idea.... A warming shelf !
A few cuts and it's gone if it doesn't work out.
-
The Czar
- Expert
- Posts: 8334
- Joined: May 22nd, 2011, 9:30 am
- Title: Spam Hammerer
- BBQ Comp Team Name: Team SmokerBuilder- Competition BBQ Team
I'm Certifiable - Location: Missouri
Re: Reverse flow questions...
Nice and shiny!!!
If you can't fix it by sheer force or cursing......then it can't be fixed.....
AKA= The Czar
AKA= The Czar
Re: Reverse flow questions...
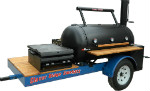
Well, laydeez and gennumen, I've gone and done it. I finished my reverse flow offset around noon today, hauled it home, and fired it up.
I've never used a stick burner. Ever. I've never even been around one when it was running. So I was absolutely lost. I have read guys use charcoal to start the fire. OK, I can do that. How much? No clue. One full chimney should do it. Check. I filled the chimney and lit it, and while waiting for it time ignite I sprayed the entire cooking chamber and grates with cooking spray.
Now to add splits. First of all, what is a split, anyway? How long is it? How wide of a wedge? I just guessed and cut some seasoned apple wood into approximately 12" long pieces and split them into nice wedges that looked dimensionally like normal pieces of firewood only smaller. I tossed about 3 of these on the coals and as soon as they ignited I slid the fire basket in. I had wondered if this thing would draft correctly but my wonderings were quickly allayed when the chimney started emitting smoke almost before I shut the fire box door.
I didn't know how much to add how often so I just started keeping an eye on the bed of coals and trying to stay ahead of the game and keep adding splits in time that they would be ignited before the last ones burned down too much. I'd guess every half hour to hour I was chucking some wood in there. Sometimes it was just one big one, sometimes it was a couple small ones.
After lighting I kept the vents wide open and let it rise. I had about a 40° differential left to right on the lid thermometers. Once the higher one hit about 260° I started playing with the vents and found a setting where the differential closed to only about 8-12° and it maintained 250° plus or minus a few. I was absolutely amazed at how simple it was to run. As long as I added a split every so often it just ran steady as a rock and hardly even wiggled, the left thermometer reading about 245° and the right about 255°. I noticed that if I opened the door to the cooking chamber it seems to take awhile to climb back to temp, so all I did was opened the exhaust damper all the way and opened the fire box door for like one minute and it would shoot right back to where it was before. Close the door and reset the chimney damper and there she sat til the next time. I'll say it again, I am amazed at how controllable this pit is. You seasoned offset guys are probably laughing at me but I honestly expected some trouble learning to run this thing and I had no trouble at all.
I ran for a total of 5 hours. I cooked a whole package of bacon to drip fat and splatter it around and season the pit. My wife got excited and whipped up some moinks and ABT's and I did them next. I asked my brother in law to bring some ribs and he showed up with something called "boneless beef country style ribs." Never heard of them but I cooked them too. By tonight the pit is a nice greasy dark brown / black throughout and I'm ready to cook something real, like a butt or brisket.
All in all it was very fun. Very hands-on. It's a thrill to cook food in something made with your own ten thumbs and that adds to the enjoyment.
Stay tuned. I'll try to remember to post when I actually cook some Q in this pit. For now, here's a couple shots I took when the thing was just getting going.
-
- Similar Topics
- Replies
- Views
- Last post
-
- 3 Replies
- 8957 Views
-
Last post by Rodcrafter
-
- 3 Replies
- 4586 Views
-
Last post by Dirtytires
-
- 14 Replies
- 5698 Views
-
Last post by Dirtytires
-
- 2 Replies
- 3288 Views
-
Last post by Tower870