205 gal RF natural gas pipe smoker
-
Big T

- Moderator

- Posts: 6897
- Joined: September 1st, 2013, 2:40 pm
- Title: Go Getter
- BBQ Comp Team Name: Backyard Boys
- Location: Lower Alabama
Re: 205 gal RF natural gas pipe smoker
I just knock it off with a wire wheel like your first picture.
Measure Twice.....Cut Three Times.

-
Smurf

- Expert

- Posts: 487
- Joined: January 20th, 2013, 8:17 am
- Title: Lets all have fun
- BBQ Comp Team Name: Not competing yet...
- Location: Franklin,OH
- Contact:
Re: 205 gal RF natural gas pipe smoker
Ronn I should have said 36 grit for carbon and 60 grit pads for stainless. Just a personal preference. Cheap ones from the flea market and harbor f don't seem to last as long.

Re: 205 gal RF natural gas pipe smoker
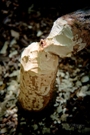
Hello all here is another update,
Got the inside pretty darn clean, after contemplating how to do this and save my back, i choose too use my brain. I went and bought a bottle of full strength Muratic Acid, and coated the inside with that. It took a total of about 2 hours with beer in hand to apply coats and wait till just about dry then reapply i did this about 6 times after the 3rd coat i did a complete rinse and waited then started over. The toughest part was at the end after neutralizing the acid i ran the wire wheel lightly over the inside with a wire wheel took about 20-30 mins. I was able to achieve a very clean shiny surface after the process was complete i covered the interior surface with Vegetable oil to prevent any recurring rust between now and completion.
Got the inside pretty darn clean, after contemplating how to do this and save my back, i choose too use my brain. I went and bought a bottle of full strength Muratic Acid, and coated the inside with that. It took a total of about 2 hours with beer in hand to apply coats and wait till just about dry then reapply i did this about 6 times after the 3rd coat i did a complete rinse and waited then started over. The toughest part was at the end after neutralizing the acid i ran the wire wheel lightly over the inside with a wire wheel took about 20-30 mins. I was able to achieve a very clean shiny surface after the process was complete i covered the interior surface with Vegetable oil to prevent any recurring rust between now and completion.
- view 1
- View 2 Notice the inside endcap that is the way it was
- view 3
-
Puff

- Expert
- Posts: 2352
- Joined: May 29th, 2013, 11:16 pm
- Title: Always All In !
- Location: New Jersey...Southern New Jersey
Re: 205 gal RF natural gas pipe smoker
A man I knew 34 years ago once told me... " you'll never out muscle the steel...but you can easily outsmart it."
Make no mistake, there ain't no powder in this Puff ! And... I'm not really a crazy person but I play one in real life
Re: 205 gal RF natural gas pipe smoker
It surprised me that i had not seen any mention about this method to clean rusty pipe on any other post, maybe folks will see this and think wow that is a novel idea. Not to mention the cost savings look below.
1 Gallon of Muratic Acid was $8 dollars vs. one flapper wheel $14 dollars. The pipe is 30"x 67" with pretty heavy surface rust how many flappers would it have taken to get it rust free?
The Down side to the Acid is: You MUST be very careful...........
I would also like to mention that the fumes are quite robust, you absolutely need to have a respirator and pull the work outside. I used a 3M with filters on each side was 20 bucks and rubber gloves (household type is fine). I had the respirator already as i don't like breathing metal dust when grinding haha.
Also worth mentioning I used the full strength stuff not the "safer" diluted stuff.
Re: 205 gal RF natural gas pipe smoker
Hello all
Thought i would post pics of the work completed this weekend. I wanted to work on something a little easier today so i started fabrication on the cook racks and the finished the fab on the Food Prep shelf that will run along the front of the smoker.
Thought i would post pics of the work completed this weekend. I wanted to work on something a little easier today so i started fabrication on the cook racks and the finished the fab on the Food Prep shelf that will run along the front of the smoker.
- Food racks framed
- one food rack completed
- Food prep shelf for front of the smoker
-
Rodcrafter

- Moderator
- Posts: 8488
- Joined: July 21st, 2012, 5:46 pm
- Title: Member
- BBQ Comp Team Name: Not competing yet...
- Location: Orlando, Florida
Re: 205 gal RF natural gas pipe smoker
Nice, keep up the good work!
Current Smokers: Backyard RF Offset and Hybrid RF Offset trailer rig with Cowboy cooker and fish fryer, always room for more........
-
Big T
- Moderator
- Posts: 6897
- Joined: September 1st, 2013, 2:40 pm
- Title: Go Getter
- BBQ Comp Team Name: Backyard Boys
- Location: Lower Alabama
Re: 205 gal RF natural gas pipe smoker
Sometimes a change of pace can keep you from getting burned out.

Measure Twice.....Cut Three Times.
Re: 205 gal RF natural gas pipe smoker
Hello Everyone,
It has been a little while since my last post life has gotten in the way ... I thought i would post some recent pic's where I completed and installed the baffle plate.
Just a few details I used 1/4" plate and cut it down the middle just off center (to line up the drain hole) and added 1.5" angle iron to join the two halves.
To create the slope needed from front to back and end to end I did the following. I put a 1-2 degree slope from the small side to the center and on the large side to the center, that should allow grease to drain to the angle iron. For the end to end I created the required slope to the center hole by making the angle iron .5" on the opposing edges running the center 1.5" deep.
Anyways to the pics
It has been a little while since my last post life has gotten in the way
Just a few details I used 1/4" plate and cut it down the middle just off center (to line up the drain hole) and added 1.5" angle iron to join the two halves.
To create the slope needed from front to back and end to end I did the following. I put a 1-2 degree slope from the small side to the center and on the large side to the center, that should allow grease to drain to the angle iron. For the end to end I created the required slope to the center hole by making the angle iron .5" on the opposing edges running the center 1.5" deep.
Anyways to the pics
- Baffle 1
- baffle3
- baffle2
-
Big T
- Moderator
- Posts: 6897
- Joined: September 1st, 2013, 2:40 pm
- Title: Go Getter
- BBQ Comp Team Name: Backyard Boys
- Location: Lower Alabama
Re: 205 gal RF natural gas pipe smoker
That looks like a lot of work but it looks great !
Measure Twice.....Cut Three Times.
-
forty_creek
- Expert
- Posts: 1130
- Joined: January 11th, 2015, 7:06 pm
- Title: 40 Ways 2 Kansas
- BBQ Comp Team Name: Not competing yet...
- Location: Springhill,LA
Re: 205 gal RF natural gas pipe smoker
Lotta work but does look good!
Drankin, Smokin and Dreamin
Sent from my iPhone using Tapatalk
Drankin, Smokin and Dreamin
Sent from my iPhone using Tapatalk
DRANKIN, SMOKIN and DREAMIN
-
Rodcrafter
- Moderator
- Posts: 8488
- Joined: July 21st, 2012, 5:46 pm
- Title: Member
- BBQ Comp Team Name: Not competing yet...
- Location: Orlando, Florida
Re: 205 gal RF natural gas pipe smoker
It is going to be worth all the work you invest.
Making memories.
Making memories.
Current Smokers: Backyard RF Offset and Hybrid RF Offset trailer rig with Cowboy cooker and fish fryer, always room for more........
-
forty_creek
- Expert
- Posts: 1130
- Joined: January 11th, 2015, 7:06 pm
- Title: 40 Ways 2 Kansas
- BBQ Comp Team Name: Not competing yet...
- Location: Springhill,LA
Re: 205 gal RF natural gas pipe smoker
Truth RC! Don't let time be a deciding factor on your build
Drankin, Smokin and Dreamin
Sent from my iPhone using Tapatalk
Drankin, Smokin and Dreamin
Sent from my iPhone using Tapatalk
DRANKIN, SMOKIN and DREAMIN
Re: 205 gal RF natural gas pipe smoker
thanks for the kind words I'll get better pics up tomorrow i now have it welded in about to start the fire box. The firebox will be round 30" in dia and 25" long. I am thinking of making the top of the fire box flat to set stuff on and create/match the 1/2 moon shape of the throat opening better.
I'm thinking it will take about 3" off the height of the firebox but it should create a flat surface about 10-12 inches wide and 25 inches long. this will serve a dual purpose later as i am pre-planning to add a vertical smoker cabinet on top of the firebox. My future plans will include 2 10" round ports with butterfly's to redirect heat flow to the cabinet. But that is pretty far in the future and the purpose will be to provide a smaller cooking chamber when i don't need all the huge rack space for small cookings.
Anyways now i ramble thanks again for the compliments.
I'm thinking it will take about 3" off the height of the firebox but it should create a flat surface about 10-12 inches wide and 25 inches long. this will serve a dual purpose later as i am pre-planning to add a vertical smoker cabinet on top of the firebox. My future plans will include 2 10" round ports with butterfly's to redirect heat flow to the cabinet. But that is pretty far in the future and the purpose will be to provide a smaller cooking chamber when i don't need all the huge rack space for small cookings.
Anyways now i ramble
-
Rodcrafter
- Moderator
- Posts: 8488
- Joined: July 21st, 2012, 5:46 pm
- Title: Member
- BBQ Comp Team Name: Not competing yet...
- Location: Orlando, Florida
Re: 205 gal RF natural gas pipe smoker
Current Smokers: Backyard RF Offset and Hybrid RF Offset trailer rig with Cowboy cooker and fish fryer, always room for more........
Re: 205 gal RF natural gas pipe smoker
ok all i have a crap ton of pics to post basically i have been working as i could but not posted pics. Today i took the smoker to the painter. The pics are pretty self explanatory here we go
-
Pete Mazz

- Administrator

- Posts: 3399
- Joined: February 16th, 2013, 8:19 am
- Title: Meathead
- Location: Bucks County, PA
Re: 205 gal RF natural gas pipe smoker
If it's tourist season, how come I can't shoot 'em?
Don't speak the language? Try this: Smoker Terminology
Try my SmokerBuilder Calculators
Don't speak the language? Try this: Smoker Terminology
Try my SmokerBuilder Calculators

Re: 205 gal RF natural gas pipe smoker
now for the piece de-resistance the test fire. It was a huge success within 45 mins the smoker was up to 255 degrees with only 1/2 a chimney of charcoal and 4 small 8 in long by 4 inch wide 1/4 split logs.
Then after about a total of 1.5 hours i added 2 x 14 in long 1/4 split logs. and it climbed to 296 and sat there for about 1.5 hours.
Then i added another piece of wood and it held steady at 295 for another hour. After 2.5 hours total at 295 with no additional wood the temp started slowly dropping to 270 where i added one more log and it sat at 270 for another hour or so with no more wood added it took quite a while for it to drop below 225 maybe another 2 hours.
So the total test was about 6 hours with minimal wood and about 3.5 hours in prime cooking zone.
Anyways enough blabbing here are the pics
Re: 205 gal RF natural gas pipe smoker
Here it is cooking i think i got a pretty thin blue smoke the door is cracked and the stack is wide open. I have no air openings in the firebox because i am going to install a stoker system on it. But it runs just fine with the door cracked.
-
- Similar Topics
- Replies
- Views
- Last post
-
- 7 Replies
- 5065 Views
-
Last post by JH1973
-
- 11 Replies
- 6296 Views
-
Last post by Dirtytires
-
- 3 Replies
- 4588 Views
-
Last post by Dirtytires
-
- 1 Replies
- 3562 Views
-
Last post by Dirtytires