
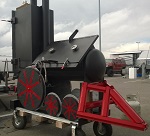
I had most of the materials and calcs ready to go and today opened up so I went for it. Cut the cabinet out of longer piece of 23inch pipe with .375 wall to 40 in long. Did the following:
Cut in door and added hinges
Using a pipe wrench for a stop and going to add a counterweight
Used an old combo wrench for handle
Cut and fit BP with a piece of angle for drip groove and a 1/2 in pipe for drain
Cut and tacked ends
Fit exhaust stack and going to use a 3/8 plate on top with a acetylene bottle cap on top to match the rat tool theme
Question: Is there any concern with the opening size I used coming out the end of the cabinet into the 4 in pipe?
Plan to fab fire box next and cooking trays
Going to install this on a small trailer I already had built a few months ago.
Reverse Flow Rat Theme Smoker

-
Big T

- Moderator

- Posts: 6897
- Joined: September 1st, 2013, 2:40 pm
- Title: Go Getter
- BBQ Comp Team Name: Backyard Boys
- Location: Lower Alabama
Re: Reverse Flow Rat Theme Smoker
There shouldn't be any problems as long as your opening isn't smaller than the stack. I use the same design and I haven't had any issues.

Measure Twice.....Cut Three Times.
-
Rodcrafter

- Moderator
- Posts: 8488
- Joined: July 21st, 2012, 5:46 pm
- Title: Member
- BBQ Comp Team Name: Not competing yet...
- Location: Orlando, Florida
Re: Reverse Flow Rat Theme Smoker
The only problem I see is the 1/2' drain. I think that will clog easy so make sure you can get to it to poke something through it if needed.
You're doing some nice work.
You're doing some nice work.
Current Smokers: Backyard RF Offset and Hybrid RF Offset trailer rig with Cowboy cooker and fish fryer, always room for more........
Re: Reverse Flow Rat Theme Smoker
Roger that on the drain! Should have gone big!
Accomplished the following:
Added counterweight to door
Fabbed firebox, ashtray, sliding damper and tapered wood burning bin
Started welding joints
Also fabbed exhaust cap and mechanism
Going to hinge the door down so it doubles as a catch tray for hot coals when starting fire and briquets
Sure hope this tapered firebox works.
- Attachments
-
-
-
-

-
The Czar

- Expert

- Posts: 8334
- Joined: May 22nd, 2011, 9:30 am
- Title: Spam Hammerer
- BBQ Comp Team Name: Team SmokerBuilder- Competition BBQ Team
I'm Certifiable - Location: Missouri
Re: Reverse Flow Rat Theme Smoker
Boy that’s nice!!!
Sent from my iPhone using Tapatalk Pro
Sent from my iPhone using Tapatalk Pro
If you can't fix it by sheer force or cursing......then it can't be fixed.....
AKA= The Czar
AKA= The Czar
Re: Reverse Flow Rat Theme Smoker
Thanks Gentlemen - It seemed to get small when I put the tray racks in! Can someone confirm if 6.5 in lower and 5 in clearance will be usable from your experience? I have no experience with actually using one.
Finished majority of the welding and mounted it on the trailer. Going to do some clean up and maybe make the trays and paint this weekend.
I plan to build a wood bin underneath the CC so I will still have room for a ice chest and possibly propane grill on the backside.
Still open to input if you see something that will not function correct.
- Attachments
-
-
-
-
-
-
Re: Reverse Flow Rat Theme Smoker
Fabbed an upper and lower tray and used somem stainless steel reverse cutouts from some past jobs for the grates. Adds a custom touch and the stainless should avoid the rust of expanded metal.
- Attachments
-
-
-
-
Big T
- Moderator
- Posts: 6897
- Joined: September 1st, 2013, 2:40 pm
- Title: Go Getter
- BBQ Comp Team Name: Backyard Boys
- Location: Lower Alabama
Re: Reverse Flow Rat Theme Smoker
That rack spacing will be fine for most cuts of meat. Some of the larger butts might be tight but you could pull the top rack for turkeys and large cuts if you had to.
Measure Twice.....Cut Three Times.
-
Rodcrafter
- Moderator
- Posts: 8488
- Joined: July 21st, 2012, 5:46 pm
- Title: Member
- BBQ Comp Team Name: Not competing yet...
- Location: Orlando, Florida
Re: Reverse Flow Rat Theme Smoker
You are going to be very happy with that rascal. The fire basket is great too.
Current Smokers: Backyard RF Offset and Hybrid RF Offset trailer rig with Cowboy cooker and fish fryer, always room for more........
Re: Reverse Flow Rat Theme Smoker
Thanks BT and RC. I am buttoning it up although I am still waiting for the thermometer. Added a small wood bin underneath and added a 2" pipe fitting in to the bottom of the tank to aid in cleanout of the area below BP.
Fabbed a L-shaped aluminum counter with cupholder for setting trays etc. Fabricated a swing away FB door latch with a small vise grip and also have the chain option for opening when starting or using the door as a ash catcher to prevent potential fire hazards. Also added the seals on both doors and used a spot weld pattern to emulate the look of a boiler.
Most importantly I added a drop in receiver tube to accept a telescoping pole I had that will be our flag pole!!! Murica
- Attachments
-
-
-
-
-
-
-
-
Rodcrafter
- Moderator
- Posts: 8488
- Joined: July 21st, 2012, 5:46 pm
- Title: Member
- BBQ Comp Team Name: Not competing yet...
- Location: Orlando, Florida
Re: Reverse Flow Rat Theme Smoker
I have to say that is some nice work right there. I wish I had a stainless table around my smokers.
Current Smokers: Backyard RF Offset and Hybrid RF Offset trailer rig with Cowboy cooker and fish fryer, always room for more........
Re: Reverse Flow Rat Theme Smoker
Sorry to bore you guys with pics but there is always a chance a problem area will be noted. Touched up paint and anchored down tool box, cargo rack, added tray loops and some other tie downs on trailer. Also found a cool fire truck fitting I had to use for the 2 inch clean out under the BP. Of course I added a fire extinguisher and a Shelterwerks MPS-1 Aluminum camp survival shovel which I manufacture for marketing.
Plan to season this afternoon and maybe try a quick smoke effort on some chicken or sausage.
Plan to season this afternoon and maybe try a quick smoke effort on some chicken or sausage.
- Attachments
-
-
-
-
-
Re: Reverse Flow Rat Theme Smoker
Sorry to bore you guys with pics but there is always a chance a problem area will be noted. Touched up paint and anchored down tool box, cargo rack, added tray loops and some other tie downs on trailer. Also found a cool fire truck fitting I had to use for the 2 inch clean out under the BP
-
Big T
- Moderator
- Posts: 6897
- Joined: September 1st, 2013, 2:40 pm
- Title: Go Getter
- BBQ Comp Team Name: Backyard Boys
- Location: Lower Alabama
Re: Reverse Flow Rat Theme Smoker
Doesn't bore me at all, I think it's awesome 
Measure Twice.....Cut Three Times.
-
temurf
- Expert
- Posts: 916
- Joined: May 12th, 2016, 7:37 pm
- Title: Train Driver
- BBQ Comp Team Name: Rednecks con Fuego
- Location: El Paso, Texas
Re: Reverse Flow Rat Theme Smoker
We LOVE looking at pics.
If you could post some pics showing more detail on the exhaust cap, I would not be bored when I look at them.
Yer gonna like what we've been smokin'.
-
ajfoxy

- Expert
- Posts: 2364
- Joined: April 12th, 2016, 8:07 pm
- Title: Neophyte Smoker Bldr
- BBQ Comp Team Name: Not competing yet...
- Location: Brisbane, Queensland, Australia
Re: Reverse Flow Rat Theme Smoker
Yep, more pics the better. Very nice build and awesome unit. Well Done!
Learning generally boils down to "Repetition or the avoidance of pain", some people learn by doing, some by watching and some just have to pee on the electric fence.
Whether you think that you can, or that you can't, you are usually right. Henry Ford
Whether you think that you can, or that you can't, you are usually right. Henry Ford
Re: Reverse Flow Rat Theme Smoker
Well the T Rex Smoker Trailer build was unbalanced and I wanted more cooking capacity for events so I made the following changes:
Relocated the toolbox
Purchased 8 burner event gill and remove the base and fabricated a custom configured and special height base and closed in ends with dimple die aluminum and going to and a slide out tray underneath for more storage.
Still need to fab a propane tank rack at each end
Added a tank mount on the tongue to supply the Shelterwerks UFO-1 Cooking disc that I manufacture
Fine tuned the flag pole mount install
Add a T post up front with an led light for each side of the trailer - these are hard wired to a custom box I put together that contains a 18 AH battery and capability to charge on shore or solar panel
UPDATE on Smoking-I fired it up again on Sunday and am very impressed with how well and easy it has been to maintain temperature.
- Attachments
-
-
-
-
-
-
-
-
-
-
-
temurf
- Expert
- Posts: 916
- Joined: May 12th, 2016, 7:37 pm
- Title: Train Driver
- BBQ Comp Team Name: Rednecks con Fuego
- Location: El Paso, Texas
Re: Reverse Flow Rat Theme Smoker
That is sure looking good dude.
And speaking of pics, it looks like its time for some Q-view.
And speaking of pics, it looks like its time for some Q-view.
Yer gonna like what we've been smokin'.

Re: Reverse Flow Rat Theme Smoker
temurf wrote:
We LOVE looking at pics.
If you could post some pics showing more detail on the exhaust cap, I would not be bored when I look at them.
Hi Temurf
There is not anything special regarding the exhaust cap. I used a 3/8 thick plate for the actual cover plate and then welded the acetylene cap on top to match my tool theme.
-
- Similar Topics
- Replies
- Views
- Last post
-
- 3 Replies
- 4579 Views
-
Last post by Dirtytires
-
- 3 Replies
- 8903 Views
-
Last post by Rodcrafter
-
- 7 Replies
- 5056 Views
-
Last post by JH1973
-
- 11 Replies
- 6281 Views
-
Last post by Dirtytires
-
- 1 Replies
- 3538 Views
-
Last post by Dirtytires