250 Gal RF Build Attempt

-
Dirtytires

- Expert

- Posts: 3845
- Joined: November 24th, 2015, 12:36 am
- Title: It ain't broke...yet
- BBQ Comp Team Name: Dont compete...cook for events once in a while
- Location: Phoenix, Az
Re: 250 Gal RF Build Attempt
For grating I have used 1/2 inch rebar and sometimes 1/2inch solid square bar. Both will last a long time and be easy to replace if needed.
If no ash pan, remember you will need to keep the ash cleaned out to avoid it prematurely rusting out the bottom. The benefit of an ash pan is that it is easier to clean and the pan is expendable. It will rust out (saving the bottom of the smoker) and is cheaper to rebuild than a whole new firebox.
Your damper system sounds pretty neat but extremely complicated. I would be concerned about sealing each one properly to ensure proper air control/shutoff. Simple=durable.
-
TexasSmoke

- Just Got in trouble for buying tools

- Posts: 44
- Joined: February 20th, 2016, 3:19 pm
- Title: Member
- BBQ Comp Team Name: Not competing yet...
- Location: Austin Texas
Re: 250 Gal RF Build Attempt
My free time has been kidnapped by work and school, for some reason teachers want to load you down before spring break so you can work through it... kinda defeats the purpose but i do have some updates and a view of what it can be like.
That's the Slide for the Log Basket. I'm thinking that a simple rectangle is all i have room for with he size of the door. But I believe it will be plenty large enough to get temps up. I think...
I'm humble enough to know I can't do everything but, I'm stubborn enough to try to until I can!
-
Big T

- Moderator

- Posts: 6897
- Joined: September 1st, 2013, 2:40 pm
- Title: Go Getter
- BBQ Comp Team Name: Backyard Boys
- Location: Lower Alabama
Re: 250 Gal RF Build Attempt
It doesn't take a very big fire to maintain temp, I think you'll be fine.

Measure Twice.....Cut Three Times.
-
Rodcrafter

- Moderator
- Posts: 8488
- Joined: July 21st, 2012, 5:46 pm
- Title: Member
- BBQ Comp Team Name: Not competing yet...
- Location: Orlando, Florida
Re: 250 Gal RF Build Attempt
It is the coal bed that does the work you just keep it feed and you will get all the heat you need
Making memories.
Making memories.
Current Smokers: Backyard RF Offset and Hybrid RF Offset trailer rig with Cowboy cooker and fish fryer, always room for more........
-
TexasSmoke
- Just Got in trouble for buying tools
- Posts: 44
- Joined: February 20th, 2016, 3:19 pm
- Title: Member
- BBQ Comp Team Name: Not competing yet...
- Location: Austin Texas
Re: 250 Gal RF Build Attempt
After a full week a rain I finally got a nice weekend of weather solely dedicated to working on the smoker.
welded legs
Cutting those pipes with the correct arch took quite a bit of time and practice.
finished all the lid hinges
Finally received the insulation for the hinges so I can get started on the door but i'm thinking I want to wait until the DP is in
started on the Log Basket (Thanks RC for the Idea)
For some reason mine is a little long (only measured twice....) and partially blocking the throat..
I'm hoping shortening it wont impede the smoke flow if so I'll drill a few 1 1/2" holes in the back plate to clear a path.
My best weld yet Not bad for a beginner... Funny Story my mom asked me if the smoker would be finished by June her church needs 4 briskets done by then. Some how I was volunteered to be the cook
My Neighbor also asked when was the first cookout he also pointed out that the noise from the cut--wheels and grinding wasn't bothering him at all. Not sure if that was a self-invite lol but alls well that ends well.
welded legs
- Legs
finished all the lid hinges
- Hinges
started on the Log Basket (Thanks RC for the Idea)
- Log Basket Cut out
- Log Basket
I'm hoping shortening it wont impede the smoke flow if so I'll drill a few 1 1/2" holes in the back plate to clear a path.
My best weld yet Not bad for a beginner...
My Neighbor also asked when was the first cookout he also pointed out that the noise from the cut--wheels and grinding wasn't bothering him at all. Not sure if that was a self-invite lol but alls well that ends well.
I'm humble enough to know I can't do everything but, I'm stubborn enough to try to until I can!
-
Rodcrafter
- Moderator
- Posts: 8488
- Joined: July 21st, 2012, 5:46 pm
- Title: Member
- BBQ Comp Team Name: Not competing yet...
- Location: Orlando, Florida
Re: 250 Gal RF Build Attempt
LOL
Funny thing about building smokers, we get invited to lots of events. Then we get asked to bring our smoker. People are funny that way
Making memories.
Funny thing about building smokers, we get invited to lots of events. Then we get asked to bring our smoker. People are funny that way
Making memories.
Current Smokers: Backyard RF Offset and Hybrid RF Offset trailer rig with Cowboy cooker and fish fryer, always room for more........

-
Dirtytires
- Expert
- Posts: 3845
- Joined: November 24th, 2015, 12:36 am
- Title: It ain't broke...yet
- BBQ Comp Team Name: Dont compete...cook for events once in a while
- Location: Phoenix, Az
Re: 250 Gal RF Build Attempt
True....but at least now it LOOKS like I have friends!Rodcrafter wrote:LOL
Funny thing about building smokers, we get invited to lots of events. Then we get asked to bring our smoker. People are funny that way
Making memories.
-
Rodcrafter
- Moderator
- Posts: 8488
- Joined: July 21st, 2012, 5:46 pm
- Title: Member
- BBQ Comp Team Name: Not competing yet...
- Location: Orlando, Florida
Re: 250 Gal RF Build Attempt
Hey, if the q is good you do have friends
Making memories.
Making memories.
Current Smokers: Backyard RF Offset and Hybrid RF Offset trailer rig with Cowboy cooker and fish fryer, always room for more........
-
Dirtytires
- Expert
- Posts: 3845
- Joined: November 24th, 2015, 12:36 am
- Title: It ain't broke...yet
- BBQ Comp Team Name: Dont compete...cook for events once in a while
- Location: Phoenix, Az
Re: 250 Gal RF Build Attempt
You mentioned you took a lot of time it mimick the angle of the cooking chamber onto your legs. I agree it is a pain. Something I do is to make a template out of thin cardboard (like a cereal box or 18 pack beer carton). It is much easier to cut with a pair of scissors and adjust than to grind away material. When you create what you like, simply trace on the metal and cut out.
In your case, the cardboard could have been curled and taped in a cylinder just big enough to slide over the legs. Use this as a template to find the perfect fit and look. Once you get the angles cut and like the fit, slip it over the leg and trace your lines.
Also keep in mind that a close fit is important but that your weld is gonna fill in any imperfections.
And this is just my 2cents but I might consider shortening the log rack or cutting an end down before you go any farther. The throat dimensions are one of the critical items and restricting it is the same as making it too small. My guess it that a blocked throat could cause low cook chamber temps. Cutting holes later is an option but cutting a few inches off each angle and re welding is pretty easy at this stage.
Lastly tho, how did you manage to find an entire weekend to work on the project? I'm lucky to find 3 consecutive hours in any given week. Congrats and looks like a great start.
-
TexasSmoke
- Just Got in trouble for buying tools
- Posts: 44
- Joined: February 20th, 2016, 3:19 pm
- Title: Member
- BBQ Comp Team Name: Not competing yet...
- Location: Austin Texas
Re: 250 Gal RF Build Attempt
Thanks Dirtytires I've only two more legs to cut out to keep the FB up I'll definitely be using your advice. As for the LogRack, I have already shortened it by 2 inches and notched the back as to not interfere with the throat opening. It is now coated with #9 grate and ready to go.
I think My next step will be cutting out the back plate for the CC. I'll use a Cardboard template for that as well only hard part about hat is getting it positioned and held up while i weld 1/4" plate is slightly heavy. Well I could also get the BP cut and put in before that just ran out of angle iron to set it on... I'll pick some up this week. I used sheet metal to cover the air inlet and I'm already feeling bad about it. Just didn't think I would be able to form steel around the contour of my FB, but what I have works... for now. I'll try to get some progress pictures up soon.
On a side note, is there any treatment to the area below the BP before I permanently cover it up? Grind away the rust and treat it with oil and heat? I don't think there is any worry about the grease drain. Although I have seen many split the plate in half longways and have angle in the middle to direction the grease. Seams like a lot or effort for a small problem. Any thoughts on that?
Thanks again everyone!
I'm humble enough to know I can't do everything but, I'm stubborn enough to try to until I can!
-
Dirtytires
- Expert
- Posts: 3845
- Joined: November 24th, 2015, 12:36 am
- Title: It ain't broke...yet
- BBQ Comp Team Name: Dont compete...cook for events once in a while
- Location: Phoenix, Az
Re: 250 Gal RF Build Attempt
I put my end caps on before I attached the legs/cart. This allowed me to set the cook chamber on end and just set the end cap on flat to allow that gravity thing to hold it on. You will need some "help" holding yours onto weld it in place. There is no problem with tack welding brackets onto the tank to help then cutting them off when done.
If your baffle plate is heavy enough, forget the angle iron frame. Just set it in and weld it to the tank. I don't cut and angle mine to center...I do put in a drain valve in.
I don't prep bottom of my cook chamber (but I use new piper for mine)...I'd just wire brush it to kick off the heavy rust and maybe a heavy coat of Cooking spray to help it season.
-
TexasSmoke
- Just Got in trouble for buying tools
- Posts: 44
- Joined: February 20th, 2016, 3:19 pm
- Title: Member
- BBQ Comp Team Name: Not competing yet...
- Location: Austin Texas
Re: 250 Gal RF Build Attempt
Thanks DT the BP will be 27"x48" 1/4" plate so that should be heavy enough to hold it in place.I could turn the tank over on its side but not sure it will be worth the trouble. Sure would be easier welding it though.
As stated earlier here are some pictures Mainly of FB and LogBasket
The rest is for the intake I cut 2 slots 3" x 7" which is dead on what PitCalc said I would need curious if i should have done them on opposite sides of the FB.
I may need to cut a slot in the of the damper plate for a wing nut or something similar to hold it at the right level.
(still not feeling good about the sheet metel
I will weld on some grate inside the FB over the Intake slots.
As always if there any glaring problems please let me know. Thanks everyone!
As stated earlier here are some pictures Mainly of FB and LogBasket
- Log Basket
(still not feeling good about the sheet metel
I will weld on some grate inside the FB over the Intake slots.
As always if there any glaring problems please let me know. Thanks everyone!
I'm humble enough to know I can't do everything but, I'm stubborn enough to try to until I can!

-
Weldun

- Expert
- Posts: 588
- Joined: December 24th, 2015, 3:40 pm
- Title: I'm no expert
- BBQ Comp Team Name: Not competing yet...
- Location: Northern Indiana
Re: 250 Gal RF Build Attempt
Moving right along and doing a fine job!
Grandma always said "if ya can't be handsome ya better at least be handy"
-
forty_creek

- Expert
- Posts: 1130
- Joined: January 11th, 2015, 7:06 pm
- Title: 40 Ways 2 Kansas
- BBQ Comp Team Name: Not competing yet...
- Location: Springhill,LA
Re: 250 Gal RF Build Attempt
TexasSmoke- as far as intakes on your FB it is up to you but having then on separate sides gives you options pending the wind.
I have 4 on my rear door. Pit calculator called for 5.15. So I added 2 on each side of the FB. Allows for some flexibility.

Just offering my $0.02 plus what others have recommended.
Drankin, Smokin and Dreamin
Sent from my iPhone using Tapatalk
I have 4 on my rear door. Pit calculator called for 5.15. So I added 2 on each side of the FB. Allows for some flexibility.
Just offering my $0.02 plus what others have recommended.
Drankin, Smokin and Dreamin
Sent from my iPhone using Tapatalk
DRANKIN, SMOKIN and DREAMIN


Re: 250 Gal RF Build Attempt
I like to have my dampers on the front of my firebox. It may just be in my head, but I like to make the air flow directly to the throat and cook chamber.
-
Big T
- Moderator
- Posts: 6897
- Joined: September 1st, 2013, 2:40 pm
- Title: Go Getter
- BBQ Comp Team Name: Backyard Boys
- Location: Lower Alabama
Re: 250 Gal RF Build Attempt
I also have intakes on 3 sides of the FB, if you get a direct wind blowing in your intake it's just like have a stoker fan.
Measure Twice.....Cut Three Times.
-
TexasSmoke
- Just Got in trouble for buying tools
- Posts: 44
- Joined: February 20th, 2016, 3:19 pm
- Title: Member
- BBQ Comp Team Name: Not competing yet...
- Location: Austin Texas
Re: 250 Gal RF Build Attempt
Hey guys Long Time No See. Work sent me all the way to East Texas working 7 days a week and at least 12 hours a day... Cant turn down the money... after that and a week of catch up in school left my build on hold. I plan on a long day of work today. we had rain so I have a nice coat of rust to deal with but that's nothing to a wire wheel right?
Any way with all the extra loot I've decided on purchasing my Warming cabinet piping I've been scourging for any vessel 20" diameter and 3' tall but haven't been able to find anything. So 20" pipe at the local supplier is $36 per foot $20 per cut. Going to bite the bullet
The real problem is how do i get the grills inside I doubt my door cut out will be the full 20" diameter. do i build my circular racks and load them from the top before welding it on the FB? and then How exactly am I going to build circular racks?
Hoping someone can link me a build to the racks or maybe it will be easier to just find and buy some racks 19.5" in diameter after all its going in the WC and doesn't necessarily have to be Home Fabricated right? but ... everything else will be and I'd like to keep it that way. Any Ideas?
Also the Clone I'm building has racks that spin. (my astronomy professor would be so pissed) "Rotate" any way I can link those with a rod to accomplish that?
In short
* guide to building racks for cylinder WC
* Ideas on rotating said racks
* I've been lurking but now I'm back
I'm humble enough to know I can't do everything but, I'm stubborn enough to try to until I can!
-
Dirtytires
- Expert
- Posts: 3845
- Joined: November 24th, 2015, 12:36 am
- Title: It ain't broke...yet
- BBQ Comp Team Name: Dont compete...cook for events once in a while
- Location: Phoenix, Az
Re: 250 Gal RF Build Attempt
I might suggest rolling a piece of 1" x 0.25 flat bar into a hoop. Lay down some 0.25 rod on top to make the cooking surface.
Backing up a bit, after you roll the flat bar, cut it and make 2 half-circle grates by putting a straight flat bar thru the middle. The half-circle grates can be put in the smoker and bolted together to make a round. Bolting allows removal if needed down the road. The center bar also gives you a place to put a round collar to slip the rack on a vertical rod (1" pipe) so that it can be adjustable with a few cross pins.
We missed the updates......get back at it.
-
Rodcrafter
- Moderator
- Posts: 8488
- Joined: July 21st, 2012, 5:46 pm
- Title: Member
- BBQ Comp Team Name: Not competing yet...
- Location: Orlando, Florida
Re: 250 Gal RF Build Attempt
This is what I did;
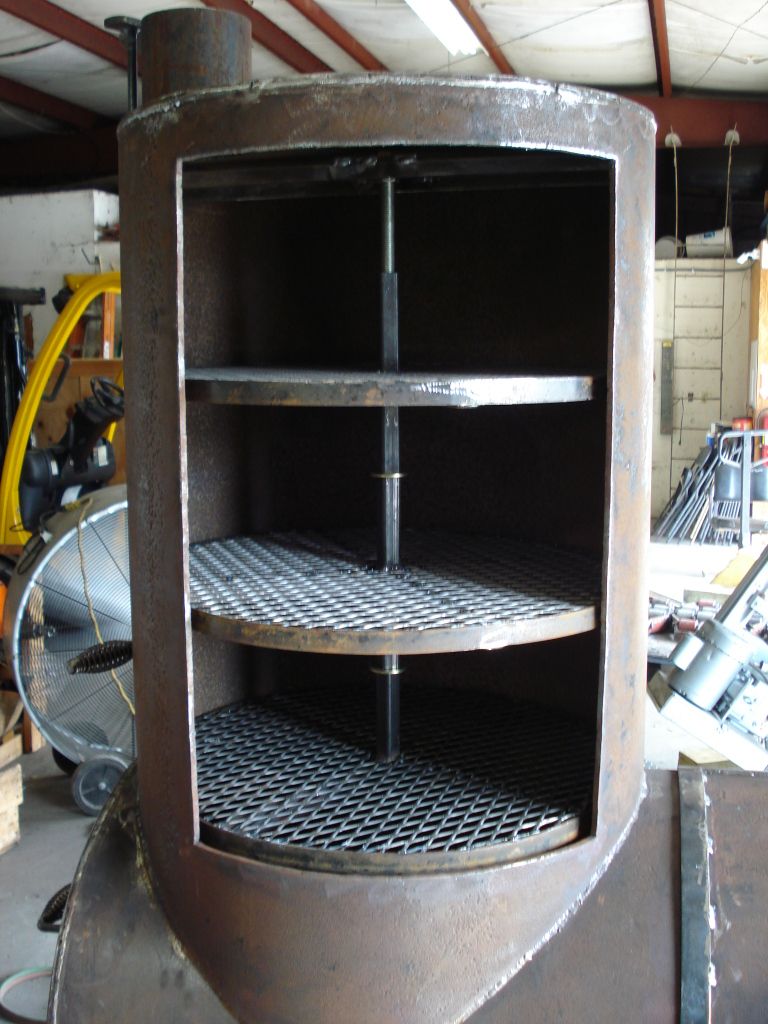
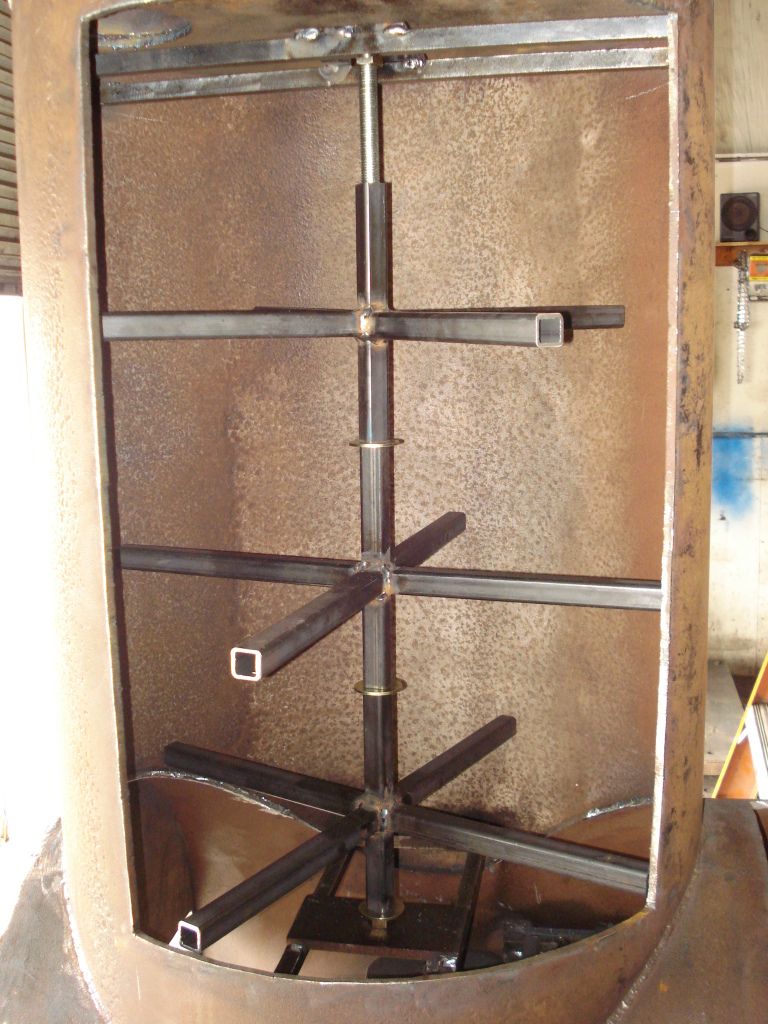

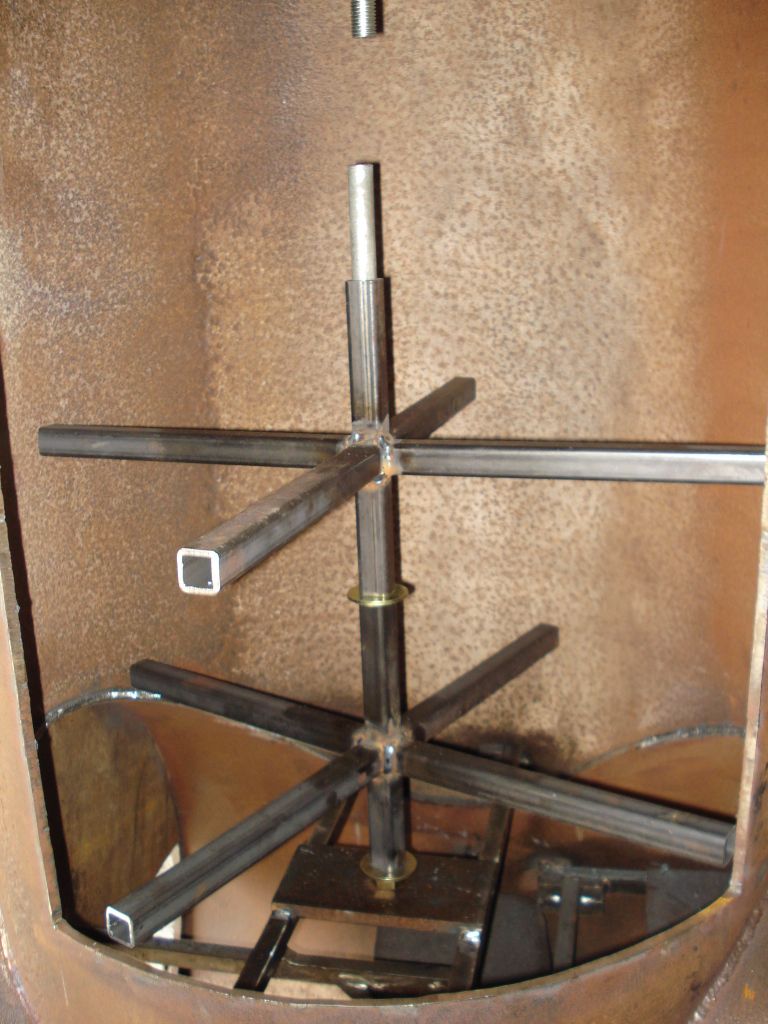
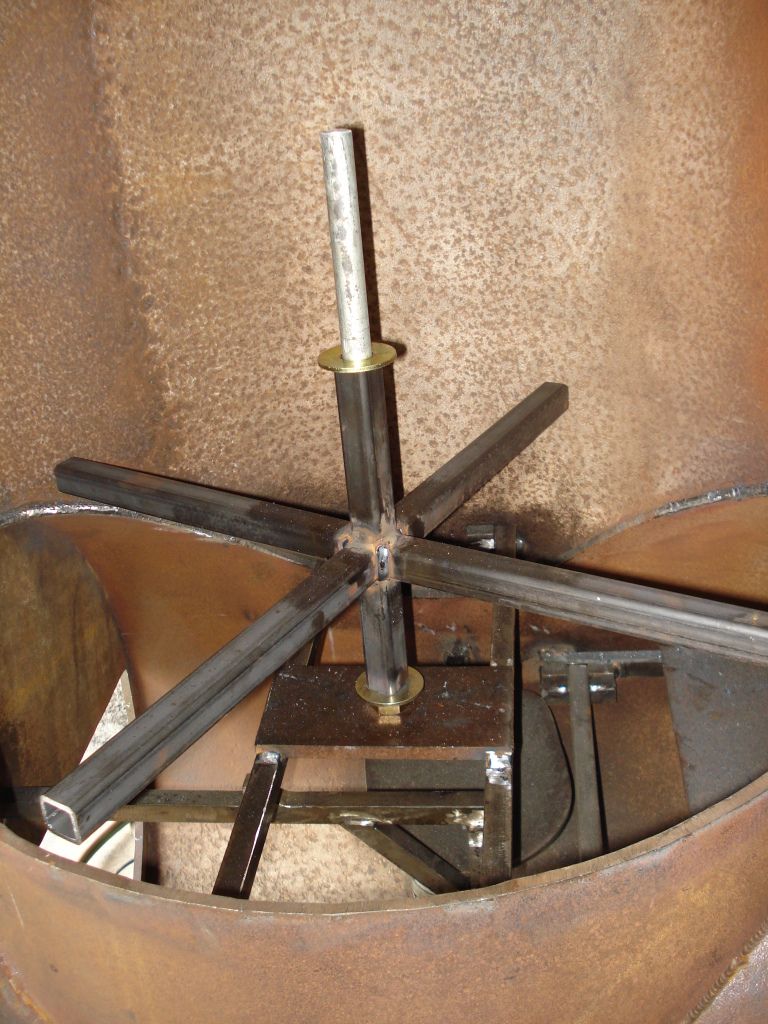
They may help
Making memories.


They may help
Making memories.
Current Smokers: Backyard RF Offset and Hybrid RF Offset trailer rig with Cowboy cooker and fish fryer, always room for more........
-
TexasSmoke
- Just Got in trouble for buying tools
- Posts: 44
- Joined: February 20th, 2016, 3:19 pm
- Title: Member
- BBQ Comp Team Name: Not competing yet...
- Location: Austin Texas
Re: 250 Gal RF Build Attempt
Well, I didn't get the full days worth of work done half was spent rounding up more material... and tools but as promised an update for sure.
DT. I took your advice on making the hoops If I remember correctly there is a video on this forum I watched with tips on how to make hoops. ( sightly confused on the complete plan however I'm believing each hoop cut in have then a and a flat bar vertically welded in the center to make a giant "D" so in the end you have something like ----> (||) would I then cut out the center section to weld in a piece of 1" tubing?
RC. That is an amazing design maybe a bit over designed for my needs Would you be able to take the racks out if need be? Wow That's a strong build! can't stop looking at it....
I will cut the hoop about 1 1/2" short and weld it together to get a smaller circumference to fit inside the WC or is my plan.
I'll make a lever the same way in the Mack Build
A lot of insulation had to purchased for a small amount of work. I suppose i'll throat the rest in the attic. If I get another build I'll already have it. A buddy has already asked if I could make him one identical. I said of-course for a small fee! but let me try mine out to make sure it's design is solid.
As always if there is any glaring problems small or large please feel obligated to let me know
Oh my B-day just passed 3-29
DT. I took your advice on making the hoops If I remember correctly there is a video on this forum I watched with tips on how to make hoops. ( sightly confused on the complete plan however I'm believing each hoop cut in have then a and a flat bar vertically welded in the center to make a giant "D" so in the end you have something like ----> (||) would I then cut out the center section to weld in a piece of 1" tubing?
RC. That is an amazing design maybe a bit over designed for my needs
- Hoop Forming
- Hoop Forming 2
- FB Top Plate
- FB with Heat Vent
- Top Plate Spacer Fab
- Top Plate Spacer Fab2
- Spacer Complete
- Spacer Complete2
A lot of insulation had to purchased for a small amount of work. I suppose i'll throat the rest in the attic. If I get another build I'll already have it. A buddy has already asked if I could make him one identical. I said of-course for a small fee! but let me try mine out to make sure it's design is solid.
As always if there is any glaring problems small or large please feel obligated to let me know
Oh my B-day just passed 3-29
I'm humble enough to know I can't do everything but, I'm stubborn enough to try to until I can!
-
- Similar Topics
- Replies
- Views
- Last post
-
- 13 Replies
- 7725 Views
-
Last post by Dirtytires
-
- 56 Replies
- 18024 Views
-
Last post by Barrion2018
-
- 7 Replies
- 5065 Views
-
Last post by JH1973
-
- 2 Replies
- 3303 Views
-
Last post by Tower870
-
- 11 Replies
- 6296 Views
-
Last post by Dirtytires