Well you can use them in about any sized pit. Are you looking for a recommendation? Tuning plates would be a good setup for a first pit. Use them to dial it in or pull them out and don’t use them at all.
Sent from my iPhone using Tapatalk
Help Tweak My Design Please

-
Brewmaster
- SmokerBuilder Addict

- Posts: 159
- Joined: April 25th, 2021, 6:23 pm
Re: Help Tweak My Design Please
A friend has a 20" x 40" offset with a small baffle maybe 2" or so wide, angled downward maybe 15 degrees, mounted directly above the throat inlet so directs the heat slightly downward. Hit spot ends up being almost center of the grate between firebox and stack. He runs it with 2 tuning plates only, each about 4" wide and spaced 3" apart. Evened the whole thing out for him. Also the couple pits I've seen/used with plates have no rails, they just sized to length to sit in at the correct height.
Most of the larger pits like yours from reputable builders (ones I follow at least) don't use tuning plates at all, some use a similar type small baffle directly above throat opening. Either way good luck with the old girl!!
Most of the larger pits like yours from reputable builders (ones I follow at least) don't use tuning plates at all, some use a similar type small baffle directly above throat opening. Either way good luck with the old girl!!
-
EverydayDiesel
- Needs a Bigger Shop!

- Posts: 81
- Joined: October 18th, 2020, 1:51 pm
Re: Help Tweak My Design Please
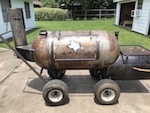
I need a little advice if I could from people that are more experienced then myself.
I cut the bell end off of the firebox side of my smoker (wife says it looks better) however now the pipe is out of round.
My question is do I need to make this round before I cut the doors out for the CC? My fear is that the doors and/or the cooking grate wont be square? Will this affect anything?

I cut the bell end off of the firebox side of my smoker (wife says it looks better) however now the pipe is out of round.
My question is do I need to make this round before I cut the doors out for the CC? My fear is that the doors and/or the cooking grate wont be square? Will this affect anything?
-
hogaboomer
- Expert

- Posts: 919
- Joined: July 15th, 2019, 9:47 am
- Title: old pipe welder
- BBQ Comp Team Name: Not competing yet...
- Location: Groves, TX.
Re: Help Tweak My Design Please
I wouldn't worry about it. It probably wasn't round before you cut it, anyway. Your door is gonna go all over the place by the time you get through messing with it. The cooking grate, just take measurements and build your grate to those. It doesn't have to be perfect.
I live on Hogaboom Road.
-
EverydayDiesel
- Needs a Bigger Shop!
- Posts: 81
- Joined: October 18th, 2020, 1:51 pm
Re: Help Tweak My Design Please
I was also thinking that it might be a good idea, since I have the cap off, to get my fat ass inside the pipe and weld some gussets before I cut the doors. This should keep the spring back down on the doors. Is this a bad idea?
Something like this

Something like this
-
Dirtytires

- Expert
- Posts: 3845
- Joined: November 24th, 2015, 12:36 am
- Title: It ain't broke...yet
- BBQ Comp Team Name: Dont compete...cook for events once in a while
- Location: Phoenix, Az
Re: Help Tweak My Design Please
I'm not a fan of the extra bracing. In reality, if you pipe/tank has stresses in it from manufacture, it is going to spring a bit and really nothing you can do about it. The warped oval is no problem at all and doors can be massaged back into shape with a little effort.
-
Devin&Bobbi
- Just Got in trouble for buying tools

- Posts: 42
- Joined: April 20th, 2021, 10:17 am
Re: Help Tweak My Design Please
Can I just say that on our 250 build we did everything to avoid reshaping the doors (I even made a thread about it) in the end we ended up using the jack and chain method and to be honest, idk what we were so worried about. It was fairly easy and now the doors fit great. I'm happy to be wrong about this but common sense tells me that those gussets will impede airflow and take up some cooking area, especially on the second shelf. My advice having just done it would be to cut the doors off and if they spring work them with a jack and chain. That's what we'll be doing on the next one. 

-
EverydayDiesel
- Needs a Bigger Shop!
- Posts: 81
- Joined: October 18th, 2020, 1:51 pm

-
EverydayDiesel
- Needs a Bigger Shop!
- Posts: 81
- Joined: October 18th, 2020, 1:51 pm
Re: Help Tweak My Design Please
Where are you guys putting your vents? I wanted to do a double vent (one on the left of the fb and one on the right) so if the wind is acting up that day I can just use one side.
The problem is, I am making a 2" insulated firebox. What slick ideas have you come up with on how to handle vents that are 2" thick?
The problem is, I am making a 2" insulated firebox. What slick ideas have you come up with on how to handle vents that are 2" thick?
-
dacolson
Help Tweak My Design Please
This was my take on side vents on an insulated FB. Worked out well.


Sent from my iPhone using Tapatalk
Sent from my iPhone using Tapatalk
-
Dirtytires
- Expert
- Posts: 3845
- Joined: November 24th, 2015, 12:36 am
- Title: It ain't broke...yet
- BBQ Comp Team Name: Dont compete...cook for events once in a while
- Location: Phoenix, Az
Re: Help Tweak My Design Please
I just boxed in the opening and put a slider on the outside. Little more work with the double wall but not a bit deal. Remember to keep the vent low on the firebox.
-
EverydayDiesel
- Needs a Bigger Shop!
- Posts: 81
- Joined: October 18th, 2020, 1:51 pm
Re: Help Tweak My Design Please
Is there any reason I would not use round bar over expanded metal for the cooking grate?


-
dacolson
Re: Help Tweak My Design Please
Looks cool. I like it. Might cost quite a bit more though.
Sent from my iPhone using Tapatalk
Sent from my iPhone using Tapatalk
-
EverydayDiesel
- Needs a Bigger Shop!
- Posts: 81
- Joined: October 18th, 2020, 1:51 pm
Re: Help Tweak My Design Please
I was thinking that quarter inch round spaced 1" apart would be enough? i have a 30" depth in my cc

Re: Help Tweak My Design Please
1" apart will lose you a lot of food.....wings, and smaller food will droop and fall through.
-
Dirtytires
- Expert
- Posts: 3845
- Joined: November 24th, 2015, 12:36 am
- Title: It ain't broke...yet
- BBQ Comp Team Name: Dont compete...cook for events once in a while
- Location: Phoenix, Az
Re: Help Tweak My Design Please
As previously mentioned, expense, weight and fabrication time would be the biggest drawback. They would work but who wants a rack that weighs 100 pounds.
My gas grill has 0.625 gaps between the bars and I loose food all the time thru them....it drives me nuts.
The bars will work just fine if you want but I see no advantage to use them over expanded metal.
My gas grill has 0.625 gaps between the bars and I loose food all the time thru them....it drives me nuts.
The bars will work just fine if you want but I see no advantage to use them over expanded metal.
-
EverydayDiesel
- Needs a Bigger Shop!
- Posts: 81
- Joined: October 18th, 2020, 1:51 pm
Re: Help Tweak My Design Please
I called around and found that the cheapest would cost 6.4 times the cost of expanded metal. Looks nice but not worth it.
What size works best for a grate? This is what I have to choose from but if it is not listed I can get it somewhere else
Gauge: #18 Thickness: 0.202" Hole Size: 0.75"
Gauge: #13 Thickness: 0.202" Hole Size: 0.75"
Gauge: #18 Thickness: 0.164" Hole Size: 0.5"
Gauge: #13 Thickness: 0.08" Hole Size: 0.75"
Gauge: #18 Thickness: 0.04" Hole Size: 0.5"
Gauge: #13 Thickness: 0.225" Hole Size: 0.5"
Gauge: #13 Thickness: 0.08" Hole Size: 0.5"
Gauge: #9 Thickness: 0.119" Hole Size: 0.75"
Gauge: #9 Thickness: 0.3" Hole Size: 0.75"
-
Devin&Bobbi
- Just Got in trouble for buying tools
- Posts: 42
- Joined: April 20th, 2021, 10:17 am
Re: Help Tweak My Design Please
You want 3/4 x #9 expanded flattened, look on craigslist or marketplace, you don't need stainless, lots of places tried to sell us stainless. Also, idk if you have Grainger in your area but they are far cheaper than any steel supplier in my area. I think my price from Grainger was 98$ for a full 4x8 sheet.EverydayDiesel wrote: ↑September 27th, 2021, 11:01 amI called around and found that the cheapest would cost 6.4 times the cost of expanded metal. Looks nice but not worth it.
What size works best for a grate? This is what I have to choose from but if it is not listed I can get it somewhere else
Gauge: #18 Thickness: 0.202" Hole Size: 0.75"
Gauge: #13 Thickness: 0.202" Hole Size: 0.75"
Gauge: #18 Thickness: 0.164" Hole Size: 0.5"
Gauge: #13 Thickness: 0.08" Hole Size: 0.75"
Gauge: #18 Thickness: 0.04" Hole Size: 0.5"
Gauge: #13 Thickness: 0.225" Hole Size: 0.5"
Gauge: #13 Thickness: 0.08" Hole Size: 0.5"
Gauge: #9 Thickness: 0.119" Hole Size: 0.75"
Gauge: #9 Thickness: 0.3" Hole Size: 0.75"
-
tinspark
- Expert
- Posts: 607
- Joined: February 20th, 2020, 3:08 pm
- Title: Papa Oso
- Location: West Coast USA
Re: Help Tweak My Design Please
The rods are pretty cheap, but take time to cut and assemble. #9 expanded metal was pretty cheap too. A 4x8 sheet about 6 months ago was $45. I bet it costs more now though. The nice thing about expanded though is its easy to use and work great too. You can price both and see what you wanna do of course. I wouldnt use a 1" space though if I were to use rod, as the other members indicated.. Most suppliers have shearing services. You could also get a price on them being cut and that way you aren't stuck with all of the drop. give them the quantity and sizes and they'll give you a price. easy peasy..EverydayDiesel wrote: ↑September 26th, 2021, 10:38 pmIs there any reason I would not use round bar over expanded metal for the cooking grate?
Regards,
"tinspark's" build links below:
Last build-GF:https://smokerbuilder.com/forums/viewto ... 30#p114730
First build- Santa Maria Smoker: https://smokerbuilder.com/forums/viewto ... 7a614a230a
Santa Maria Rebuild: viewtopic.php?f=17&t=7533&p=112344&hili ... 34#p112344
"tinspark's" build links below:
Last build-GF:https://smokerbuilder.com/forums/viewto ... 30#p114730
First build- Santa Maria Smoker: https://smokerbuilder.com/forums/viewto ... 7a614a230a
Santa Maria Rebuild: viewtopic.php?f=17&t=7533&p=112344&hili ... 34#p112344
-
EverydayDiesel
- Needs a Bigger Shop!
- Posts: 81
- Joined: October 18th, 2020, 1:51 pm
Re: Help Tweak My Design Please
I should have specified, 1 inch on centers using 1/4" thick rod would be a little more then 1/2" actual spacing. I am still looking for a rod supplier, prices are crazy high right now.
-
dacolson
Re: Help Tweak My Design Please
1" on center leaves you with .75" gap with 1/4" rod. You might consider 1/2" or 3/8" at a minimum. Or shrink down to 3/4" on center with your 1/4" rod.
-
tinspark
- Expert
- Posts: 607
- Joined: February 20th, 2020, 3:08 pm
- Title: Papa Oso
- Location: West Coast USA
Re: Help Tweak My Design Please
I made a set of grates for my santa maria smoker from 1/8" x 1/2" flat bars and stood them on edge a few summers ago. it works fine. then made a notched spatula to fit between the vertical flat bars so that I could get under the burgers and such. I only use those grates when I am grilling and switch over to a #9 expanded grate when I am doing some smoking with the thing.. I made brackets on the side of the smoker to store the grates that are not being used.. 1/4" rod used to be under $10 for a 20' stick . I think I paid almost double that a few months back..
https://smokerbuilder.com/forums/viewto ... 2&start=50
https://smokerbuilder.com/forums/viewto ... 2&start=50
Regards,
"tinspark's" build links below:
Last build-GF:https://smokerbuilder.com/forums/viewto ... 30#p114730
First build- Santa Maria Smoker: https://smokerbuilder.com/forums/viewto ... 7a614a230a
Santa Maria Rebuild: viewtopic.php?f=17&t=7533&p=112344&hili ... 34#p112344
"tinspark's" build links below:
Last build-GF:https://smokerbuilder.com/forums/viewto ... 30#p114730
First build- Santa Maria Smoker: https://smokerbuilder.com/forums/viewto ... 7a614a230a
Santa Maria Rebuild: viewtopic.php?f=17&t=7533&p=112344&hili ... 34#p112344
-
EverydayDiesel
- Needs a Bigger Shop!
- Posts: 81
- Joined: October 18th, 2020, 1:51 pm


-
hogaboomer
- Expert
- Posts: 919
- Joined: July 15th, 2019, 9:47 am
- Title: old pipe welder
- BBQ Comp Team Name: Not competing yet...
- Location: Groves, TX.
Re: Help Tweak My Design Please
That's a pipe with a round bar inside. Tightens up the wobble a bit, and looks cool at the same time. I did The Cadillac like that. 1/2 inch schedule 80 pipe, 1/2 inch round bar.

I live on Hogaboom Road.
-
Pete Mazz

- Administrator

- Posts: 3399
- Joined: February 16th, 2013, 8:19 am
- Title: Meathead
- Location: Bucks County, PA
Re: Help Tweak My Design Please
Yup, just a glorified hinge pin.
If it's tourist season, how come I can't shoot 'em?
Don't speak the language? Try this: Smoker Terminology
Try my SmokerBuilder Calculators
Don't speak the language? Try this: Smoker Terminology
Try my SmokerBuilder Calculators
-
- Similar Topics
- Replies
- Views
- Last post
-
- 2 Replies
- 3314 Views
-
Last post by Dirtytires
-
- 11 Replies
- 5214 Views
-
Last post by Dirtytires