

Thanks. Ya I'm a new welder too and I find that the more of a comfortable position I am in, the better my welds come out. I will say that I have become well acquainted with my grinder if that tells you anything!. Whats the dimension of the red line? thats what I'm trying to determine on mine.dacolson wrote: ↑October 6th, 2020, 3:35 pmThx Thejm. I still struggle with fit up and surface prep. I’ll get one good bead and the next one looks like garbage. Still a lot to learn.
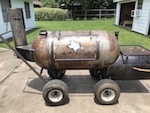
It’s actually a 120 gallon tank. I think the pictures a little bit deceiving. The Stack is 27 inches from the top of the tank, 37 inches from the smoke collector. It’s a 5 inch outside diameter, 4.75 inch inside diameter pipe. I got a pile of it for cheap. Got to keep your eye out for good finds like that.
First offset build! Have some questions.
Re: First offset build! Have some questions.

-
dacolson
Re: First offset build! Have some questions.
5”. Trying to make sure there are no bottlenecks smaller than the 4.75” diameter of the stack. Probably mute since the collector opening is so wide but ...
Re: First offset build! Have some questions.
No, that makes perfect sense. Especially since the air is having to change direction at that point.
Re: First offset build! Have some questions.
Okay so I apologize for the delay but i have made some major progress! I burned the tank out, cleaned it out, installed hinges, bent the doors back to shape, installed straps, and got them all mounted.
Burning the tank out
I spent a lot of time taking a wire wheel on my grinder to the inside of the tank and vacuuming all the crap out so I wondered whether burning it out was necessary. I can say after actually doing the burn out that I am really happy that I did. The tank really didnt have a smell to it. Just the smell of metal but the burn out gave it a nice sent of blackjack oak. I feel confident putting food in here now.
Had the whole family over for a fire in the driveway
Making the hinges
I am using some round tube and rod stock for my hinges. For those interested, I used 0.75" OD, 0.083" wall tube with 0.5" solid rod to form the hinges. I didn't take a lot of pictures during this process But to give a quick summary, I tacked the top strap in place, measured and mounted the hinge, and used these to bend my 1/2" rod to connect the door and the hinge.
One note about the above picture, the doors fit pretty good here because the straps are only tacked on. Below or in the next post, I will discuss the doors really warping after the straps were fully welded on and how I corrected it.
You can see from the below picture how I was able to use this alignment of the door and tube to bend the rod such that it connected them. I needed to have the top strap in place so that I made sure the rod would clear it. See below.
I bent the first one and used that one to form the rest of them. It was pretty simple to take distance and angle measurements to copy to the new pieces of rod. The key i found was to measure t the center of the bend and place that mark in the center of the bender. WD40 helps too to make sure the rod stays in place while bending it. My bender is a cheap one for Harbor Freight but it seemed to do the job fine. I bought it specifically for this project.
I got all 4 of the rods bent and them moved on to the side and bottom straps. I will detail that in the next post.
Burning the tank out
I spent a lot of time taking a wire wheel on my grinder to the inside of the tank and vacuuming all the crap out so I wondered whether burning it out was necessary. I can say after actually doing the burn out that I am really happy that I did. The tank really didnt have a smell to it. Just the smell of metal but the burn out gave it a nice sent of blackjack oak. I feel confident putting food in here now.
Had the whole family over for a fire in the driveway
I am using some round tube and rod stock for my hinges. For those interested, I used 0.75" OD, 0.083" wall tube with 0.5" solid rod to form the hinges. I didn't take a lot of pictures during this process But to give a quick summary, I tacked the top strap in place, measured and mounted the hinge, and used these to bend my 1/2" rod to connect the door and the hinge.
You can see from the below picture how I was able to use this alignment of the door and tube to bend the rod such that it connected them. I needed to have the top strap in place so that I made sure the rod would clear it. See below.
-
dacolson
Re: First offset build! Have some questions.
Looks great. I should pick up a bender like that. Been using a torch to bend mine. Probably get more consistency w the bender.
Re: First offset build! Have some questions.
Installing the straps and bending the doors back
Quite honestly this step kicked my A$$. I originally cut the doors on September 13th..over a month ago and have been working since then trying to get them to fit right again. This post might sound like a bunch of rambling but my hope is that i am writing it in a way where it can help others avoid the pitfalls that I made and save time by applying my techniques to their builds.
One note: A few posts back, I wrote about bending the tank back to square around the door frame. At that point the doors fit great.
For my straps i am using 1/5" x 1/8" flat stock. With the top strap in place moved on to my side straps. I used clamps to force the piece to conform to the doors curve and tacked it in place. Then i installed the bottom strap. Then I stitch welded them in place.
I put the door on the tank again and found it was pretty heavily warped. the corners of the doors were all bent out about 1/4" or more. I did notice that the door was not warped past the point where i have the inside supports so they seemed to do their job but the corners needed work. If i had to do it over again, i would do 3 inside supports with the outer 2 being very close to the corners.
I regret that I didn't take pictures at this point but it looked bad...or at least it did in my opinion. I will not bore you with all the things i tried over the past month (working 2/3 days/evenings a week on it) to fix this but suffice it to say that i ground the straps completely off and reinstalled new ones a few times...another trip to the metal supply store, it wasn't fun but i learned a LOT. This is my first big metal working project after-all.
Steps i took to fix the corner warp:
1. I hypothesized that the side straps were exerting a good bit of force on the door so before I cut and installed new ones, i used my bender as a poor man's ring roller, keeping the arm in place with a screw driver while a pulled or used a hammer to bend the flat stock to the right curvature. I had to run it through several times, increasing the curve each time to get it right.
2. I knew that my heat and strength of my stitch welds were pulling on the doors as well. To fix this, I removed all the straps on my doors (which were fully welded at this point) and then welded big fat beads on the inside of the door to bend it back. It was easy to use a straight edge on the door to get it nice and straight. I learned that the placement of the bead was very important. Basically they ended up being in the same location as my stitch welds but on the inside. I made sure the welds were within a 1/2" or so from the edge of the door and that they were centered on the apex of the bend as determined by my straight edge. I was also important to let the door cool because it took 15 or so minutes for the weld it have its full pulling effect before adding another one.
I then took the already bent side straps (from step 1) and fully welded them and the top and bottom straps in place. Next I checked the bend of the door and used a cutoff wheel to grind off the above inside welds. Finally I made new welds on the inside (many times on top of my old welds that i just ground off) to pull the door back. I just kept adding welds, letting it cool, and adding welds until the doors were flush. Finally, after I was happy with the doors, I let the doors cool overnight and cut all the inside welds off as they had served their purpose.
Here are the results! Again I regret that you cant see how bad they were because this is a big improvement!
In my next post I will describe aligning and hinging the doors
Quite honestly this step kicked my A$$. I originally cut the doors on September 13th..over a month ago and have been working since then trying to get them to fit right again. This post might sound like a bunch of rambling but my hope is that i am writing it in a way where it can help others avoid the pitfalls that I made and save time by applying my techniques to their builds.
One note: A few posts back, I wrote about bending the tank back to square around the door frame. At that point the doors fit great.
For my straps i am using 1/5" x 1/8" flat stock. With the top strap in place moved on to my side straps. I used clamps to force the piece to conform to the doors curve and tacked it in place. Then i installed the bottom strap. Then I stitch welded them in place.
I regret that I didn't take pictures at this point but it looked bad...or at least it did in my opinion. I will not bore you with all the things i tried over the past month (working 2/3 days/evenings a week on it) to fix this but suffice it to say that i ground the straps completely off and reinstalled new ones a few times...another trip to the metal supply store, it wasn't fun but i learned a LOT. This is my first big metal working project after-all.
Steps i took to fix the corner warp:
1. I hypothesized that the side straps were exerting a good bit of force on the door so before I cut and installed new ones, i used my bender as a poor man's ring roller, keeping the arm in place with a screw driver while a pulled or used a hammer to bend the flat stock to the right curvature. I had to run it through several times, increasing the curve each time to get it right.
Here are the results! Again I regret that you cant see how bad they were because this is a big improvement!
Last edited by thejm on October 16th, 2020, 11:10 am, edited 2 times in total.
Re: First offset build! Have some questions.
Hinging the doors
Hinging the doors was fairly simple. I am using a 1/8" thick gasket and so i bought some washers that were 1/16" thick. I used a grinder to cut them into small pieces and taped 8 of them around the outside of the door and 2 for the door to sit on.
I also used a strap to hold the doors securely and then tacked the round stock to the door in a few places. I will fully weld this once i install the gasket and confirm the fit.
This was the final product!
Whew! I am glad that I am past these steps!! Next I will make handles for the doors and move onto the smoke stack!
Hinging the doors was fairly simple. I am using a 1/8" thick gasket and so i bought some washers that were 1/16" thick. I used a grinder to cut them into small pieces and taped 8 of them around the outside of the door and 2 for the door to sit on.
-
dacolson
Re: First offset build! Have some questions.
I’ll have to consider the door braces. I haven’t used them b/c I’m worried about them hitting my upper row of grates.
Re: First offset build! Have some questions.
Thats a good point that I didn't consider because im not planning on installing a top grate. I put the supports in because I really didn't know what i was getting myself into lol.
I think my tank and doors warped more than average (or maybe im more particular than others). I see a lot of posts where tanks didn't move at all and it was smooth sailing. I knew I could correct small issues but I was afraid of the door warping diagonally like a rhombus. I had no clue how to fix that. Luckily that didnt happen but dont know if the supports were prevented that or if it wasnt going to happen to begin with.
I just modeled a top grate out to see the effect. Looks like they protrude about 2.9" into the top grate. I could easily make cut outs in that grate to get that space back if i ever do a top grate and just place meat around the supports.
This is an important point to consider for anyone who is planning on doing a top grate.
Here is a quick clip of the model.
-
Big T

- Moderator

- Posts: 6897
- Joined: September 1st, 2013, 2:40 pm
- Title: Go Getter
- BBQ Comp Team Name: Backyard Boys
- Location: Lower Alabama
Re: First offset build! Have some questions.
It sounds like you've got it going your way now.

Measure Twice.....Cut Three Times.
-
dacolson
Re: First offset build! Have some questions.
Impressive the effort you’ve put into getting it right. Nice work.
-
hogaboomer
- Expert

- Posts: 919
- Joined: July 15th, 2019, 9:47 am
- Title: old pipe welder
- BBQ Comp Team Name: Not competing yet...
- Location: Groves, TX.
Re: First offset build! Have some questions.
Your door corners warped from welding the flanges on. If you weld the flanges out completely, your doors are likely going to warp again. My corners warped up just from welding the handle plates on. Doors are a massive pain in the butt.
I live on Hogaboom Road.
-
Dirtytires

- Expert
- Posts: 3845
- Joined: November 24th, 2015, 12:36 am
- Title: It ain't broke...yet
- BBQ Comp Team Name: Dont compete...cook for events once in a while
- Location: Phoenix, Az
Re: First offset build! Have some questions.
I’m all worn out just reading about all that effort you put in.....
Re: First offset build! Have some questions.
Thank you all. I think it is turning out pretty well!
I am trying to finalize how I’m going to do the smoke stack assembly and need your advice. I am using an 8” pipe for my stack.
I went full science fair project on this one and made it out of poster board to see how it would look on the smoker before cutting it out of metal.
This assembly is 6” tall. Should I go to 8 or does it look fine with 6”? I am not as much worried about airflow because the area of the smoke stack assembly funnel doesn’t get less than the stack area. Going to 8” will make the vertical pieces more curved where they meet the tank but I think I’d be ok with that.
What do y’all say? 8” or 6”?
-
dacolson
Re: First offset build! Have some questions.
I think it looks fine with 6”. My only concern is that the 6” height may be a bit of an airflow restriction for the 8” pipe. I’ve thought a fair bit about this as this is my preferred stack configuration. As the airflow reaches the back of the collector, it’s getting more and more constricted before it hits your pipe. If your stack height is based off an 8” diameter, then I think the smallest opening measurement on the collector should be 8”. I’m sure I’m over thinking this but this is my take on collector opening height. Better to be larger than too small.
Re: First offset build! Have some questions.
I see what you are saying. Here is a top-down view of my smoke stack assembly with some dimensions.dacolson wrote: ↑October 20th, 2020, 12:06 amI think it looks fine with 6”. My only concern is that the 6” height may be a bit of an airflow restriction for the 8” pipe. I’ve thought a fair bit about this as this is my preferred stack configuration. As the airflow reaches the back of the collector, it’s getting more and more constricted before it hits your pipe. If your stack height is based off an 8” diameter, then I think the smallest opening measurement on the collector should be 8”. I’m sure I’m over thinking this but this is my take on collector opening height. Better to be larger than too small.
The only drawback from going with a 8" assembly height is that my stack will be 1" short according to the PitCalc. This is my first build so I dont have any experience to back this up but I kinda feel like my stack looks a bit short already compared to other pits I see online. I had my stack precut at 37" and changing the assembly from 6" to 8" will bring the stack down by 1". Ill need to cut the stack to accept the smoke from the assembly so there's a chance that I can weld part of that back on the bottom extending it by 1" to solve the problem.
Anyone else have experience or advice on my assembly height that they'd like to share?
Last edited by thejm on October 20th, 2020, 9:24 am, edited 1 time in total.
-
dacolson
Re: First offset build! Have some questions.
First, my justification is based on “gut” and “feelings.” Yours is on math! I’d say trust the math in most cases. Nice work on the drawings and calcs. I should learn that stuff.
Second, if you changed the collector design to be fully enclosed with an 8” hole in the top for the stack, you’d have plenty of pipe. You might throw an elbow bracket on top of the collector for extra support. Remember that the pit calc stack size is from the top of the tank, not the top of the collector.
Second, if you changed the collector design to be fully enclosed with an 8” hole in the top for the stack, you’d have plenty of pipe. You might throw an elbow bracket on top of the collector for extra support. Remember that the pit calc stack size is from the top of the tank, not the top of the collector.
-
Cole Leffert

- Big Time SmokerBuilder

- Posts: 240
- Joined: June 11th, 2020, 10:23 am
- Title: Country boy!
- Location: Indiana
Re: First offset build! Have some questions.
I think physics is usually visualized best when you exaggerate the problem in both directions. Your exhaust creates your draw, works like a vacuum cleaner. So picture your exhaust like a vacuum cleaner hose with different ends (collectors) on it. Say you make the one end 3 inches tall instead of 6. There will be more resistance but you would pick up dirt (smoke) across the full width of the end. Now if you made it 10 inches tall there would be less resistance but you would most likely only draw dirt (smoke) from the center and not the full width. So I'm thinking the narrower (6") collector would draw in smoke from the sides better but still not have much resistance. Just my thought.
Re: First offset build! Have some questions.
I think you make a great point. I think I'm going to stick with the 6" design.Cole Leffert wrote: ↑October 20th, 2020, 9:25 amI think physics is usually visualized best when you exaggerate the problem in both directions. Your exhaust creates your draw, works like a vacuum cleaner. So picture your exhaust like a vacuum cleaner hose with different ends (collectors) on it. Say you make the one end 3 inches tall instead of 6. There will be more resistance but you would pick up dirt (smoke) across the full width of the end. Now if you made it 10 inches tall there would be less resistance but you would most likely only draw dirt (smoke) from the center and not the full width. So I'm thinking the narrower (6") collector would draw in smoke from the sides better but still not have much resistance. Just my thought.
-
dacolson
Re: First offset build! Have some questions.
You can always use your weld eraser and smoke collector enlarger if it gives you trouble:

-
Big T
- Moderator
- Posts: 6897
- Joined: September 1st, 2013, 2:40 pm
- Title: Go Getter
- BBQ Comp Team Name: Backyard Boys
- Location: Lower Alabama
Re: First offset build! Have some questions.
I know that math/physics doesn't lie and y'all seem to have that part figured out so I'm sure it'll be fine. I'm more along the thought process of dacolson where in my mind it seems like if I have a 4'' stack, I should be able to drop a 4'' ball down the stack and it end up in the CC, same for 6'',8'' and so on. I know air doesn't work like that but my simple mind can't get away from that idea, lol.
Measure Twice.....Cut Three Times.
Re: First offset build! Have some questions.
I am well acquainted with my weld eraser! This is my garage after all the work i did to get the doors to fit.
Re: First offset build! Have some questions.
So I spent some time this past weekend making my handles for the CC doors and I am really happy with how they turned out!
These handles are made out of some horseshoes that I bought at Tractor Supply and the same tube and rod that I used for my hinges. I started out by cutting the horseshoes.
I was going to just cut them in half and weld them to the tube and rod but I didn't like how they looked going past 90 degrees. These are obviously pics from google not my horseshoes but, this is what I'm talking about that i didn't want.
To get around this, I cut them such that the cut face was perpendicular with the tip of the horseshoe. Doing this on both sides left the middle portion unused. I did this so it would create a nice 90 degree sweep rather than a shape that came back on itself like i referenced above. As you can see from the graphic below, 2 squares and an angle grinder made this process simple.
This graphic only shows setting up the cut for 1 side. I repeated this on the other side which would be the mirror of this.
This was the end result:
After cutting the horseshoes, I moved onto the tube and rod. I wanted my handles to have some rigidity and weight to them so I inserted the rod inside the tube, drilled holes in both and plug welded them. To drill the rod, I first drilled the tube then placed it in the tube and used my newly drilled hole to keep my bit in place as i drilled from the tube down into the rod. I only drilled about 1/4 of an inch, just enough so when I plug welded it, it had enough meat to hold the rod in place inside the tube. Finally, taking a flap disk to the area made it all but disappear.
Next I welded the horseshoe to the rod and tube using several clamps taking care to place the plug welds such they will be against the CC and out of sight. After a little grinding, they looked like they were 1 piece to begin with.
Finally I used some magnets to hold the handle in place and welded it to the CC. For those wondering, I placed my handles at a 45 (135) degree angle to the CC and the top of the horseshoe is about an inch above the top of the strap.
Its coming together!! Once I get the stack on it'll really start looking like a smoker!
These handles are made out of some horseshoes that I bought at Tractor Supply and the same tube and rod that I used for my hinges. I started out by cutting the horseshoes.
I was going to just cut them in half and weld them to the tube and rod but I didn't like how they looked going past 90 degrees. These are obviously pics from google not my horseshoes but, this is what I'm talking about that i didn't want.
- 216770-500x430-Lucky-horseshoe-1.jpg (8.1 KiB) Viewed 296 times
This graphic only shows setting up the cut for 1 side. I repeated this on the other side which would be the mirror of this.
- 216770-500x430-Lucky-horseshoe-2.jpg (7.57 KiB) Viewed 296 times
-
Dirtytires
- Expert
- Posts: 3845
- Joined: November 24th, 2015, 12:36 am
- Title: It ain't broke...yet
- BBQ Comp Team Name: Dont compete...cook for events once in a while
- Location: Phoenix, Az
-
- Similar Topics
- Replies
- Views
- Last post