
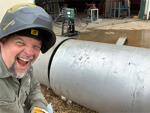
Thought I d post a few pics of build. I am a newbie welder with more equipment than time but this project has been a great excuse to start teaching my 14 year old how to weld-As they say 14 year olds will always have better welds than 57 year olds even as newbies because they can see ! I know it is not all square and the welds are ugly but its great fun!
I am wondering if I need insulation around firebox and chute? Also does the end of the c channel plate attach to the opposite wall ? Not sure it is quite long enough. I could not find 9 inch channel so I welded up mine with 1/4 plate
(Sorry cannot figure out how to make images rotate correctly)
Mini build progress

-
Big T

- Moderator

- Posts: 6897
- Joined: September 1st, 2013, 2:40 pm
- Title: Go Getter
- BBQ Comp Team Name: Backyard Boys
- Location: Lower Alabama
Re: Mini build progress
The channel does attach to the wall and I would put insulation around the FB and chute as well as the outer skin. It looks like y'all are doing a fine job, keep up the good work. 
Measure Twice.....Cut Three Times.
-
Dirtytires

- Expert

- Posts: 3845
- Joined: November 24th, 2015, 12:36 am
- Title: It ain't broke...yet
- BBQ Comp Team Name: Dont compete...cook for events once in a while
- Location: Phoenix, Az
-
ajfoxy

- Expert
- Posts: 2364
- Joined: April 12th, 2016, 8:07 pm
- Title: Neophyte Smoker Bldr
- BBQ Comp Team Name: Not competing yet...
- Location: Brisbane, Queensland, Australia
Re: Mini build progress
Looking good so far.
Learning generally boils down to "Repetition or the avoidance of pain", some people learn by doing, some by watching and some just have to pee on the electric fence.
Whether you think that you can, or that you can't, you are usually right. Henry Ford
Whether you think that you can, or that you can't, you are usually right. Henry Ford
Re: Mini build progress
Yes, forgot a couple but got 80% done up front. Using 3 inch batting from roxol -found it at home depot and lowes under different names but is wool based and heat resistant > 2000 degrees without formaldehyde. Also scored some cheap 1 inch solid panels online with free shipping but was not sure that it was enough to fill 1 1/2 walls to insulate. Will likely use both and weld some roofing nalis in place to hold it up. Any ideas on keeping insulation around firebox and chute? Maybe good old baling wire? Also, where is easiest place to get pipe for air intake and chimney? do most folks use galvanized and grind off zinc in welded areas? Just wondering. I am leaning toward screwing on outer skins so i can remove easier if something malfunctions. Figure I could bend upper lid to 90 degrees at top on both sides to overlap sides for front and back ?
-
Big T
- Moderator
- Posts: 6897
- Joined: September 1st, 2013, 2:40 pm
- Title: Go Getter
- BBQ Comp Team Name: Backyard Boys
- Location: Lower Alabama
Re: Mini build progress
I don't think that you can rotate pictures once they're posted and I'm not sure why they ended up that way. I either use an app on my phone to resize pictures or post them straight from my phone using tapatalk app. I've seen a few guys use some scraps of expanded metal or flat bar to secure the insulation around the FB. I would stay away from the galvanized material even though it isn't inside the CC but that's just my preference. I'm not sure where everyone is getting there pipe but if you can't source it local you can check bbqsmokersupply.com or give them a call.
Measure Twice.....Cut Three Times.
-
Frank_Cox
- Site Admin

- Posts: 7160
- Joined: January 17th, 2011, 6:30 pm
- BBQ Comp Team Name: https://smokerbuilderu.com
- Contact:
Re: Mini build progress
looking good!!
If ya need any parts shoot me a PM... we can send ya pre-cut smoke stack and air inlet parts...

If ya need any parts shoot me a PM... we can send ya pre-cut smoke stack and air inlet parts...
Re: Mini build progress
For the chimney is it ok to use a 4 inch diameter pipe or will it throw off the smoker flow-I have a 4 inch piece handy but can get 3 inch if 4 inch is too large? By the way thanks Frank for the offer-I can get the 2 or 3 inch pipe from the steel yard at a fairly inexpensive price compared to shipping from your place but I'll have a lot left over for the next project
By the way, I extended the cabinet by 4 inches in height for a total of 36 inches to get another rack inside if that matters
By the way, I extended the cabinet by 4 inches in height for a total of 36 inches to get another rack inside if that matters
Re: Mini build progress
The 4 inch will work fine and you could always close the flu a bit if needed. The extra 4 Inches will work out fine just takes a little longer to recover temp.

Re: Mini build progress doors
Any tips on welding skins on doors to avoid warpage? I have mig and tig available but newby with both. Should I stitch inside first then weld edges in small stitches or tack and weld around edges? Got quite a bit of warpage on inside walls but no one will notice.
-
Dirtytires
- Expert
- Posts: 3845
- Joined: November 24th, 2015, 12:36 am
- Title: It ain't broke...yet
- BBQ Comp Team Name: Dont compete...cook for events once in a while
- Location: Phoenix, Az
Re: Mini build progress
I’m not sure what ‘inside’ you were referring to but you definitely don’t need to weld both sides for door skins. I’m sure you know that tho.
I tend to stitch weld, about an inch or so on each panel at a time. It takes forever because the heat takes to long to dissipate. I have had better luck with a smaller dia wire as well....you might experiment with 0.025 vs 0.030 to see.
I tend to stitch weld, about an inch or so on each panel at a time. It takes forever because the heat takes to long to dissipate. I have had better luck with a smaller dia wire as well....you might experiment with 0.025 vs 0.030 to see.
Re: Mini build progress
Looks great so far. I plan to finally get a little done on mine next weekend. After I destroy my sheetmetal I'll know what not to do better
-
mp4

- Expert
- Posts: 1263
- Joined: September 2nd, 2014, 6:28 pm
- Title: Independent Thinker
- BBQ Comp Team Name: Just a few backyard for fun competitions.
- Location: Central Wisconsin
Re: Mini build progress
I have troubles keeping my stitch welds small enough...I just cant help myself. My new welder has a timer on it I set it down to just spot weld around the door and then ground it smooth. I did the same thing to the firebox panels for my brother-in-law's rig and he actually liked the texture it left. We just hit it with the grinder to take the sharp edges off.
Re: Mini build progress
Yes, I assumed that but thought if I stitched a couple of places on inside of door panel to hold it down where insulation goes, it may make it easier on the outside edges. I am also wondering if I should make the outer skins a little smaller to allow for better weld to edge of square tubing? I guess I need to quick talking about it and get er done!
-
Dirtytires
- Expert
- Posts: 3845
- Joined: November 24th, 2015, 12:36 am
- Title: It ain't broke...yet
- BBQ Comp Team Name: Dont compete...cook for events once in a while
- Location: Phoenix, Az
Re: Mini build progress
If I’m welding a panel to an edge, I try to get the panel 1/16 to 1/8 from the edge. It helps to cut down on the grinding a bit and keeps the weld away from the other corner so the second panel will lay flat and not be in the previous edges weld.
Re: Mini build progress
- crop1.jpg (52.1 KiB) Viewed 657 times
- crop 2.jpg (54.38 KiB) Viewed 657 times
Last edited by okcsmith on September 7th, 2020, 10:09 am, edited 1 time in total.
-
Big T
- Moderator
- Posts: 6897
- Joined: September 1st, 2013, 2:40 pm
- Title: Go Getter
- BBQ Comp Team Name: Backyard Boys
- Location: Lower Alabama
Re: Mini build progress
Looks great!! It doesn't get much better than cooking some great food on something that you've built with your own hands.
Measure Twice.....Cut Three Times.
-
- Similar Topics
- Replies
- Views
- Last post
-
- 13 Replies
- 6044 Views
-
Last post by Dirtytires
-
- 56 Replies
- 13423 Views
-
Last post by Barrion2018
-
- 52 Replies
- 14724 Views
-
Last post by SeenRed
-
- 2 Replies
- 2346 Views
-
Last post by Tower870
-
- 2 Replies
- 2386 Views
-
Last post by sfarbic