Insulated Cabinet Build (The Beast)

Let's hear about your ideas for smokers and grills.
Post Reply
GlennInDFW
beginner
beginner
Posts: 13
Joined: February 25th, 2014, 11:52 am

Insulated Cabinet Build (The Beast)

Post by GlennInDFW » March 6th, 2014, 2:18 pm

Overview

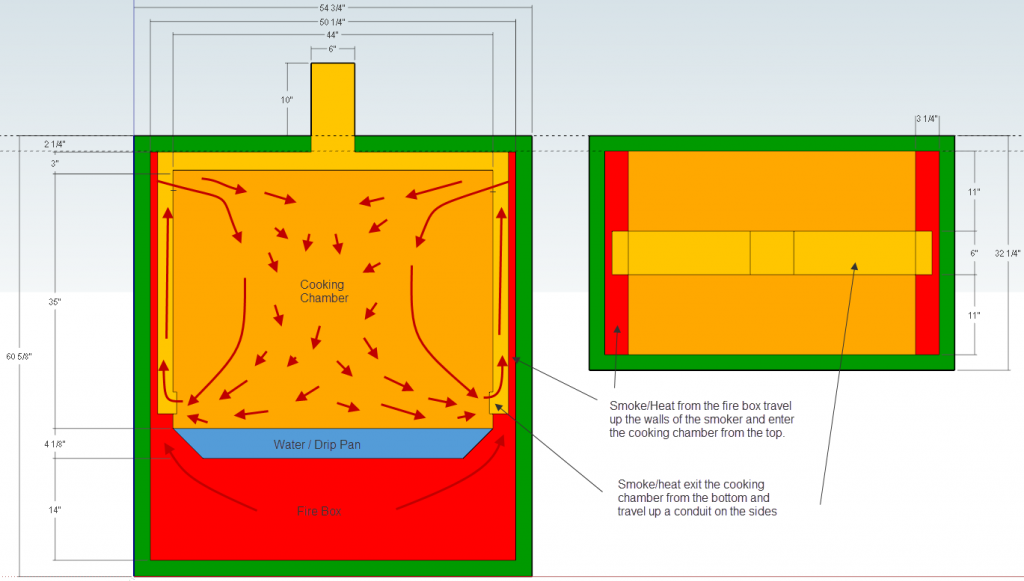
I am in the process of designing and building a double walled insulated cabinet smoker. This is a high capacity smoker that will cook up to 20 18# briskets. The smoker will burn wood or a combination of wood and charcoal. I am working through several key calculations including the channels that will carry smoke and heat from the firebox to the cooking chamber.

Any help and guidance would be greatly appreciated. Don't worry about hurting my feelings. Let me know what you think.

I've included illustrations at the bottom of this post for reference.


Basic Dimensions

Cooking Chamber – 44” W x 28” D x 35” H
Firebox – 50 ¼ W x 28” D x 14” H
Water Pan – 44” W x 28” D x 4 1/8” H
Cabinet – 54 ¾” W x 32 ¼” D x 60 5/8” H
Cabinet Walls – 2”
Stack – 6” W x 6” D x 10” H
Walls - 10 gauge steel
Insulation - 2” ceramic wool


Concept


The concept is based on several other popular cabinets so there is nothing new here. I’m merely adapting it to my needs and hopefully, I can get it right, with help from all of the experts here.
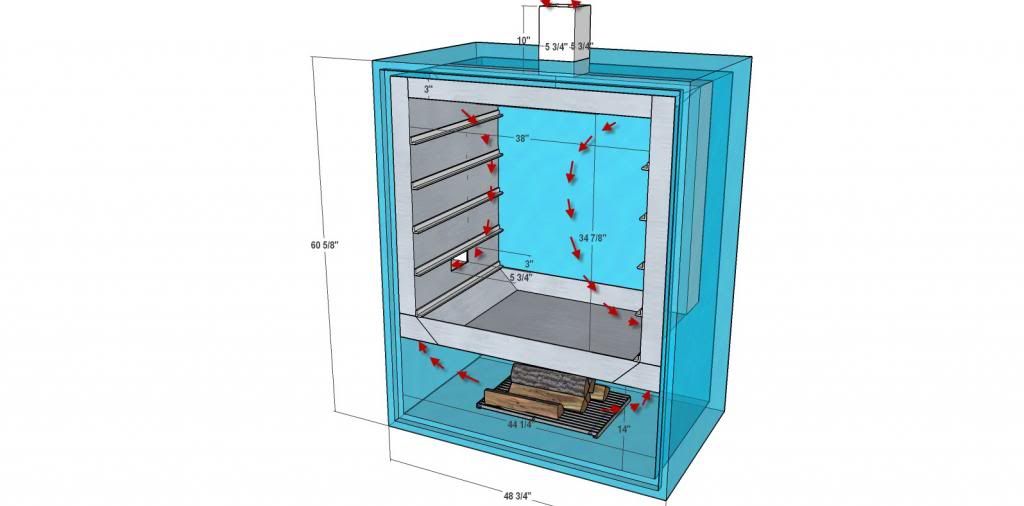
Heat and smoke will rise up from the firebox and travel through hollow walls on either side of the cooking chamber. Heat and smoke will enter the cooking chamber through two 3” H x 28” W openings on either side at the top of the cooking chamber. Smoke and heat will permeate the cooking chamber and be forced out at the bottom through 3” H x 6” W openings. The heat and smoke will travel through 3” W x 6” D conduit, up through the walls where the heat enters the cooking chamber and out a 6” D x 6” W x 10” H stack. The thinking is that the heat exiting the smoke chamber will be heated again, causing a draw which helps pull smoke and heat through the system.


I have several design considerations/questions.


1. Is this conceptually sound?
2. The heat intakes will be the depth of the smoke chamber (28”). Is 3” W too wide? Keep in mind that the exhaust conduits will reduce the overall volume here.
3. Will the 3” W x 6” D exhaust conduits be sufficient?
4. The fire box is quite large and I am concerned that even with a basket centered inside, I could end up with heat and smoke unevenly entering the intakes. This could be controlled by adding a deflector plate that is “V” shaped below the water pan.
5. What I would really be amazing is calculations or a a sizing calculator specific to insulated cabinets of this type.

3D Conceptual Sketch
Image

Front and Top Illustration

Image


Sign Up For SmokerBuilderU
User avatar
Clover Ridge Smokers
Expert
Expert
Posts: 2466
Joined: December 1st, 2012, 4:42 pm
Title: Driven By Passion
BBQ Comp Team Name: Clover Ridge Smokers
Location: Minnesota

Re: Insulated Cabinet Build (The Beast)

Post by Clover Ridge Smokers » March 7th, 2014, 11:29 am

I like the concept you've come up with. I have very little experience building these types of cookers. There are people on here like Gizmo and Frank Cox that have lots of experience building these types of cookers. I'm sure they will chime in soon.


Driven by Passion, Limited by Imagination

GlennInDFW
beginner
beginner
Posts: 13
Joined: February 25th, 2014, 11:52 am

Re: Insulated Cabinet Build (The Beast)

Post by GlennInDFW » March 7th, 2014, 7:17 pm

I'm new to the world of cabinet smokers as well, but I've heard great things about how efficiently they cook. Admittedly, building something this big as my first cabinet is probably not the smartest move, but I think with guys like Gizmo, Frank Cox and the wealth of knowledge and expertise on this site, I should be just fine.

I just need to get some inputs on what I would call magic ratios, for instance, the volume of the firebox on an offset being around 1/3 the size of the cook chamber. In the case of an insulated cabinet, I am more concerned with the volume of the chambers between the firebox and the cook chamber (the side walls). In looking a little closer at guys like pitmaker.com, the volume seems to be a much lower ratio than what I have in my current design.

Thanks for taking a look.


User avatar
Gizmo
Founder
Founder
Posts: 6135
Joined: July 23rd, 2011, 11:55 am
Title: Member
BBQ Comp Team Name: Edna's Kids Comp Team - KCBS Certified Judge
Location: Kearney, NE

Re: Insulated Cabinet Build (The Beast)

Post by Gizmo » March 7th, 2014, 7:26 pm

thinking…. :D


And on the eighth day God created barbecue …. because he DOES love us and he wants us to be happy. :D
Current smokers: Egor (trailered RF) and Easybake (tabletop pellet drive)

User avatar
CrazyD
Needs a Bigger Shop!
Posts: 76
Joined: March 4th, 2014, 10:05 am
Title: CrazyQ
BBQ Comp Team Name: CrazyQ - New at it!
Location: Abilene, TX

Re: Insulated Cabinet Build (The Beast)

Post by CrazyD » March 7th, 2014, 7:28 pm

the biggest difference i see between your setup and the pit maker safe i have is that with my safe, the heat from the FB comes up the back wall and comes into the CC from the top as yours but from the top.


GlennInDFW
beginner
beginner
Posts: 13
Joined: February 25th, 2014, 11:52 am

Re: Insulated Cabinet Build (The Beast)

Post by GlennInDFW » March 7th, 2014, 8:01 pm

I can see where the pitmaker design would essentially eliminate one of my concerns which was more smoke entering on one side than the other. When I originally drew this up, I was thinking of how to best ensure good volume and flow of smoke/heat. In other words, no stale smoke. I really ended up liking the idea of "reheating" the smoke exiting the cooking chamber. I liked it so much that I didn't think about how to ensure smoke enters the chamber evenly. I was thinking of a V shaped damper plate that would essentially split the heat rising and direct it to either side but if I use the minion method, there would be the possibility of smoke only traveling up one side.

Of course, I could be thinking about this wrong anyway. i'm assuming this is all about heat rising but there are several other things happening such as draft from the outside, expanding gasses in the firebox, convection...etc.

Thoughts guys?


User avatar
CrazyD
Needs a Bigger Shop!
Posts: 76
Joined: March 4th, 2014, 10:05 am
Title: CrazyQ
BBQ Comp Team Name: CrazyQ - New at it!
Location: Abilene, TX

Re: Insulated Cabinet Build (The Beast)

Post by CrazyD » March 7th, 2014, 8:33 pm

well the chambers that the "exhaust heat" leaves is basically on the inside of the cook chamber and not in the insulated side of it. so basically it is staying heated all the way out.


GlennInDFW
beginner
beginner
Posts: 13
Joined: February 25th, 2014, 11:52 am

Re: Insulated Cabinet Build (The Beast)

Post by GlennInDFW » March 7th, 2014, 11:30 pm

Right, but due to heat transfer, the exhaust heat is significantly cooler than when it comes into the cooking chamber. Reheating it by porting it right through the intake should help aid in convection.


User avatar
Gizmo
Founder
Founder
Posts: 6135
Joined: July 23rd, 2011, 11:55 am
Title: Member
BBQ Comp Team Name: Edna's Kids Comp Team - KCBS Certified Judge
Location: Kearney, NE

Re: Insulated Cabinet Build (The Beast)

Post by Gizmo » March 8th, 2014, 6:07 am

Pros:
The evenness of the heat throughout your CC and the smoke presence in your food should both be outstanding.

Cons:
Establishing a draft will require a little patience. Even a pinhole leak in the system will prevent a strong/smooth draft from forming.

Most of your heat will be transferred to the CC radiantly not convectively. I think this is the main reason why cabinet cookers are so efficient … which is why the water pan concerns me. Once you get the water boiling the system will likely stall - much like cooking a brisket - as the energy is diverted to boiling off the water - approx. 212F. This could mean an afternoon of "roller-coaster" temps chasing the one you want. Most "Q" cooking is hotter than 212F so make sure your design allows you to cook with the water pan removed - just in case.

You might have the latest greatest design to ever hit the "Q" hobby - and you might not …. part of the gamble we take trying new things…. personally I like the gamble - and I have some weird designs on here to prove it. But I've sold enough "great ideas" for scrap metal to know that you won't know and improve your thinking until you try…..

My hat's off to you :D


And on the eighth day God created barbecue …. because he DOES love us and he wants us to be happy. :D
Current smokers: Egor (trailered RF) and Easybake (tabletop pellet drive)

User avatar
CrazyD
Needs a Bigger Shop!
Posts: 76
Joined: March 4th, 2014, 10:05 am
Title: CrazyQ
BBQ Comp Team Name: CrazyQ - New at it!
Location: Abilene, TX

Re: Insulated Cabinet Build (The Beast)

Post by CrazyD » March 8th, 2014, 10:21 am

Yeah with my safe i dont use water. Never have and never seen a need for it.


GlennInDFW
beginner
beginner
Posts: 13
Joined: February 25th, 2014, 11:52 am

Re: Insulated Cabinet Build (The Beast)

Post by GlennInDFW » March 8th, 2014, 3:32 pm

CrazyD wrote:Yeah with my safe i dont use water. Never have and never seen a need for it.
CrazyD,

I was thinking the safe had a water/drip pan? Would you mind posting some pics that illustrate the flow through the unit?


User avatar
CrazyD
Needs a Bigger Shop!
Posts: 76
Joined: March 4th, 2014, 10:05 am
Title: CrazyQ
BBQ Comp Team Name: CrazyQ - New at it!
Location: Abilene, TX

Re: Insulated Cabinet Build (The Beast)

Post by CrazyD » March 8th, 2014, 3:47 pm

It is completely closed off from the firebox on bottom and yes there is a drain in the bottom for drippings or water if you choose to use it for that. But only time water hits mine is when i clean it out after a cook while its still all hot and basically give it a steam bath.


Im at work right now but once i get home ill take some pics of everything.


GlennInDFW
beginner
beginner
Posts: 13
Joined: February 25th, 2014, 11:52 am

Re: Insulated Cabinet Build (The Beast)

Post by GlennInDFW » March 8th, 2014, 4:29 pm

So, taking into account the feedback you guys have provided, now, I'm a bit concerned about the water pan myself. I really like the effect the water pan has on my vertical offset. Sure, it adds moisture to the chamber which helps to keep the moisture in the meat (I suspect), but it also helps to even out the temperature throughout the cook chamber. I noticed after adding the pan, that the temperatures on the left and right side went from about an 8-10 degree difference to only a 1-2 degree difference at most.

Now, if the primary method of heat transfer in a cabinet smoker is radiant energy, I can see where the water pan could and likely would boil. I think I've seen several cabinet designs that use a deflector plate below the water pan to avoid this boiling, but wouldn't the addition force the cabinet to rely more on convection to provide heat and in turn, cause you to have to use a bigger fire to provide that heat. In my opinion, this would defeat the purpose of building a cabinet which is touted as being highly efficient.

One of my original thoughts was not to have a built in water pan, but to have an additional cooking grate right above the bottom of the smoke chamber. I would use standard steam table pans to act as drip pans and water pans.

I'm glad to have you guys to bounce these ideas off of and discuss this design with, but darn, I wanna get building. Can anyone say analysis paralysis?


User avatar
Gizmo
Founder
Founder
Posts: 6135
Joined: July 23rd, 2011, 11:55 am
Title: Member
BBQ Comp Team Name: Edna's Kids Comp Team - KCBS Certified Judge
Location: Kearney, NE

Re: Insulated Cabinet Build (The Beast)

Post by Gizmo » March 8th, 2014, 5:31 pm

Look at "Eli's comin' " in the reverse flow department. He is a vertical and has an inverted baffle plate. Maybe that will give you an idea. :D


And on the eighth day God created barbecue …. because he DOES love us and he wants us to be happy. :D
Current smokers: Egor (trailered RF) and Easybake (tabletop pellet drive)

StorkQ
Wants to build a smoker
Posts: 24
Joined: March 29th, 2017, 2:59 am

Re: Insulated Cabinet Build (The Beast)

Post by StorkQ » March 29th, 2017, 4:24 am

Gizmo wrote:Look at "Eli's comin' " in the reverse flow department. He is a vertical and has an inverted baffle plate. Maybe that will give you an idea. :D
I did look at that post but all images seem to have disappeared (from imageshack). Could you have a look at that? Cause I'm researching a cabinet style smoker. Thanks.


User avatar
Rodcrafter
Moderator
Moderator
Posts: 8488
Joined: July 21st, 2012, 5:46 pm
Title: Member
BBQ Comp Team Name: Not competing yet...
Location: Orlando, Florida

Re: Insulated Cabinet Build (The Beast)

Post by Rodcrafter » March 29th, 2017, 6:57 am

StorkQ wrote:
Gizmo wrote:Look at "Eli's comin' " in the reverse flow department. He is a vertical and has an inverted baffle plate. Maybe that will give you an idea. :D
I did look at that post but all images seem to have disappeared (from imageshack). Could you have a look at that? Cause I'm researching a cabinet style smoker. Thanks.

Just so you know since the thread is a few years old you may need to send Gizmo a pm to ask questions he may not see this post otherwise.


Current Smokers: Backyard RF Offset and Hybrid RF Offset trailer rig with Cowboy cooker and fish fryer, always room for more........

Post Reply
  • Similar Topics
    Replies
    Views
    Last post

Return to “Other Smoker and Grill Designs”