First build, stick burner 72" x 30" RF offset

Tell us a little about yourself!
User avatar
BitBucket
Wants More tools
Wants More tools
Posts: 106
Joined: August 17th, 2015, 12:42 pm
Title: Smoker noob
BBQ Comp Team Name: I like to cook for crowds, but I'm not sure I'll ever compete.
Location: Fairbanks, Alaska

Re: First build, stick burner 72" x 30" RF offset

Post by BitBucket » September 8th, 2015, 3:58 pm

Thanks for stopping by again, and thanks for the comments and encouragement. I've set a question in BOLD below, if anyone has any comments.

Status update:

I didn't get as much time over the long weekend put in as I would like, had a pet emergency that took up most of a day.

During the week last week I got the firebox corrected and everything but the top welded on. I really wanted to get the firebox attached to the smoker over the weekend, which required putting the cook chamber end plate in place, which required fabricating the cook chamber <> firebox damper assembly.

Setting the damper alignment plate angles and getting holes drilled sequence. I've ordered some parts that might make this work really smooth--I'm getting a 1/2" compression spring and a 1/2" stainless ball bearing that i'm going to load into the damper lever via a 1/2" sched. 40 nipple (should be 0.602 ID). The holes in the damper alignment plate are 7/16 (I may fill the backs depending on how well this works), but the idea is that spring pressure and ball bearing keep the damper in whatever hole you set it at, but its movable with direct pressure. I figure I can tune that to work like a charm, whether it's reducing the depth of the holes, beveling the tops or both. I'll post pics when I get the parts in. Meanwhile, slipping a bolt in works really well as the pics show:
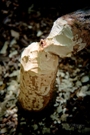
Image
Image
Image
Image
Damper closed
Image
Image
Image
Damper Open
Image
Image


Once that was done, it was time to hang the firebox--a milestone moment in my opinion. I got all the inside and outside welds against the cook chamber end plate, but the top is till not permanently affixed all the way around (I should have waited on the back top weld, but I got excited).
Image

Finally, starting to look like a smoker!
Image

Next up: well, there's a list but it's not so long it feels worthwhile to list it
FIREBOX
--I want some bracing so the fire box isn't just hanging off the cook chamber end plate. I debated about this quite a bit. With expansion and whatnot I'm still not sure how I'm going to do that. Question--have you guys had problems with firebox expansion as it heats causing issues if its hard welded to a trailer frame vs. just the cook chamber?
--There's an ash tray to build
--I'm probably going to put in a grate above that of some sort even though I don't recall seeing it on the plans.
--Firebox door and side dampers yet to assemble

BAFFLE PLATE
--Baffle plate drain and cook chamber drain (I like the idea of separate drains so grease and other drippings have less of a chance to accumulate below the baffle plate but I still want to be able to drain that space)
--Weld baffle plate in place

RACKS to assemble
--three tiers

2nd COOK CHAMBER END TO WELD ON
--It will be easier to do the racks with the end off I think

STACK
--Assemble and attach
Test fire
Paint
Season firing(s)
Cook!
More as things develop. Thanks again for stopping by, Bb


--
My motto on building smokers: “It does not matter how slowly you go so long as you do not stop” ~ Confucius

Sign Up For SmokerBuilderU
User avatar
mp4
Expert
Expert
Posts: 1263
Joined: September 2nd, 2014, 6:28 pm
Title: Independent Thinker
BBQ Comp Team Name: Just a few backyard for fun competitions.
Location: Central Wisconsin

Re: First build, stick burner 72" x 30" RF offset

Post by mp4 » September 8th, 2015, 9:13 pm

I welded mine to the trailer frame on 3 sides...so far so good. I've only warmed it up 5 times so far though.


User avatar
Rodcrafter
Moderator
Moderator
Posts: 8488
Joined: July 21st, 2012, 5:46 pm
Title: Member
BBQ Comp Team Name: Not competing yet...
Location: Orlando, Florida

Re: First build, stick burner 72" x 30" RF offset

Post by Rodcrafter » September 9th, 2015, 5:05 am

I welded mine to the trailer and cc no problems.


Making memories.


Current Smokers: Backyard RF Offset and Hybrid RF Offset trailer rig with Cowboy cooker and fish fryer, always room for more........

User avatar
BitBucket
Wants More tools
Wants More tools
Posts: 106
Joined: August 17th, 2015, 12:42 pm
Title: Smoker noob
BBQ Comp Team Name: I like to cook for crowds, but I'm not sure I'll ever compete.
Location: Fairbanks, Alaska

Re: First build, stick burner 72" x 30" RF offset

Post by BitBucket » September 9th, 2015, 1:19 pm

Right on, thanks guys. I'll feel way better if it has some additional bracing. I'll get it in place.

I got the ash tray cut and mostly built last night, just some final fitting, a handle and some rails in the firebox and it's ready to put in.
Image


--
My motto on building smokers: “It does not matter how slowly you go so long as you do not stop” ~ Confucius

FATNECK
Needs a Bigger Shop!
Posts: 89
Joined: May 13th, 2014, 8:13 pm

Re: First build, stick burner 72" x 30" RF offset

Post by FATNECK » September 9th, 2015, 1:53 pm

Keep up the good work!!!


User avatar
Rodcrafter
Moderator
Moderator
Posts: 8488
Joined: July 21st, 2012, 5:46 pm
Title: Member
BBQ Comp Team Name: Not competing yet...
Location: Orlando, Florida

Re: First build, stick burner 72" x 30" RF offset

Post by Rodcrafter » September 10th, 2015, 11:22 am

:LG:


Current Smokers: Backyard RF Offset and Hybrid RF Offset trailer rig with Cowboy cooker and fish fryer, always room for more........

User avatar
BitBucket
Wants More tools
Wants More tools
Posts: 106
Joined: August 17th, 2015, 12:42 pm
Title: Smoker noob
BBQ Comp Team Name: I like to cook for crowds, but I'm not sure I'll ever compete.
Location: Fairbanks, Alaska

Re: First build, stick burner 72" x 30" RF offset

Post by BitBucket » September 14th, 2015, 2:03 pm

Hey all, thanks again for all your encouragement and advice.

Last week I worked pretty much exclusively on the fire box.

In a previous post, you saw the ash tray. Here it is with the handle on.
Image

Next I worked on the log rack, which I had to resize for the Big Bull's firebox from the FFMS Lone Star drawings.
One log rack, some assembly required:
Image
And assembled:
Image
For cutting expanded steel I found a diamond-tipped metal-cutting circular saw blade on a worm drive makes laser-clean straight cuts--just slap on some kind of a fence and it cuts like plywood (wear long sleeves and a face shield though--the little nibbles of metal it flings sting a bit. The blade set me back a bit almost $50, but time saved grinding off 'berries' from cutting with a torch or plasma cutter or cutoff wheel (and bending up the steel strands as I did it) were totally worth it.

Next I got the strap and hinges on the firebox door and got it hung. It closes nicely. The chunk of metal in the handle area is just a piece of scrap I had so I could handle the door easier while getting it hung--it'll come off when I get the rest of my spring handles in. UPS managed to misroute them, I was supposed to have them on Friday. I also got the rest of the top plate welds on the fire box done. I ave a ton more grinding to do on the firebox to make it pretty, but its cosmetic work only now. I need to get a positive lock figured out for the ash tray. I may end up cutting that handle off and doing some sort of twist-lock handle since door width makes it difficult to use an external latch without welding an ear on or something and I'm not into banging my shins all that much.

Image

I got started on the left and right dampers for the firebox, but don't have any pics yet. I'm grappling with the 5/16" 'spacers' the plans call for. I think I have a solution, but I have yet to prove it works. I'll post more as I progress.

Sunday, I was greeted by this: Yep, that's snow. It didn't stay around thankfully, but that really kind of set the mood for the day. Usually things dry out and we get some clear cool days toward the end of September--I'm hoping that proves true this year.

Image
Rock on,
Bb


--
My motto on building smokers: “It does not matter how slowly you go so long as you do not stop” ~ Confucius

User avatar
Big T
Moderator
Moderator
Posts: 6897
Joined: September 1st, 2013, 2:40 pm
Title: Go Getter
BBQ Comp Team Name: Backyard Boys
Location: Lower Alabama

Re: First build, stick burner 72" x 30" RF offset

Post by Big T » September 14th, 2015, 6:57 pm

:LG:


Measure Twice.....Cut Three Times.

User avatar
Rodcrafter
Moderator
Moderator
Posts: 8488
Joined: July 21st, 2012, 5:46 pm
Title: Member
BBQ Comp Team Name: Not competing yet...
Location: Orlando, Florida

Re: First build, stick burner 72" x 30" RF offset

Post by Rodcrafter » September 15th, 2015, 8:55 pm

Wow, that looks cold, hard to get work done in that mess.


Making memories.


Current Smokers: Backyard RF Offset and Hybrid RF Offset trailer rig with Cowboy cooker and fish fryer, always room for more........

User avatar
BitBucket
Wants More tools
Wants More tools
Posts: 106
Joined: August 17th, 2015, 12:42 pm
Title: Smoker noob
BBQ Comp Team Name: I like to cook for crowds, but I'm not sure I'll ever compete.
Location: Fairbanks, Alaska

Re: First build, stick burner 72" x 30" RF offset

Post by BitBucket » September 16th, 2015, 2:46 pm

Rodcrafter wrote:Wow, that looks cold, hard to get work done in that mess.
The good news is the snow didn't stay around. The bad news is it hasn't stopped raining since. I need to be more careful what I wish for I guess!

Midweek update:

Firebox side dampers are tacked on. The left and right firebox walls both warp/bow inward, and I don't want to clamp the damper assemblies to it or I reckon the dampers won't slide and probably won't seal very well. the piece of rod seen in this pic is just a temporary grab handle while I work fitting out. I'm thinking a bottle jack and some cribbing and then maybe some stiffening ribs to hold it and hopefully I can get things to behave.

Image

I got the stack in place too. I spent quite a while thinking about this. Stretching the doors left me needing to edge-fit the stack 6x6x1/4" square steel. That shortens it a bit from the top of the cook chamber, which is actually GOOD, since I think I only have about 2" clearance to get the smoker out of the garage even with the shorter stack. It might be bad though, if the stack length isn't enough. Using the stack volume from the pit calculator, i'm at about 96% of the recommended volume. It seems like there's a tendency to make things slightly overbuilt, so I'm hoping I'll be ok. The overall stack is still the proper length, but it's now sunk 3" into the cook chamber (see pics). If not, what I'll do is make a slip-on extender that I can use to give the stack an extra few inches with I guess. I've got some ideas about how to make that go up and down without having to hold a 40 lb piece of steel over my head each time, or just do a hinged flip-up stack that locks into place with a pin and can be doubled over for easy clearance. That'll take some careful fitting but I think it could work.

Image
Image

Just stack damper/cover, drain pipe, left cook chamber end, racks, and permanently affixing the baffle plate to go--feels like there's some momentum now, it's just a sprint to the finish!

--Bb


--
My motto on building smokers: “It does not matter how slowly you go so long as you do not stop” ~ Confucius

User avatar
Pete Mazz
Administrator
Administrator
Posts: 3399
Joined: February 16th, 2013, 8:19 am
Title: Meathead
Location: Bucks County, PA

Re: First build, stick burner 72" x 30" RF offset

Post by Pete Mazz » September 16th, 2015, 4:09 pm

:LG:


If it's tourist season, how come I can't shoot 'em?

Don't speak the language? Try this: Smoker Terminology

Try my SmokerBuilder Calculators

User avatar
forty_creek
Expert
Expert
Posts: 1130
Joined: January 11th, 2015, 7:06 pm
Title: 40 Ways 2 Kansas
BBQ Comp Team Name: Not competing yet...
Location: Springhill,LA

Re: First build, stick burner 72" x 30" RF offset

Post by forty_creek » September 17th, 2015, 1:36 pm

I like the square stack with the square counterweights! Strong Work


Drankin, Smokin and Dreamin

Sent from my iPhone using Tapatalk


DRANKIN, SMOKIN and DREAMIN

User avatar
Rodcrafter
Moderator
Moderator
Posts: 8488
Joined: July 21st, 2012, 5:46 pm
Title: Member
BBQ Comp Team Name: Not competing yet...
Location: Orlando, Florida

Re: First build, stick burner 72" x 30" RF offset

Post by Rodcrafter » September 17th, 2015, 4:28 pm

Looking good


Making memories.


Current Smokers: Backyard RF Offset and Hybrid RF Offset trailer rig with Cowboy cooker and fish fryer, always room for more........

User avatar
BitBucket
Wants More tools
Wants More tools
Posts: 106
Joined: August 17th, 2015, 12:42 pm
Title: Smoker noob
BBQ Comp Team Name: I like to cook for crowds, but I'm not sure I'll ever compete.
Location: Fairbanks, Alaska

Re: First build, stick burner 72" x 30" RF offset

Post by BitBucket » September 17th, 2015, 6:28 pm

forty_creek wrote:I like the square stack with the square counterweights! Strong Work
Sent from my iPhone using Tapatalk
Thanks!

It's funny how things work out.

If the plans hadn't called for the square stack @ 6x6x1/4" the counterweights wouldn't have been made that way. When buying that stuff, I just went ahead and got 10' from the local steel supplier figuring I almost never get away with getting 'only' what the plans call for anyway.

Each door after I stretched the dimensions weighs about 74 lbs, so I needed more heft than the original 3" pipe the plan called for, and the math for even 4" pipe was pretty grim (I'd be pouring lead or sand in the things vs. sliding in some scrap metal for final balance). Just making pipe long enough by itself meant the counterweights would have hit each other (or double/triple up lengths of pipe in a complex shape of some sort. Then I got to thinking, "Hey! 6x6 has more lbs per foot than 4" pipe," and since I had the scrap after cutting my stack length I figured why not, and the rest is history. The counterweights kinda look like 'warp nacelles' from star trek to me, which I can dig.


--
My motto on building smokers: “It does not matter how slowly you go so long as you do not stop” ~ Confucius

FATNECK
Needs a Bigger Shop!
Posts: 89
Joined: May 13th, 2014, 8:13 pm

Re: First build, stick burner 72" x 30" RF offset

Post by FATNECK » September 17th, 2015, 7:46 pm

Looking good!!


User avatar
BitBucket
Wants More tools
Wants More tools
Posts: 106
Joined: August 17th, 2015, 12:42 pm
Title: Smoker noob
BBQ Comp Team Name: I like to cook for crowds, but I'm not sure I'll ever compete.
Location: Fairbanks, Alaska

Re: First build, stick burner 72" x 30" RF offset

Post by BitBucket » September 23rd, 2015, 11:55 am

Update:

When last I posted I had gotten the stack on.
Here's the Damper/cover assembly, which I modified from the plans a bit based on similar assemblies I found on the web so I didn't have to reach up so high to change it. Now that it's on, a design flaw has been revealed--that is, I really only have full open or full closed--anything else and the handle bumps into the right-hand door when it opens. It's easy enough to fix, and if I do that I'll switch from hand-formed strap to 1/2" sch. 40 pipe--it's just easier and I think will have a neater appearance. That, or I need to get more tools for working wrought iron.
Closed:
Image

Open
Image

I ran out of consumables for my plasma cutter while working on the end lip on my baffle plate last thursday night, which stalled work on the drains, (I got some ordered with fedex high priority shipping Friday morning). With the baffle plate on hold, I cut expanded steel and angle iron for racks on Friday and Saturday.

Image
Image

Consumables arrived on Monday, and I got to work on the drains:
Image
Image

Image

Yep, they're different heights. They ended up being so close together I had to put the valves on first, and to keep the valve levers from colliding in closed position, I had to get creative with the spacing. I reckon that might bite me later, but I can always cut them off and weld a fresh nipple on if it comes to that (I hope it never does).

With the drain from the baffle plate welded in place, the baffle plate wasn't going anywhere anymore, so I finally got to get started on the seams. .030 wire and some odd edges (what I get for cutting freehand) means multiple passes. I had to stop a few times and let my welder cool off, and of course with about 18" to go I ran out of shield gas last night--so that's where I am at the moment.
Image
I do have one of the top racks built as well, but somehow don't have a picture of it yet. With the baffle plate wrapped up it'll be time to put the left end on this beast. I noted as the cook chamber heated up my left door and the door frame had some odd contact that will need to be resolved. That's anticipated, but just one more thing to add to the 'punch list' of small details yet to iron out. 26 degrees this morning, but daytime temps are still reaching low 40's. Nothing short of a blizzard will stop me from making fire in this thing at least to the point of seasoning, but dang I gotta hurry...

Stay tuned...


--
My motto on building smokers: “It does not matter how slowly you go so long as you do not stop” ~ Confucius

User avatar
Big T
Moderator
Moderator
Posts: 6897
Joined: September 1st, 2013, 2:40 pm
Title: Go Getter
BBQ Comp Team Name: Backyard Boys
Location: Lower Alabama

Re: First build, stick burner 72" x 30" RF offset

Post by Big T » September 23rd, 2015, 7:28 pm

It won't be long now !!
:LG:


Measure Twice.....Cut Three Times.

User avatar
forty_creek
Expert
Expert
Posts: 1130
Joined: January 11th, 2015, 7:06 pm
Title: 40 Ways 2 Kansas
BBQ Comp Team Name: Not competing yet...
Location: Springhill,LA

Re: First build, stick burner 72" x 30" RF offset

Post by forty_creek » September 23rd, 2015, 7:47 pm

Strong Work


Drankin, Smokin and Dreamin

Sent from my iPhone using Tapatalk


DRANKIN, SMOKIN and DREAMIN

User avatar
Rodcrafter
Moderator
Moderator
Posts: 8488
Joined: July 21st, 2012, 5:46 pm
Title: Member
BBQ Comp Team Name: Not competing yet...
Location: Orlando, Florida

Re: First build, stick burner 72" x 30" RF offset

Post by Rodcrafter » September 24th, 2015, 2:42 pm

:LG:

Nice


Current Smokers: Backyard RF Offset and Hybrid RF Offset trailer rig with Cowboy cooker and fish fryer, always room for more........

User avatar
BitBucket
Wants More tools
Wants More tools
Posts: 106
Joined: August 17th, 2015, 12:42 pm
Title: Smoker noob
BBQ Comp Team Name: I like to cook for crowds, but I'm not sure I'll ever compete.
Location: Fairbanks, Alaska

Re: First build, stick burner 72" x 30" RF offset

Post by BitBucket » September 29th, 2015, 3:03 pm

Update:

Smoker progress has had to slow down. One of our clients is the local electric utility which is a 24/7 shop and they were due for a round of software updates across the board (a full weekend day for 5 of us), and we've had one winter storm drop 5 inches of snow on Friday, and another one underway predicting 6-12 more inches in the low areas with 24 in the hills. I've had to shift my evening activities from making sparks fly in the garage to making snow fly in the yard with my plow rig. Not that it's not fun, but I'd rather be doing the other thing.

Image

I did get some racks built and rails tacked in, but I need to put the left end plate on before I put any more left-edge rack rails in.

Cue heavenly chorus for this photo:
Image

The good news is, unused 1/4" x 4' x 8' plate makes really good ballast in the bed of my plow truck! Abide with me guys--the weather usually dries out fairly soon, which will free up the evenings again...


--
My motto on building smokers: “It does not matter how slowly you go so long as you do not stop” ~ Confucius

User avatar
BitBucket
Wants More tools
Wants More tools
Posts: 106
Joined: August 17th, 2015, 12:42 pm
Title: Smoker noob
BBQ Comp Team Name: I like to cook for crowds, but I'm not sure I'll ever compete.
Location: Fairbanks, Alaska

Re: First build, stick burner 72" x 30" RF offset

Post by BitBucket » October 5th, 2015, 2:14 pm

After getting about a foot of snow and plowing it back, we've had eerie fog and rain. Snow has given way to mud again, and progress on the smoker has been made.

I got the left end and front supports on:
Image

I made a removable center rack rail rig and got it mounted in case I ever want to put something large enough in there that the middle rails will be in the way:
Image
Image

...and got the lower rails in place. I've got all the expanded steel and angle iron cut out, I just have the mid and lower racks to finish to complete 'primary construction'.
Image

(this next pic just me getting an idea of how the final rack layout will look)
Image

I hope to get the racks finished this evening, I'll post when I have more...


--
My motto on building smokers: “It does not matter how slowly you go so long as you do not stop” ~ Confucius

User avatar
mp4
Expert
Expert
Posts: 1263
Joined: September 2nd, 2014, 6:28 pm
Title: Independent Thinker
BBQ Comp Team Name: Just a few backyard for fun competitions.
Location: Central Wisconsin

Re: First build, stick burner 72" x 30" RF offset

Post by mp4 » October 5th, 2015, 5:03 pm

Nice - progress is good!


User avatar
BitBucket
Wants More tools
Wants More tools
Posts: 106
Joined: August 17th, 2015, 12:42 pm
Title: Smoker noob
BBQ Comp Team Name: I like to cook for crowds, but I'm not sure I'll ever compete.
Location: Fairbanks, Alaska

Re: First build, stick burner 72" x 30" RF offset

Post by BitBucket » October 12th, 2015, 12:17 pm

Well I had a draft post up and closed the browser tab and lost it, so let's try this again.

Finished racks a week ago Monday, and got closures on, lowered the door handles, fixed the left firebox damper and got damper handles on:
Image
Image

That was about it before seeing what happened with heat, so I wheeled the thing out of the garage and fired up a chimney of lump and poured it in:

Image

Temps came up pretty good for not really being sealed tight (my food-grade RTV was supposed to come in last week but it's taking its time getting here, so no gaskets anywhere yet).

Image

I swapped to briquettes, since I wasn't cooking anything. At these ambient temps without good seals it took a pretty good-sized fire to get warm, but seemed to stay there without too much tinkering by me, which is awesome.

Image

Below is a link to a short video. Yeah I know--I yelled 'focus' at the screen a few times too. Auto focus has some issues with hot surfaces in a cold envrionment.

https://photos.google.com/share/AF1QipP ... Y5cFVnVzVR

Sunday I did a 'purge firing' and built a larger big briquette fire in the firebox and put an ash tray from a 'cajun microwave' style cooker in the cooking chamber and put about 16 lbs of briquettes in there too and got it good and hot to hopefully burn out as much as I can.

Image

I still have to weld in a brace for the firebox to the frame, but after that it's time to start prepping for exterior paint. I want to have at least a primer coat on before next firing so it can bake in. Next firing will also season the interior enough to put this thing to rest for the winter.
It stings to not cook on this thing this year and I still might but the bottom could drop out of the temps at any time, so I'm trying not to get my hopes up. Cooking for 6 much less 12 or 16 hours in 20 degrees is not nearly as much fun as wandering out in shorts at 11 p.m. and still see the sun up like it is in the summer. Having even just fired this thing up once I'm incredibly happy--I started with nothing but an idea last November and a year later I've got an epic cooker that is functional if not yet pretty.

It also turns out getting a good wood supply is a bit of a challenge. There's tons of spruce but nobody uses that to cook. There's birch, which is a candidate but I'll have to strip off the bark which burns sooty and black, but its still my best candidate for an all wood fire Googling around has people saying its a milder hickory-like flavor which I can handle. I'll probably be stuck with charcoal and wood chunks for flavor at least until I can get a stockpile of wood figured out.

I'll update when I have more--Bb
Last edited by BitBucket on March 30th, 2017, 1:08 pm, edited 1 time in total.


--
My motto on building smokers: “It does not matter how slowly you go so long as you do not stop” ~ Confucius

User avatar
Pete Mazz
Administrator
Administrator
Posts: 3399
Joined: February 16th, 2013, 8:19 am
Title: Meathead
Location: Bucks County, PA

Re: First build, stick burner 72" x 30" RF offset

Post by Pete Mazz » October 12th, 2015, 12:38 pm

Looks good!!


If it's tourist season, how come I can't shoot 'em?

Don't speak the language? Try this: Smoker Terminology

Try my SmokerBuilder Calculators

User avatar
Big T
Moderator
Moderator
Posts: 6897
Joined: September 1st, 2013, 2:40 pm
Title: Go Getter
BBQ Comp Team Name: Backyard Boys
Location: Lower Alabama

Re: First build, stick burner 72" x 30" RF offset

Post by Big T » October 12th, 2015, 5:34 pm

:beer: Congrats :beer:


Measure Twice.....Cut Three Times.

Post Reply
  • Similar Topics
    Replies
    Views
    Last post

Return to “Introduce yourself!”