Geez I'm envious..when my first smoker was at this stage, I would light it up and burn it just to hang out next to it and enjoy the radiant heat. I alway knew I would love Alaska. Although, it is 76 here today in the pavement (Garden ) state and my wife and I are both sick....Freezing sick. At 76 degrees I was sleeping with an electric blanket today.
Spruce as you know would not be a good choice but when we lived in Vermont, birch was a frequent go to along with maple. Peeling away bark is a pain. Do you have alder in your area. Buying lump charcoal can get expensive as you are also aware, especially on a big smoker
First build, stick burner 72" x 30" RF offset
-
Puff

- Expert

- Posts: 2352
- Joined: May 29th, 2013, 11:16 pm
- Title: Always All In !
- Location: New Jersey...Southern New Jersey
Re: First build, stick burner 72" x 30" RF offset
Make no mistake, there ain't no powder in this Puff ! And... I'm not really a crazy person but I play one in real life

-
Rodcrafter

- Moderator

- Posts: 8488
- Joined: July 21st, 2012, 5:46 pm
- Title: Member
- BBQ Comp Team Name: Not competing yet...
- Location: Orlando, Florida
Re: First build, stick burner 72" x 30" RF offset
With all the oak you have Puff you should make your own lump charcoal. Frank did a video about it.
Making memories.
Making memories.
Current Smokers: Backyard RF Offset and Hybrid RF Offset trailer rig with Cowboy cooker and fish fryer, always room for more........
-
BitBucket
- Wants More tools

- Posts: 106
- Joined: August 17th, 2015, 12:42 pm
- Title: Smoker noob
- BBQ Comp Team Name: I like to cook for crowds, but I'm not sure I'll ever compete.
- Location: Fairbanks, Alaska
Re: First build, stick burner 72" x 30" RF offset
Yuck nobody likes being sick no matter what the temp outside Puff. I did sit pretty close to the smoker when it was going, it was nice. I got the brace between the firebox and the back trailer frame crossmember last night, but I'm still waiting on the silicone to put in the gaskets. It's sad that I have to re-demonstrate how important shield gas is to MIG welding to myself now and then. I couldn't figure out why my tacks looked like a moon rock for a minute there.Puff wrote:Geez I'm envious..when my first smoker was at this stage, I would light it up and burn it just to hang out next to it and enjoy the radiant heat. I alway knew I would love Alaska. Although, it is 76 here today in the pavement (Garden ) state and my wife and I are both sick....Freezing sick. At 76 degrees I was sleeping with an electric blanket today.
Spruce as you know would not be a good choice but when we lived in Vermont, birch was a frequent go to along with maple. Peeling away bark is a pain. Do you have alder in your area. Buying lump charcoal can get expensive as you are also aware, especially on a big smoker
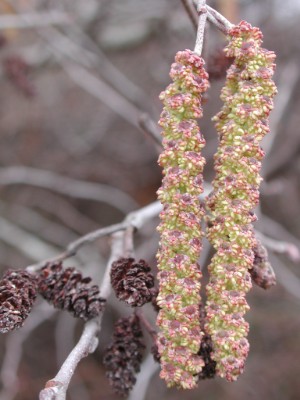
There is alder here for sure. If its what I think it is I might be looking at 4-inch whole rounds as a max size this far north which isn't a bad size to cut and handle without splitting. I know I've seen these mini-cone things all over the place which the internets say are alder but still haven't set my mind to being able to point to the tree they come from and say "alder", so I need to do some stomping around the yard to say for sure.
*edited, changed silicon to silicone, which will work much better as gasket material.
--
My motto on building smokers: “It does not matter how slowly you go so long as you do not stop” ~ Confucius
My motto on building smokers: “It does not matter how slowly you go so long as you do not stop” ~ Confucius
-
Puff
- Expert
- Posts: 2352
- Joined: May 29th, 2013, 11:16 pm
- Title: Always All In !
- Location: New Jersey...Southern New Jersey
Re: First build, stick burner 72" x 30" RF offset
That sure looks like alder...I know there are many varieties so knowing that it's good to use might take a bit of checking. I have a sticker on my log splitter that reads " turn the gas on, dummy" ...it helps sometimes !
Last spring, I tried to find out whether or not locally used pesticides had an effect on Apple and peach wood in the orchards. I'd eventually gotten information from the Ph.D. Arborist at univ of Wisconsin who graciously explained that the pesticides do not have longevity beyond a two weeks and would not have an effect the wood harvested from these sources
I'm thinking if you email a few pictures to someone in this capacity, you may get some great answers that can provide you reasonable supply and variety besides bags and bags of lump
Make no mistake, there ain't no powder in this Puff ! And... I'm not really a crazy person but I play one in real life
-
Puff
- Expert
- Posts: 2352
- Joined: May 29th, 2013, 11:16 pm
- Title: Always All In !
- Location: New Jersey...Southern New Jersey
Re: First build, stick burner 72" x 30" RF offset
Your suggestion is a great one RC. Problem is I'm getting tired quickly these days...based on your advice I just got the log lifter working on the splitter. I'll just keep splitting for the time being. ;)
Make no mistake, there ain't no powder in this Puff ! And... I'm not really a crazy person but I play one in real life
-
BitBucket
- Wants More tools
- Posts: 106
- Joined: August 17th, 2015, 12:42 pm
- Title: Smoker noob
- BBQ Comp Team Name: I like to cook for crowds, but I'm not sure I'll ever compete.
- Location: Fairbanks, Alaska
Re: First build, stick burner 72" x 30" RF offset
Yeah these shots are from my yard:


That's gotta be alder, but what you see there might be 3" dia on the largest one (pretty scrawny imo), and that's a typical specimen. No doubt it would be useful for flavor, but to get enough to burn for heat might be a stretch. If I want non-briquettes it looks like I'll be stripping birch bark at least until I get a lead on something else--or lump.
I did lots of surface cleanup and got the end caps on my 'warp nacelles' (counterweights) but have yet to make 'em pretty The doors are a bit lighter with the extra counterweight but I don't feel like they're going to open dangerously or anything. Although as I type this I find myself wondering what it would be like to catch one in the teeth. If I have to its trivial to add weight to the door though, including completing full-length beads instead of a the 'skip weld' style I have now on the strap around the edges.

Hopefully I'm still on target to make paint and gaskets happen by Saturday.
That's gotta be alder, but what you see there might be 3" dia on the largest one (pretty scrawny imo), and that's a typical specimen. No doubt it would be useful for flavor, but to get enough to burn for heat might be a stretch. If I want non-briquettes it looks like I'll be stripping birch bark at least until I get a lead on something else--or lump.
I did lots of surface cleanup and got the end caps on my 'warp nacelles' (counterweights) but have yet to make 'em pretty The doors are a bit lighter with the extra counterweight but I don't feel like they're going to open dangerously or anything. Although as I type this I find myself wondering what it would be like to catch one in the teeth. If I have to its trivial to add weight to the door though, including completing full-length beads instead of a the 'skip weld' style I have now on the strap around the edges.
Hopefully I'm still on target to make paint and gaskets happen by Saturday.
--
My motto on building smokers: “It does not matter how slowly you go so long as you do not stop” ~ Confucius
My motto on building smokers: “It does not matter how slowly you go so long as you do not stop” ~ Confucius
-
Puff
- Expert
- Posts: 2352
- Joined: May 29th, 2013, 11:16 pm
- Title: Always All In !
- Location: New Jersey...Southern New Jersey
Re: First build, stick burner 72" x 30" RF offset
I've often thought about places like desert area and places like yours where wood for smoking could be at a premium. Never has it become so visually presented. RC and a few guys from Texas talk about wishing for some oak as they have tons of mesquite. Or Georgia guys who have pecan or hickory...even Hawaii.
You have near zero choice...would be a tough decision being a building and smoking enthusiast and being in a location that had so little fuel without forking over a ton of cash. I have more red oak here than I can burn in several lifetimes including home heat....but no hickory, pecan or mesquite
Sorry to rub that in...just outlining the situation....hope you get the weather for paint....good luck
Make no mistake, there ain't no powder in this Puff ! And... I'm not really a crazy person but I play one in real life
-
BitBucket
- Wants More tools
- Posts: 106
- Joined: August 17th, 2015, 12:42 pm
- Title: Smoker noob
- BBQ Comp Team Name: I like to cook for crowds, but I'm not sure I'll ever compete.
- Location: Fairbanks, Alaska
Re: First build, stick burner 72" x 30" RF offset
Hello, I've been under the weather a bit, but finally I got things masked off and a coat of high temp primer on the cook chamber.

The Firebox didn't get masked and hence is still 'nude' at the moment. I haven't been happy with the ash tray and am still tinkering with that. There's not really room for a latch like there is on the rest of the cooker, and pulling that 55 lb tray out hot to clean out ashes works just fine but that's the beauty of doing things yourself, you get ponder if you want things different. If you remember it looks like this now:


I like the fact that it reflects heat from the log box and keeps ash out of the bottom of the smoker and I like that it can be removed to clean, but somehow there's got to be a better way. I have images in my head of a bottom hinge on the front plate of the tray and a built-in ash rake type-thing that will allow using the front plate as a chute, but complexity + deviation from plans = time and still doesn't 100% resolve the issue of "positive closure" for a tight seal and safe transport either, so we'll see what happens.
The Firebox didn't get masked and hence is still 'nude' at the moment. I haven't been happy with the ash tray and am still tinkering with that. There's not really room for a latch like there is on the rest of the cooker, and pulling that 55 lb tray out hot to clean out ashes works just fine but that's the beauty of doing things yourself, you get ponder if you want things different. If you remember it looks like this now:
I like the fact that it reflects heat from the log box and keeps ash out of the bottom of the smoker and I like that it can be removed to clean, but somehow there's got to be a better way. I have images in my head of a bottom hinge on the front plate of the tray and a built-in ash rake type-thing that will allow using the front plate as a chute, but complexity + deviation from plans = time and still doesn't 100% resolve the issue of "positive closure" for a tight seal and safe transport either, so we'll see what happens.
--
My motto on building smokers: “It does not matter how slowly you go so long as you do not stop” ~ Confucius
My motto on building smokers: “It does not matter how slowly you go so long as you do not stop” ~ Confucius
-
BitBucket
- Wants More tools
- Posts: 106
- Joined: August 17th, 2015, 12:42 pm
- Title: Smoker noob
- BBQ Comp Team Name: I like to cook for crowds, but I'm not sure I'll ever compete.
- Location: Fairbanks, Alaska
Re: First build, stick burner 72" x 30" RF offset
Ok, I got the ash tray sorted out. I'm going to put some deadbolts in a few places to hold bits closed while going down the road, then I think the firebox should be ready to clean up and paint.
Before: A center handle that had really asymmetric bends that drove me crazy. You really had to work to get the tray pulled out, no positive closing mechanism at all. There wasn't much room to put a latch mechanism on this face, although a side-latch would have worked, it would have been the kind of shin-basher that makes me want to throw things because I "find" them too often.
After: Two side grips that move vertical to open and give you a really solid hold of the thing. The tray seems much easier to manage this way.
--
My motto on building smokers: “It does not matter how slowly you go so long as you do not stop” ~ Confucius
My motto on building smokers: “It does not matter how slowly you go so long as you do not stop” ~ Confucius

-
Puff
- Expert
- Posts: 2352
- Joined: May 29th, 2013, 11:16 pm
- Title: Always All In !
- Location: New Jersey...Southern New Jersey
Re: First build, stick burner 72" x 30" RF offset
Nice...I know that the cleanout weighs a ton...the last two or three inches I just stand back and let it hit the ground. Then I have to tilt it up, dump the ash and try to align it back up into the slide track.
I like your double latch setup up.
I like your double latch setup up.
Make no mistake, there ain't no powder in this Puff ! And... I'm not really a crazy person but I play one in real life
-
BitBucket
- Wants More tools
- Posts: 106
- Joined: August 17th, 2015, 12:42 pm
- Title: Smoker noob
- BBQ Comp Team Name: I like to cook for crowds, but I'm not sure I'll ever compete.
- Location: Fairbanks, Alaska
Re: First build, stick burner 72" x 30" RF offset
Last night I made deadbolts for the firebox openings as shown here. I think that's all the welding on the firebox unless if I find anyplace I need to fill or touch up before paint but as far as I know, no more parts which is a big milestone.
2-door deadbolt, catches the firebox door and the ash tray door.

Damper deadbolt. Stops are nice, but it can't wiggle around in transit this way.

Next up:
Finish at least one coat each primer and paint
Get gaskets in place
That should finish the smoker itself. That's not to say I'm done with the project or even with welding. Next spring I've got a shelf to mount in front of the cook chamber doors, a wood box and other enhancements to outfit the trailer with (and bring tongue weight up), fenders to trim and paint and lights and wiring yet to tackle--and after all that, get it licensed and titled, but this will be usable if not yet street legal. Getting the garage in shape before really cold weather hits is a weight I don't want to have to carry much longer.
More posts as I wrap up paint and seals and get a seasoning firing going. Hopefully I'll get to cook something soon too, even if only "hot'n'fast", and only to satisfy my brain before it gets put to bed for the winter.
2-door deadbolt, catches the firebox door and the ash tray door.
Damper deadbolt. Stops are nice, but it can't wiggle around in transit this way.
Next up:
Finish at least one coat each primer and paint
Get gaskets in place
That should finish the smoker itself. That's not to say I'm done with the project or even with welding. Next spring I've got a shelf to mount in front of the cook chamber doors, a wood box and other enhancements to outfit the trailer with (and bring tongue weight up), fenders to trim and paint and lights and wiring yet to tackle--and after all that, get it licensed and titled, but this will be usable if not yet street legal. Getting the garage in shape before really cold weather hits is a weight I don't want to have to carry much longer.
More posts as I wrap up paint and seals and get a seasoning firing going. Hopefully I'll get to cook something soon too, even if only "hot'n'fast", and only to satisfy my brain before it gets put to bed for the winter.
--
My motto on building smokers: “It does not matter how slowly you go so long as you do not stop” ~ Confucius
My motto on building smokers: “It does not matter how slowly you go so long as you do not stop” ~ Confucius
-
BitBucket
- Wants More tools
- Posts: 106
- Joined: August 17th, 2015, 12:42 pm
- Title: Smoker noob
- BBQ Comp Team Name: I like to cook for crowds, but I'm not sure I'll ever compete.
- Location: Fairbanks, Alaska
Re: First build, stick burner 72" x 30" RF offset
Got the firebox primed and the whole thing painted with high temp grill paint.


I'll let that cure for another day and then get gaskets and seals going.
I'll let that cure for another day and then get gaskets and seals going.
--
My motto on building smokers: “It does not matter how slowly you go so long as you do not stop” ~ Confucius
My motto on building smokers: “It does not matter how slowly you go so long as you do not stop” ~ Confucius
-
Rodcrafter
- Moderator
- Posts: 8488
- Joined: July 21st, 2012, 5:46 pm
- Title: Member
- BBQ Comp Team Name: Not competing yet...
- Location: Orlando, Florida
Re: First build, stick burner 72" x 30" RF offset
Sweet
Making memories.
Making memories.
Current Smokers: Backyard RF Offset and Hybrid RF Offset trailer rig with Cowboy cooker and fish fryer, always room for more........

-
Puff
- Expert
- Posts: 2352
- Joined: May 29th, 2013, 11:16 pm
- Title: Always All In !
- Location: New Jersey...Southern New Jersey
Re: First build, stick burner 72" x 30" RF offset
That a great feeling after all the work you put into it...
Make no mistake, there ain't no powder in this Puff ! And... I'm not really a crazy person but I play one in real life
-
BitBucket
- Wants More tools
- Posts: 106
- Joined: August 17th, 2015, 12:42 pm
- Title: Smoker noob
- BBQ Comp Team Name: I like to cook for crowds, but I'm not sure I'll ever compete.
- Location: Fairbanks, Alaska
Re: First build, stick burner 72" x 30" RF offset
So Here's a few shots after the paint dried:


Lots of room for the wood basket (next spring) and other storage on the back side.

Masking removed


These last two are a bit blurry, but show the sealing and gasketing. Using high temp foodgrade RTV as sealer and adhesive, although the gasket has an adhesive strip built in.


I used plastic wrap to protect the door frames and gently closed the doors and am letting them sit for 24 hours. Tomorrow I hope to heat it up for a seasoning firing. I still need to finish the trailer/baskets, but that's next spring.
I'll post some action shots of that but assuming all the seals work and I don't get something funky when I cook that needs a fabrication fix or somesuch, this puppy is done. I did the math and I guess I'm up around about 215 hours and 155 days to complete.
Learning how to cook on this thing is a whole separate topic. That's a task I'm looking forward to digging into!
Lots of room for the wood basket (next spring) and other storage on the back side.
Masking removed
These last two are a bit blurry, but show the sealing and gasketing. Using high temp foodgrade RTV as sealer and adhesive, although the gasket has an adhesive strip built in.
I used plastic wrap to protect the door frames and gently closed the doors and am letting them sit for 24 hours. Tomorrow I hope to heat it up for a seasoning firing. I still need to finish the trailer/baskets, but that's next spring.
I'll post some action shots of that but assuming all the seals work and I don't get something funky when I cook that needs a fabrication fix or somesuch, this puppy is done. I did the math and I guess I'm up around about 215 hours and 155 days to complete.
Learning how to cook on this thing is a whole separate topic. That's a task I'm looking forward to digging into!
--
My motto on building smokers: “It does not matter how slowly you go so long as you do not stop” ~ Confucius
My motto on building smokers: “It does not matter how slowly you go so long as you do not stop” ~ Confucius
-
Rodcrafter
- Moderator
- Posts: 8488
- Joined: July 21st, 2012, 5:46 pm
- Title: Member
- BBQ Comp Team Name: Not competing yet...
- Location: Orlando, Florida
Re: First build, stick burner 72" x 30" RF offset

Current Smokers: Backyard RF Offset and Hybrid RF Offset trailer rig with Cowboy cooker and fish fryer, always room for more........
-
Pete Mazz

- Administrator

- Posts: 3399
- Joined: February 16th, 2013, 8:19 am
- Title: Meathead
- Location: Bucks County, PA
Re: First build, stick burner 72" x 30" RF offset

If it's tourist season, how come I can't shoot 'em?
Don't speak the language? Try this: Smoker Terminology
Try my SmokerBuilder Calculators
Don't speak the language? Try this: Smoker Terminology
Try my SmokerBuilder Calculators
-
Puff
- Expert
- Posts: 2352
- Joined: May 29th, 2013, 11:16 pm
- Title: Always All In !
- Location: New Jersey...Southern New Jersey
Re: First build, stick burner 72" x 30" RF offset
Looks great and you've got a great paint job on it. Ain't it time to put the bike away?
Back in Dec 1991 or 1992, I knew a guy that rode any where. My wife and I were out picking up some holiday stuff for the kids. Glad we had a 4wd suburban because we were about 30 miles from the house and it was snowing like crazy. At a stop light, I look in the rear view mirror to see this guy and his wife behind me covered with snow on two wheels heading to their house.
And not to hijack the thread. We rode to Daytona every year for 16 or so years. At the Delaware Memorial Bridge toll booth the lady said to my friend..." Man, I have seen a lot of motorcycles going through today, but you're the only two riding them!"
Good luck with this great rig
Make no mistake, there ain't no powder in this Puff ! And... I'm not really a crazy person but I play one in real life
-
BitBucket
- Wants More tools
- Posts: 106
- Joined: August 17th, 2015, 12:42 pm
- Title: Smoker noob
- BBQ Comp Team Name: I like to cook for crowds, but I'm not sure I'll ever compete.
- Location: Fairbanks, Alaska
Re: First build, stick burner 72" x 30" RF offset
Thanks Puff--Yeah it's beyond time to put the bike away, but it goes in the back corner of the garage for the winter, and until I get done making sparks 'n' dust out of respect (and a solid sense of fire safety) I roll it just outside the garage to work. Not to mention there's just not all that much room with it in. I got my first 2-wheeler at 14, but the one you see appearing in the pictures was the fulfillment of a promise I made myself over 20 years ago. I've ridden it in 90 and 18 degrees. I much prefer the 90!
Thanks everyone for the comments and encouragement.
This morning I cleared the driveway and brought out the smoker and took the following pics:


Sorry about the finger in this next one:


As you can see, the far side of the trailer will be picked up next spring:

I sprayed the racks and interior with spray cooking oil and I put in my first lit chimney of lump at 11:25. It was 12 degrees out.


Quick walkaround video:
https://lh3.googleusercontent.com/fkLa6 ... cver=html5
I had picked up some small pork shoulders and got them marinated overnight and rubbed and on the smoker:

I was able to hold ~250 for three hours using 20 lbs of briquettes + 1 chimney of lump and a bunch of small chunks of hickory from the home store. Temp adjustment was very responsive to damper settings. I had to burn pretty hot though, stretches of no visible stack exhaust for a fair amount of time. At the 3 hour mark (about 4.5 hours from lighting) I wrapped the shoulders and (don't beat me up too bad here) moved them to the oven to finish. They went in @ 250 at around 150 degrees internal and took about 5 hours to come up to 200-205. I unwrapped and glazed and put them back in with the oven off for an hour to rest. I did one shredded and one pulled. They came apart like butter. More importantly, I don't taste any funk like paint or anything. I would have liked to taste more smoke, but the hot fire and lack of decent sized splits made that a challenge. Finishing in the oven feels like cheating, but by the time I pulled the shoulders out of the oven it was TWO degrees out, so I'm gonna ask for some slack
Here's how it turned out:


I didn't inject and everything was juicy and moist--I'm very happy with the results. Oven 'cheating' aside, that was my first cook on a reverse flow. I didn't cook to serve at a particular time, I just wanted to focus on maintaining temp and watching for leaks or other issues. I kept a journal of temps and times I added chimneys of fuel, I plan to see if I can tune things a bit and not 'worry the fire', which to me just means watch the temp gauges quite so frequently and have a little faith once I get a bit more comfortable. I did find a local supplier of splits of 'flavor wood' which looks to be better than the chunks the home stores sell--depending on how much for how much if you know what I mean.
While the meat was finishing, I pulled out the ash and wheeled the smoker into a corner of the yard, put a lock on the hitch and got it covered with a tarp. That's not to say I won't pull it back out, but 0 degrees means its time to get my daily driver in the garage. Happy Halloween gents, these forums helped me alot. I'm already looking at some gravity feed cabinet-style plans by the way. I enjoy the building almost as much as the cooking!
Thanks everyone for the comments and encouragement.
This morning I cleared the driveway and brought out the smoker and took the following pics:
Sorry about the finger in this next one:
As you can see, the far side of the trailer will be picked up next spring:
I sprayed the racks and interior with spray cooking oil and I put in my first lit chimney of lump at 11:25. It was 12 degrees out.
Quick walkaround video:
https://lh3.googleusercontent.com/fkLa6 ... cver=html5
I had picked up some small pork shoulders and got them marinated overnight and rubbed and on the smoker:
I was able to hold ~250 for three hours using 20 lbs of briquettes + 1 chimney of lump and a bunch of small chunks of hickory from the home store. Temp adjustment was very responsive to damper settings. I had to burn pretty hot though, stretches of no visible stack exhaust for a fair amount of time. At the 3 hour mark (about 4.5 hours from lighting) I wrapped the shoulders and (don't beat me up too bad here) moved them to the oven to finish. They went in @ 250 at around 150 degrees internal and took about 5 hours to come up to 200-205. I unwrapped and glazed and put them back in with the oven off for an hour to rest. I did one shredded and one pulled. They came apart like butter. More importantly, I don't taste any funk like paint or anything. I would have liked to taste more smoke, but the hot fire and lack of decent sized splits made that a challenge. Finishing in the oven feels like cheating, but by the time I pulled the shoulders out of the oven it was TWO degrees out, so I'm gonna ask for some slack
Here's how it turned out:
I didn't inject and everything was juicy and moist--I'm very happy with the results. Oven 'cheating' aside, that was my first cook on a reverse flow. I didn't cook to serve at a particular time, I just wanted to focus on maintaining temp and watching for leaks or other issues. I kept a journal of temps and times I added chimneys of fuel, I plan to see if I can tune things a bit and not 'worry the fire', which to me just means watch the temp gauges quite so frequently and have a little faith once I get a bit more comfortable. I did find a local supplier of splits of 'flavor wood' which looks to be better than the chunks the home stores sell--depending on how much for how much if you know what I mean.
While the meat was finishing, I pulled out the ash and wheeled the smoker into a corner of the yard, put a lock on the hitch and got it covered with a tarp. That's not to say I won't pull it back out, but 0 degrees means its time to get my daily driver in the garage. Happy Halloween gents, these forums helped me alot. I'm already looking at some gravity feed cabinet-style plans by the way. I enjoy the building almost as much as the cooking!
--
My motto on building smokers: “It does not matter how slowly you go so long as you do not stop” ~ Confucius
My motto on building smokers: “It does not matter how slowly you go so long as you do not stop” ~ Confucius
-
Pete Mazz
- Administrator
- Posts: 3399
- Joined: February 16th, 2013, 8:19 am
- Title: Meathead
- Location: Bucks County, PA
Re: First build, stick burner 72" x 30" RF offset
I "cheat" all the time as well. Once it's wrapped, heat is heat and the oven does a great job of maintaining it. Plus, it frees up the smoker for other goodies that sometimes need different temps.
If it's tourist season, how come I can't shoot 'em?
Don't speak the language? Try this: Smoker Terminology
Try my SmokerBuilder Calculators
Don't speak the language? Try this: Smoker Terminology
Try my SmokerBuilder Calculators
-
Smurf
- Expert
- Posts: 487
- Joined: January 20th, 2013, 8:17 am
- Title: Lets all have fun
- BBQ Comp Team Name: Not competing yet...
- Location: Franklin,OH
- Contact:
Re: First build, stick burner 72" x 30" RF offset
Have to agree with you building is almost as fun as cooking. That's a fine looking smoker.-
- Similar Topics
- Replies
- Views
- Last post
-
- 2 Replies
- 2108 Views
-
Last post by Pete Mazz
-
- 14 Replies
- 7110 Views
-
Last post by ThinBlue
-
- 5 Replies
- 3780 Views
-
Last post by Frank_Cox
-
- 35 Replies
- 8271 Views
-
Last post by sinor81
-
- 1 Replies
- 4770 Views
-
Last post by Dirtytires