Smoker Clones are your own version of a commercially available Smoker. Examples are Stumps, Jambo, Backwoods, or any other you want to try to copy.
-
Gizmo
- Founder

- Posts: 6135
- Joined: July 23rd, 2011, 11:55 am
- Title: Member
- BBQ Comp Team Name: Edna's Kids Comp Team - KCBS Certified Judge
- Location: Kearney, NE
Post
by Gizmo » May 9th, 2013, 5:48 pm
Hole location should be through the side so you aren't messing with them every time you open the door. Average out the location so it can reach all the grates for different cuts of meat and the probe wire will still reach. BTW - Maverick sells high-temp probes with 6 foot leads that I find very handy some times.
Pit probe:
If you're cooking then dead center of the cook chamber and about an inch under one of the grates so it's out of the way.
If you're testing a new cooker then 2 inches above the center of the grate.

And on the eighth day God created barbecue …. because he DOES love us and he wants us to be happy.
Current smokers: Egor (trailered RF) and Easybake (tabletop pellet drive)
-
Nagaburns
- Just Got in trouble for buying tools

- Posts: 40
- Joined: November 18th, 2012, 5:51 pm
- Title: Member
- BBQ Comp Team Name: Serious Lee BBQ
KCBS : CBJ
- Location: Shropshire, UK
Post
by Nagaburns » May 9th, 2013, 5:56 pm
Thanks Rick

-
The Czar
- Expert

- Posts: 8334
- Joined: May 22nd, 2011, 9:30 am
- Title: Spam Hammerer
- BBQ Comp Team Name: Team SmokerBuilder- Competition BBQ Team
I'm Certifiable
- Location: Missouri
Post
by The Czar » May 10th, 2013, 11:41 pm
It's been an observation of mine that the cooler something looks....the more pain in the ass it is to fabricate!!! And that stack looks like it will be a pain the bollocks to skin!!!!!!
Sent from my iPhone using Forum Runner
-
Nagaburns
- Just Got in trouble for buying tools
- Posts: 40
- Joined: November 18th, 2012, 5:51 pm
- Title: Member
- BBQ Comp Team Name: Serious Lee BBQ
KCBS : CBJ
- Location: Shropshire, UK
Post
by Nagaburns » May 14th, 2013, 4:00 pm
Well I got some more done at the weekend and it looks like this now ....
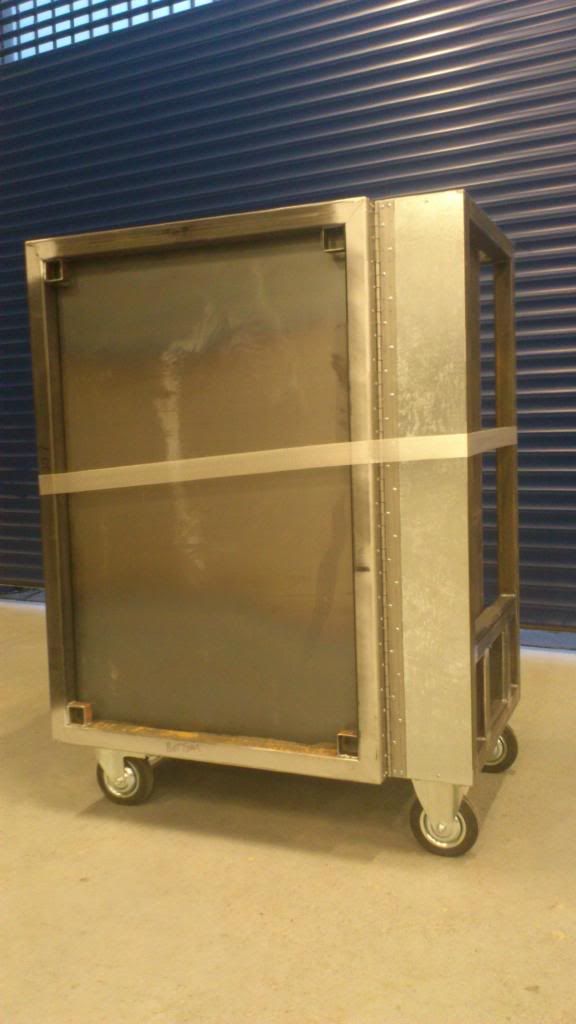
The wheels are on and they seem to be alright at the moment but I've got to add more weight to it yet and then I suppose I've got to consider all the brisket and ribs that'll be crammed inside too

I can see the light at the end of the tunnel now I've got this far with the build
and I've already got someone asking if I could put one together for them.
All the best,
Lee
-
Two Bears
- Just Got in trouble for buying tools
- Posts: 46
- Joined: March 8th, 2013, 6:26 pm
Post
by Two Bears » May 14th, 2013, 4:28 pm
Looks good.
Having a liberal along is like losing two good men.

-
Rodcrafter
- Moderator

- Posts: 8488
- Joined: July 21st, 2012, 5:46 pm
- Title: Member
- BBQ Comp Team Name: Not competing yet...
- Location: Orlando, Florida
Post
by Rodcrafter » May 15th, 2013, 8:11 am

I'm watching, your doing great!
Last edited by
Rodcrafter on May 16th, 2013, 2:01 pm, edited 1 time in total.
Current Smokers: Backyard RF Offset and Hybrid RF Offset trailer rig with Cowboy cooker and fish fryer, always room for more........
-
Nagaburns
- Just Got in trouble for buying tools
- Posts: 40
- Joined: November 18th, 2012, 5:51 pm
- Title: Member
- BBQ Comp Team Name: Serious Lee BBQ
KCBS : CBJ
- Location: Shropshire, UK
Post
by Nagaburns » May 16th, 2013, 3:01 pm
Thanks for the kind comments guys, the first beer is on me when you come over to the UK
Lee
-
Nagaburns
- Just Got in trouble for buying tools
- Posts: 40
- Joined: November 18th, 2012, 5:51 pm
- Title: Member
- BBQ Comp Team Name: Serious Lee BBQ
KCBS : CBJ
- Location: Shropshire, UK
Post
by Nagaburns » June 2nd, 2013, 4:02 am
-
Gizmo
- Founder
- Posts: 6135
- Joined: July 23rd, 2011, 11:55 am
- Title: Member
- BBQ Comp Team Name: Edna's Kids Comp Team - KCBS Certified Judge
- Location: Kearney, NE
Post
by Gizmo » June 2nd, 2013, 6:41 am
That's some nice looking work there. How did the first burn go? Or is it still burning?

And on the eighth day God created barbecue …. because he DOES love us and he wants us to be happy.
Current smokers: Egor (trailered RF) and Easybake (tabletop pellet drive)
-
The Czar
- Expert
- Posts: 8334
- Joined: May 22nd, 2011, 9:30 am
- Title: Spam Hammerer
- BBQ Comp Team Name: Team SmokerBuilder- Competition BBQ Team
I'm Certifiable
- Location: Missouri
Post
by The Czar » June 2nd, 2013, 7:33 am
Sweet....
Sent from my iPhone using Forum Runner
-
Clover Ridge Smokers
- Expert
- Posts: 2466
- Joined: December 1st, 2012, 4:42 pm
- Title: Driven By Passion
- BBQ Comp Team Name: Clover Ridge Smokers
- Location: Minnesota
Post
by Clover Ridge Smokers » June 2nd, 2013, 8:11 am
Looks great!!
Driven by Passion, Limited by Imagination
-
Nagaburns
- Just Got in trouble for buying tools
- Posts: 40
- Joined: November 18th, 2012, 5:51 pm
- Title: Member
- BBQ Comp Team Name: Serious Lee BBQ
KCBS : CBJ
- Location: Shropshire, UK
Post
by Nagaburns » June 2nd, 2013, 10:18 am
Thanks guys
Still burning Rick, I had the valve fully open for the first two or three hours to make sure any crap was burnt out of it and since then it has been merrily chugging along. Just put three racks of untrimmed ribs in that I pulled out of the freezer yesterday and I've got a dozen chicken thighs to go in in about 30 mins.
All the best
Lee
-
Gizmo
- Founder
- Posts: 6135
- Joined: July 23rd, 2011, 11:55 am
- Title: Member
- BBQ Comp Team Name: Edna's Kids Comp Team - KCBS Certified Judge
- Location: Kearney, NE
Post
by Gizmo » June 2nd, 2013, 12:32 pm

EXCELLENT!
And on the eighth day God created barbecue …. because he DOES love us and he wants us to be happy.
Current smokers: Egor (trailered RF) and Easybake (tabletop pellet drive)
-
Rodcrafter
- Moderator
- Posts: 8488
- Joined: July 21st, 2012, 5:46 pm
- Title: Member
- BBQ Comp Team Name: Not competing yet...
- Location: Orlando, Florida
Post
by Rodcrafter » June 2nd, 2013, 1:19 pm
That sure is some nice work you've done there. We will have to hear the stats as to how long and at what temp and then the details of that home made blower rig.

Current Smokers: Backyard RF Offset and Hybrid RF Offset trailer rig with Cowboy cooker and fish fryer, always room for more........
-
DUAYNE B
- Expert
- Posts: 931
- Joined: March 18th, 2012, 12:20 am
- BBQ Comp Team Name: Not competing yet...
- Location: phoenix, arizona
-
Contact:
Post
by DUAYNE B » June 2nd, 2013, 2:51 pm
-
Smoke_Chef
- beginner

- Posts: 11
- Joined: June 6th, 2012, 11:28 pm
Post
by Smoke_Chef » June 25th, 2013, 12:03 pm
Very cool. I love it!
-
Puff
- Expert
- Posts: 2352
- Joined: May 29th, 2013, 11:16 pm
- Title: Always All In !
- Location: New Jersey...Southern New Jersey
Post
by Puff » July 7th, 2014, 8:30 pm
Once again I have discovered a year old thread that I've read before. But now that I have this build in my garage ready to start, it takes on a whole new meaning.
I still find the concept of the chimney chute and firebox set up confusing. Does the overhanging shelf just redirect the flame and heat like a shadow plate might do?
Magnificent build by the way !!!
Make no mistake, there ain't no powder in this Puff ! And... I'm not really a crazy person but I play one in real life
-
Nagaburns
- Just Got in trouble for buying tools
- Posts: 40
- Joined: November 18th, 2012, 5:51 pm
- Title: Member
- BBQ Comp Team Name: Serious Lee BBQ
KCBS : CBJ
- Location: Shropshire, UK
Post
by Nagaburns » July 8th, 2014, 12:38 pm
Hello Puff
Thanks for the interest in my build thread.
When you mention the 'overhanging shelf' I am thinking you mean the part that protrudes from the firebox into the cook chamber...?
Anyhows, if that's the bit you're on about then it's there to create a more even heat distribution throughout the whole cooking area. I haven't cooked on a gravity feed pit without one so I can't tell you if it makes a massive difference but my research before the build highlighted that it can be a lot hotter on the firebox side of the cooking area without it. The material I used for it is 10mm thick and it added a fair bit of weight but when it's hot it stays hot. I think it might also have a stabilising effect on the temperature too because I don't used a blower on the cooker the temp changes happen slowly, a bit like steering a tanker

Hope this helps,
Lee
-
Puff
- Expert
- Posts: 2352
- Joined: May 29th, 2013, 11:16 pm
- Title: Always All In !
- Location: New Jersey...Southern New Jersey
Post
by Puff » July 8th, 2014, 4:42 pm
Hi Lee,
thank you for clarifying that for me. I understand your tanker analogy... You have done one spectacular job building your smoker. I like the plate that you used to help disperse the heat, as we know, good heat control is key. I am trying to avoid a similar tire situation as I have been advised that the finished smoker will be very close to 600 pounds ( 273kg in your neck of the woods) nothing here is paved or smooth it is either grass, gravel, or stone. Yesterday I acquired all of my tubing for the frame and tomorrow (July 9) I am picking up the skin materials.
I am grateful for your reply and will likely encounter several other questions. Take a peek back occasionally it would be great for me to have your input and suggestions.
Thanks.......
Make no mistake, there ain't no powder in this Puff ! And... I'm not really a crazy person but I play one in real life
-
Puff
- Expert
- Posts: 2352
- Joined: May 29th, 2013, 11:16 pm
- Title: Always All In !
- Location: New Jersey...Southern New Jersey
Post
by Puff » August 5th, 2014, 8:11 pm
Hi Lee,
It's almost a month since the last comment and I've been forging ahead. Do you recall the gauge of the interior and exterior walls on your cooker. Looking at your pictures again is like walking out to the garage and looking at my project...but of course, that would be.
My transfer tube is, in your measurement, is near 12mm and to weld it square, had to build wooden jigs to support it properly. Very heavy with a mind if it's own. Also using 8" foam filled tires on the casters.
Thanks in advance
Make no mistake, there ain't no powder in this Puff ! And... I'm not really a crazy person but I play one in real life
-
Nagaburns
- Just Got in trouble for buying tools
- Posts: 40
- Joined: November 18th, 2012, 5:51 pm
- Title: Member
- BBQ Comp Team Name: Serious Lee BBQ
KCBS : CBJ
- Location: Shropshire, UK
Post
by Nagaburns » August 7th, 2014, 5:42 pm
Hi Puff
Just checked out your thread and your cooker is shaping up nicely.
The gauge of the interior of my cook chamber is 2mm and the exterior is 1.2mm. The exterior of my cooker has a galv coating on the sheet material that makes it resistant to the crap weather we have here in the UK and it's worked so far

Your build looks similar to mine at the moment and I hope you don't mind me making a suggestion just incase you do what I did?
Add some height to the top of your fuel chute for the door to close down onto. So that when the door closes down on the top of your smoker and you're cooking the in the rainy season there will be no chance of any water getting into the fuel chute. It only happened once when I hadn't paid attention to the ground levels but the ingress of rainwater screwed with my temps and I had to run her with the vent fully open for a while afterwards

Now I just park that end of the cooker on a board bout 1/2 inch thick so the rain runs away in the opposite direction

Hope that helps,
all the best
Lee
-
Puff
- Expert
- Posts: 2352
- Joined: May 29th, 2013, 11:16 pm
- Title: Always All In !
- Location: New Jersey...Southern New Jersey
Post
by Puff » August 7th, 2014, 8:17 pm
Hi Lee, a very good idea. Thank you for replying. The entire unit has gotten heavy in the last few days. Using 8" foam filled wheels which will be here tomorrow. My side door is a flush mount and closes into the side so it does not protrude and that was the plan for the top but I need to make a change there to accommodate your good suggestion. I assume despite the gaskets, water will infiltrate the top door without some type of guard on it
My front door quick release latch arrived today and the hinges are here. I'll be using the toggle latches on all the doors but added one of those 1950's style refrigerator door latches for short term opening / closing. I hope to be able to close the door while unloading the racks or whatever needs to be without latching the front door repeatedly.
The pictures show the door frame for the side and the recess for the top. The top section of the chute is not yet welded in place and that 1" flange is to be used for the gasket to press up to. You're recommending to add the extra two inches to the chute to extend it so the door closes against the flange on the top instead of in the recess.
Make no mistake, there ain't no powder in this Puff ! And... I'm not really a crazy person but I play one in real life
-
Rodcrafter
- Moderator
- Posts: 8488
- Joined: July 21st, 2012, 5:46 pm
- Title: Member
- BBQ Comp Team Name: Not competing yet...
- Location: Orlando, Florida
Post
by Rodcrafter » August 8th, 2014, 7:17 am
Current Smokers: Backyard RF Offset and Hybrid RF Offset trailer rig with Cowboy cooker and fish fryer, always room for more........
-
-
- 13 Replies
- 7780 Views
-
Last post by Dirtytires
-
-
- 56 Replies
- 18155 Views
-
Last post by Barrion2018
-
-
- 2 Replies
- 3344 Views
-
Last post by Tower870
-
-
- 11 Replies
- 6320 Views
-
Last post by Dirtytires