Build thread, mini gravity fed smoker.
Re: Build thread, mini gravity fed smoker.
Oh and video I took of mixing the paint, I have always liked the way metallic paints look when your mixing them so I had to video tape it! hahaaa I know thats probably strange but heres the vid anyway 

-
Rodcrafter

- Moderator

- Posts: 8488
- Joined: July 21st, 2012, 5:46 pm
- Title: Member
- BBQ Comp Team Name: Not competing yet...
- Location: Orlando, Florida
Re: Build thread, mini gravity fed smoker.
Very nice, the poster too!
Making memories.
Making memories.
Current Smokers: Backyard RF Offset and Hybrid RF Offset trailer rig with Cowboy cooker and fish fryer, always room for more........

Re: Build thread, mini gravity fed smoker.
We fired it up last night and got it broke in. Sprayed the whole thing down "inside of it" with cooking oil and got it up to 300, then settled it in at 275 or so for a few hours. Works great with just the ball valve to control temp, I was very impressed how well it responded to adjustments and held temp very solid! Should be a real pleasure to cook with.
Re: Build thread, mini gravity fed smoker.
We lit about 1/3 of a chimney of charcoal and dumped it right into the chute, then put a little more on top of the lit charcoal. Initially we shut all the doors and was just waiting for it to come to temp, about 20 minutes in the temp was around 150 and we decided to give it a little boost so opened up the ash door and the temp really went up fast after that. I think it was around 40 minutes or so it was up to a good 270-300 range. We didnt pay close enough attention because it was freezing outside so that might have effected it a little bit too.
Of course with a fan it would be much faster I imagine.
Of course with a fan it would be much faster I imagine.
-
Puff

- Expert

- Posts: 2352
- Joined: May 29th, 2013, 11:16 pm
- Title: Always All In !
- Location: New Jersey...Southern New Jersey
Re: Build thread, mini gravity fed smoker.
Hey Scottyk,
Had not seen the site in a few days but coming back to read this is terrific. You guys did a fabulous job. You have to be thrilled. My big gf runs the same way if it means anything.. I think....THINK, that the fixed velocity at the air flow valve and based on the opening of the fire slot, it keeps the temp...very consistent. Even your temperature rise time is about the same. During the 45-60 minutes at startup, I try to get everything else set up. Foil, juices, rub, tongs, probes...Etc.
If you don't mind.....did you recess the rivets so that grinding the heads off kept them in place? What kind of bondo is used. Your finish looks factory !! Very happy that this looks and works so well. Congratulations on both babies....the steel one as well.
Make no mistake, there ain't no powder in this Puff ! And... I'm not really a crazy person but I play one in real life
-
WyomingLawDog
- Wants More tools

- Posts: 119
- Joined: February 3rd, 2015, 8:15 pm
Re: Build thread, mini gravity fed smoker.
Great looking scottyk, your smokers look awesome. I am curious on how you recessed your rivets also as I think I am going to go that route on mine. I have my frame and most of my firebox/charcoal chimney built. I have all my sheet metal cut out in pieces, loved using a plasma table to cut out my pieces, it even cut out the 1/2 in plate really nice. But if I can learn from you on the rivets and bondo, I would like to go that route as my welding has been a growing pain so far as it will hold with no leaks, just not real pretty. So the rest of my smoker should start coming together quicker that everything is cut and ready to be assembled. But again great job on those smokers! 
-
forty_creek

- Expert
- Posts: 1130
- Joined: January 11th, 2015, 7:06 pm
- Title: 40 Ways 2 Kansas
- BBQ Comp Team Name: Not competing yet...
- Location: Springhill,LA
Re: Build thread, mini gravity fed smoker.
Strong Work! Paint job is sweeeet!!!
Drankin, Smokin and Dreamin
Sent from my iPhone using Tapatalk
Drankin, Smokin and Dreamin
Sent from my iPhone using Tapatalk
DRANKIN, SMOKIN and DREAMIN
Re: Build thread, mini gravity fed smoker.
Thanks a bunch guys! Really looking forward to getting the 2nd one finished up pretty soon here. The rivets are actually countersunk head so all the holes have been drilled and countersunk after that. Theres quite a few there to do! but there are a few on the smokers we didnt countersink deep enough so they had to be sanded down a little bit to keep it all level.
These rivets had to be ordered from amazon because I couldnt find them anywhere locally, I think I ended up using 400-500 between both of these.
I used some duraglass reinforced filler first, then lightweight filler over the top of that for the final touch's. Some spots during initial firing shrunk the bondo, mainly around the ash door where it actually got hot enough to burn the paint and discolor it. To be fair we fired it up 2 days after spraying the paint so all the filler and paint probably was not fully cured. So I cannot say with 100% certainty that filler is the best way to finish the edges. Im sure welding them would be the best but then you have to live with the warpage of welding, which could "in my mind" tweak the entire smoker, not to mention it will be wavy all over.
Re: Build thread, mini gravity fed smoker.
Oh and we weighed the bare smoker, it was 470lbs with no paint and missing a couple small parts. So its safe to say these are 480-500 lbs cook ready, maybe a smidge over that loaded with food and charcoal!
-
Rodcrafter
- Moderator
- Posts: 8488
- Joined: July 21st, 2012, 5:46 pm
- Title: Member
- BBQ Comp Team Name: Not competing yet...
- Location: Orlando, Florida
Re: Build thread, mini gravity fed smoker.
Ok thanks, my new FB weighs more than that. Lol
Making memories.
Making memories.
Current Smokers: Backyard RF Offset and Hybrid RF Offset trailer rig with Cowboy cooker and fish fryer, always room for more........
Re: Build thread, mini gravity fed smoker.
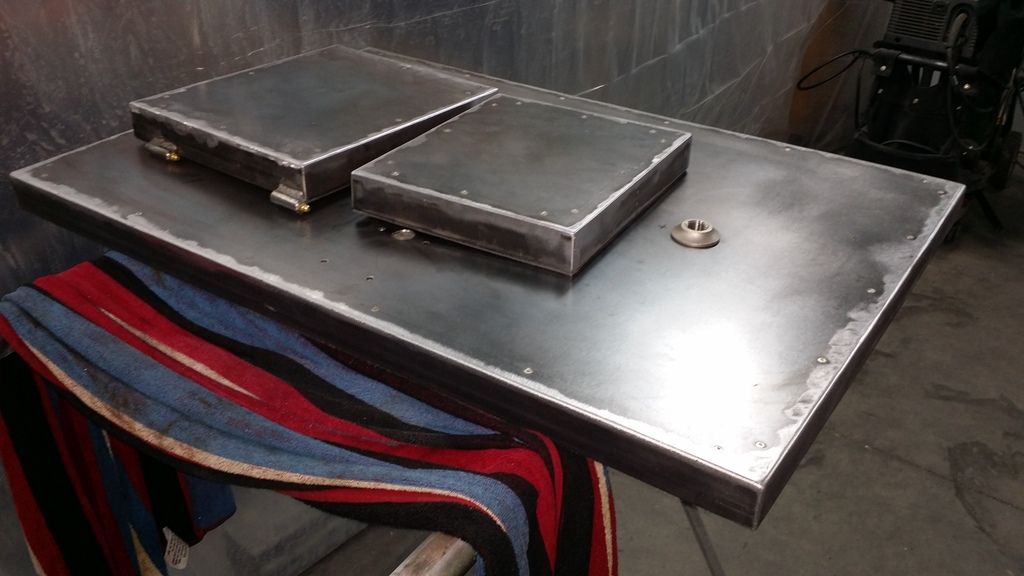
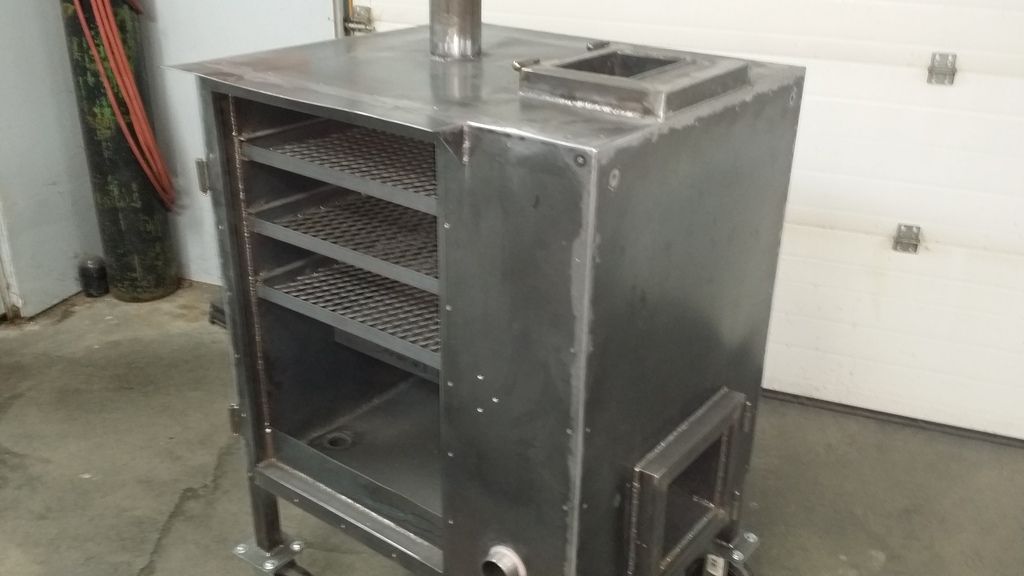
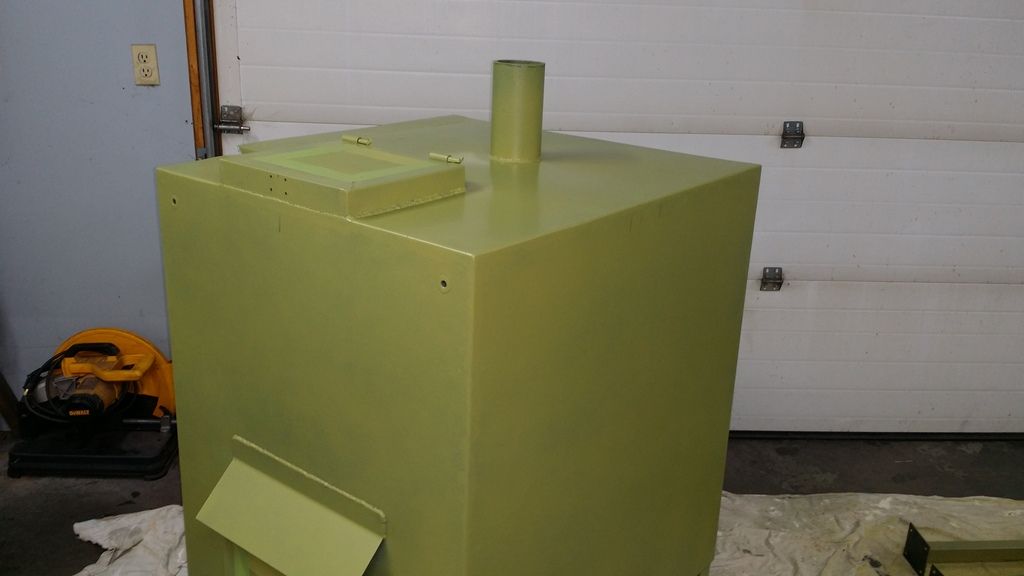
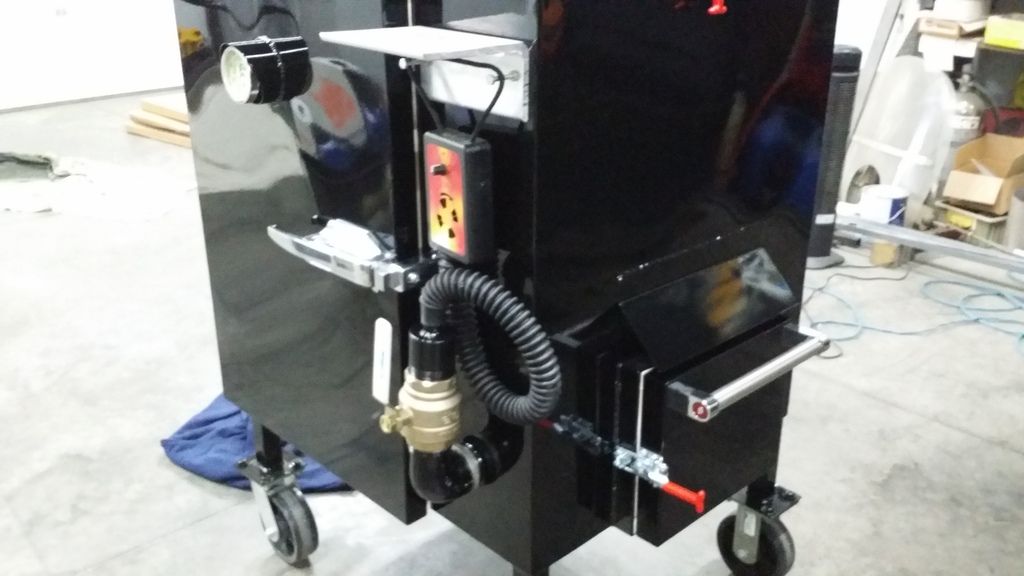
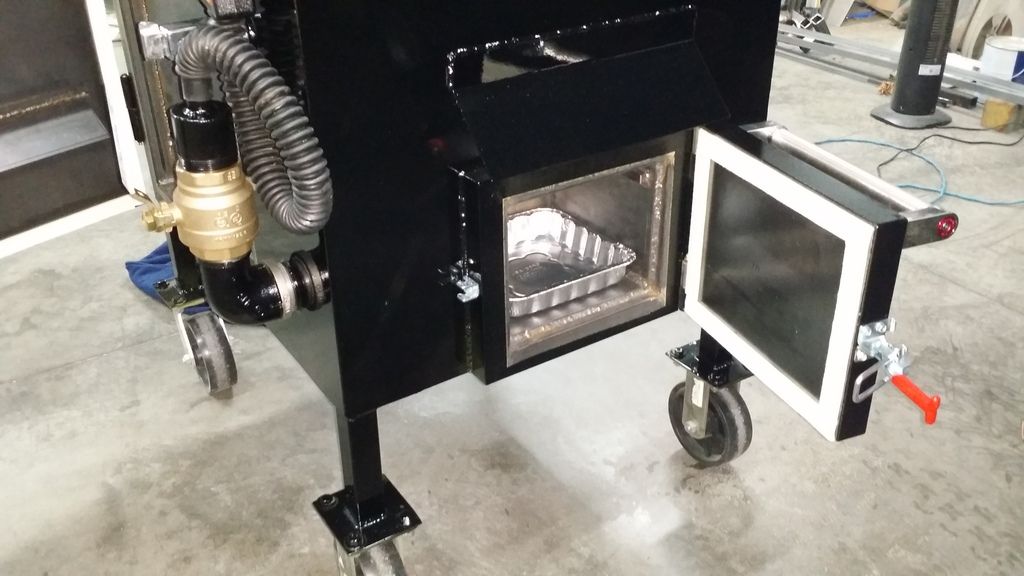
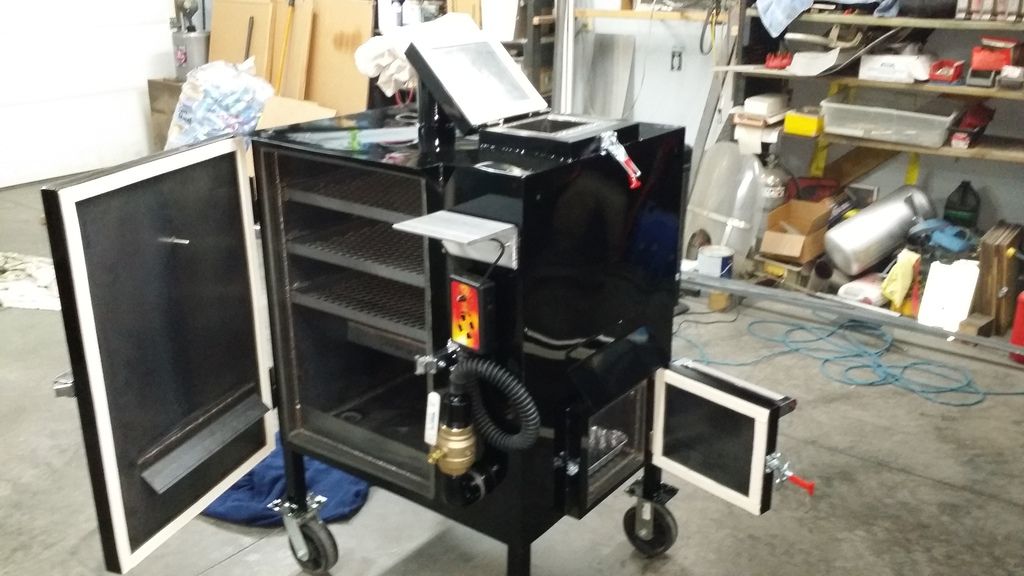
Well, got the 2nd smoker finished"ish" it is at least able to cook food.. This one has a few more trinkets on it. Put a little guard over the temp gauge on the front. 3.5" exhaust tube I simply cut a angle into and welded it on concentric with the bung. also used a chunk of aluminum angle to make a shelf in the front of the smoker to hold misc stuff. Also made an adapter to use my Pitmaster IQ110, I plan to put walls around side and front built of lexan so it should be ok to use in the rain. This smoker has all welded seams around the perimeter and it did get some pretty good warpage on some flat surfaces. Mostly the front door and top because they have welds located in the center of the panels "chimney on top, and thermometer on door" Also if you look close you can see I added 4 threaded bungs to the smoker that you can use to bolt on shelf's, tie downs for trailer or even put some long bolts in there so you can lift it easier.
Here you can see 2 of the threaded bungs on the side.

After a little grinding.
Added lip over the top of main door for rain deflector, not sure if thats nessecary but hey why not.
Time to get working, self etching primer over bare metal. Once sprayed you have a certain amount of time to lay down base coat, after base coat you have a certain amount of time to lay down clear, if you want it all to stick to each other anyway. If you dont get it all done in time then you must sand or scuff so the next layer will have mechanical adhesion to previous layer. This is NOT a filler primer so dont expect any grinding marks to be covered up. On the floor you can see some extensions I made so I can lift the smoker up 18" this will put it at a comfy height so I can wheel it right up to my deck instead of having to cook in my driveway.
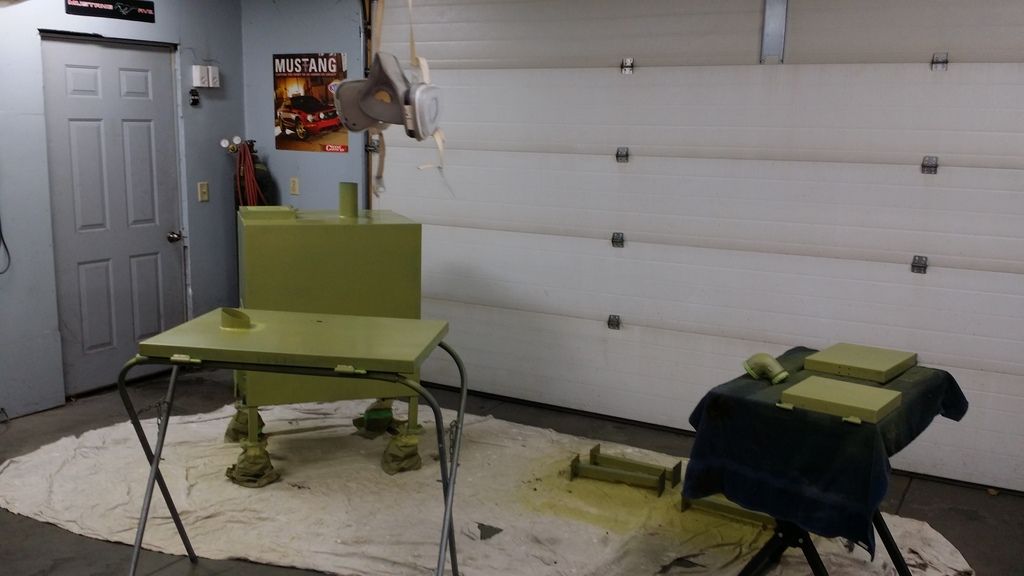
No pictures in between I was busy spraying, mixing, and running outside for fresh air LOL
I will be doing some airbrush work on this once I feel like it.. Not sure when it will be, I have to be in the right frame of mind, I am not real artistic so I have to be in the right mood for that type of work! For that I will scuff the clear with fine scotch brite pad, then airbrush and clear over the whole thing again.
So far I have only used manual ball valve control with it and I have to say it holds temp great. I lit it with a torch and put a fan blowing into ash door to get this moving along. 2nd time I lit it I forgot about the fan and a little over a hr in I checked it and the gauge on the door was over 400!! yikes that was hot, opened the door and there was flame coming out of the channel LOL so I removed fan and shut the door, took a little while to calm her down to 300 from that! I will hopefully be using the fan controller this weekend. Im impressed, this is my first smoker, before this I used a 18" weber kettle so this thing is a dream, no adding charcoal, no changing vents every 20 minutes, its great!
Here you can see 2 of the threaded bungs on the side.

After a little grinding.

Added lip over the top of main door for rain deflector, not sure if thats nessecary but hey why not.

Time to get working, self etching primer over bare metal. Once sprayed you have a certain amount of time to lay down base coat, after base coat you have a certain amount of time to lay down clear, if you want it all to stick to each other anyway. If you dont get it all done in time then you must sand or scuff so the next layer will have mechanical adhesion to previous layer. This is NOT a filler primer so dont expect any grinding marks to be covered up. On the floor you can see some extensions I made so I can lift the smoker up 18" this will put it at a comfy height so I can wheel it right up to my deck instead of having to cook in my driveway.


No pictures in between I was busy spraying, mixing, and running outside for fresh air LOL


I will be doing some airbrush work on this once I feel like it.. Not sure when it will be, I have to be in the right frame of mind, I am not real artistic so I have to be in the right mood for that type of work! For that I will scuff the clear with fine scotch brite pad, then airbrush and clear over the whole thing again.
So far I have only used manual ball valve control with it and I have to say it holds temp great. I lit it with a torch and put a fan blowing into ash door to get this moving along. 2nd time I lit it I forgot about the fan and a little over a hr in I checked it and the gauge on the door was over 400!! yikes that was hot, opened the door and there was flame coming out of the channel LOL so I removed fan and shut the door, took a little while to calm her down to 300 from that! I will hopefully be using the fan controller this weekend. Im impressed, this is my first smoker, before this I used a 18" weber kettle so this thing is a dream, no adding charcoal, no changing vents every 20 minutes, its great!

Re: Build thread, mini gravity fed smoker.
It looks awesome!! What do you think the max temp would be just using the ball valve.
Sent from my XT1080 using Tapatalk
Sent from my XT1080 using Tapatalk
-
Rodcrafter
- Moderator
- Posts: 8488
- Joined: July 21st, 2012, 5:46 pm
- Title: Member
- BBQ Comp Team Name: Not competing yet...
- Location: Orlando, Florida
Re: Build thread, mini gravity fed smoker.
I bet 350 ish nice job
Making memories.
Making memories.
Current Smokers: Backyard RF Offset and Hybrid RF Offset trailer rig with Cowboy cooker and fish fryer, always room for more........
-
Weldun

- Expert
- Posts: 588
- Joined: December 24th, 2015, 3:40 pm
- Title: I'm no expert
- BBQ Comp Team Name: Not competing yet...
- Location: Northern Indiana
Re: Build thread, mini gravity fed smoker.
Craftsmanship at its finest with great attention to detail, very nice!
Grandma always said "if ya can't be handsome ya better at least be handy"
-
Big T

- Moderator
- Posts: 6897
- Joined: September 1st, 2013, 2:40 pm
- Title: Go Getter
- BBQ Comp Team Name: Backyard Boys
- Location: Lower Alabama
Re: Build thread, mini gravity fed smoker.
Measure Twice.....Cut Three Times.
Re: Build thread, mini gravity fed smoker.
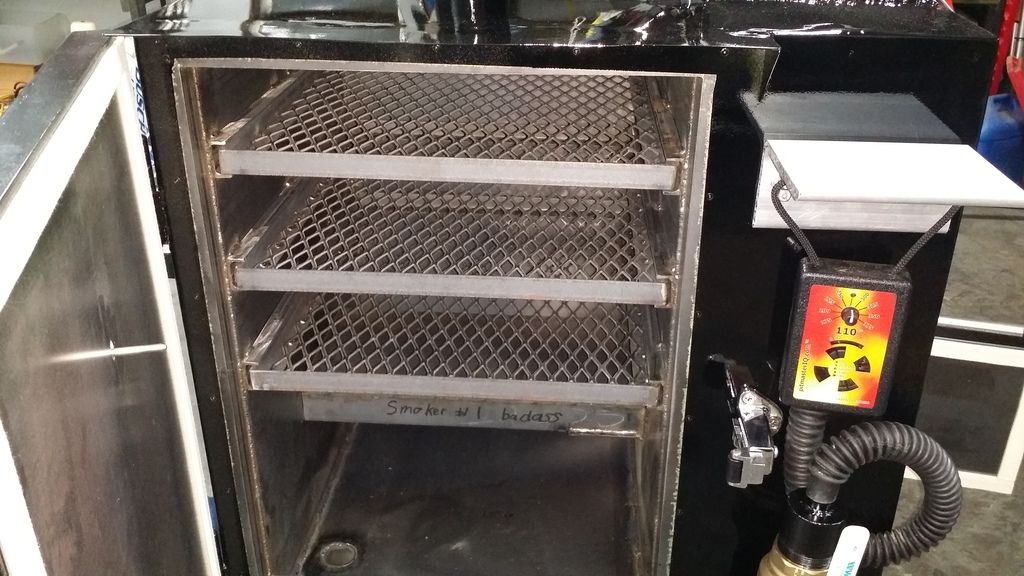
Thanks everybody its been a fun project! I have found the thermometer on the door does read about 50 lower than the middle of the center rack. I was doing a little testing while cooking chicken the other day, but I will put a disclaimer in there saying this was only a 1.5 hr cook and the longer I left it alone the closer in temp they kept getting. I had a Maverick wireless thermometer in there I was comparing it with.
You can at least hold a solid 350 will ball valve, I would imagine even more if you wanted! You could always crack the ash door open to give it even more air is you wanted too. I had it cooking in below zero temps last no problem!
You can at least hold a solid 350 will ball valve, I would imagine even more if you wanted! You could always crack the ash door open to give it even more air is you wanted too. I had it cooking in below zero temps last no problem!
-
Puff
- Expert
- Posts: 2352
- Joined: May 29th, 2013, 11:16 pm
- Title: Always All In !
- Location: New Jersey...Southern New Jersey
Re: Build thread, mini gravity fed smoker.
You've got a great smoker... Excellent job. I've had the bigger brother of this gf over 380 and have never added the controller to it...still.
Make no mistake, there ain't no powder in this Puff ! And... I'm not really a crazy person but I play one in real life
Re: Build thread, mini gravity fed smoker.
That is an awesome job!
Sent from my XT1080 using Tapatalk
Sent from my XT1080 using Tapatalk
-
Tim Schmidt
- Just Got in trouble for buying tools

- Posts: 36
- Joined: September 9th, 2014, 8:01 am
- Title: Member
- BBQ Comp Team Name: Not competing yet...
- Location: Wisconsin
Re: Build thread, mini gravity fed smoker.
Have you had a chance to run your smoker with the pitmaster iq??
Just wondering how it performed.
Thanks
TIm
Just wondering how it performed.
Thanks
TIm
Re: Build thread, mini gravity fed smoker.
Yes I did run it with the IQ, works great now. I found it needs to set on "Max blow mode" this will eliminate the constant on-off of the fan and only runs it full power or no power. It will now totally run on its own, and recovers in no time.
I initially had issues with the IQ blowing enough air to stoke the fire "ball valve flowed more air" but now that I put in the mode designed for gravity feed smokers it is great.
I initially had issues with the IQ blowing enough air to stoke the fire "ball valve flowed more air" but now that I put in the mode designed for gravity feed smokers it is great.
-
Rodcrafter
- Moderator
- Posts: 8488
- Joined: July 21st, 2012, 5:46 pm
- Title: Member
- BBQ Comp Team Name: Not competing yet...
- Location: Orlando, Florida
Re: Build thread, mini gravity fed smoker.
Cool
Making memories.
Making memories.
Current Smokers: Backyard RF Offset and Hybrid RF Offset trailer rig with Cowboy cooker and fish fryer, always room for more........
-
- Similar Topics
- Replies
- Views
- Last post
-
- 7 Replies
- 3967 Views
-
Last post by JH1973
-
- 14 Replies
- 7110 Views
-
Last post by ThinBlue
-
- 11 Replies
- 5279 Views
-
Last post by Dirtytires
-
- 5 Replies
- 3780 Views
-
Last post by Frank_Cox
-
- 8 Replies
- 5653 Views
-
Last post by sfarbic