Standard Offset Trailer Build
-
Big T

- Moderator

- Posts: 6897
- Joined: September 1st, 2013, 2:40 pm
- Title: Go Getter
- BBQ Comp Team Name: Backyard Boys
- Location: Lower Alabama
Re: Standard Offset Trailer Build
Heck yeah, that turned out great!
Measure Twice.....Cut Three Times.

-
dacolson
Re: Standard Offset Trailer Build
Thought of you today BigT. Cut the FB opening too deep for the new baffle so I cut a strip off the section of the bell and added it back in. Then realized I didn’t account for the the throat baffle in the smaller opening. Had to add steel back in and cut some corners off and rewelded a bunch of crap. Measured twice, cut 3 times, welded some stuff back in, cut again ... FML!
-
hogaboomer
- Expert

- Posts: 919
- Joined: July 15th, 2019, 9:47 am
- Title: old pipe welder
- BBQ Comp Team Name: Not competing yet...
- Location: Groves, TX.
-
tinspark
- Expert
- Posts: 607
- Joined: February 20th, 2020, 3:08 pm
- Title: Papa Oso
- Location: West Coast USA
Re: Standard Offset Trailer Build
Yeah that looks great. I like the triangles. Looks cool, yet achieves the ability to turn the air abruptly to the top of the CC, then back down low through the stack opening. That's apparently the ticket and the cat's meow when it comes to offset cookers.
Regards,
"tinspark's" build links below:
Last build-GF:https://smokerbuilder.com/forums/viewto ... 30#p114730
First build- Santa Maria Smoker: https://smokerbuilder.com/forums/viewto ... 7a614a230a
Santa Maria Rebuild: viewtopic.php?f=17&t=7533&p=112344&hili ... 34#p112344
"tinspark's" build links below:
Last build-GF:https://smokerbuilder.com/forums/viewto ... 30#p114730
First build- Santa Maria Smoker: https://smokerbuilder.com/forums/viewto ... 7a614a230a
Santa Maria Rebuild: viewtopic.php?f=17&t=7533&p=112344&hili ... 34#p112344
-
dacolson
Re: Standard Offset Trailer Build
I gotta get a plasma table. Getting the fit up close on this was a trial.
-
Big T
- Moderator
- Posts: 6897
- Joined: September 1st, 2013, 2:40 pm
- Title: Go Getter
- BBQ Comp Team Name: Backyard Boys
- Location: Lower Alabama
Re: Standard Offset Trailer Build
Haha, it happens to the best of us.dacolson wrote: ↑September 2nd, 2020, 5:38 pmThought of you today BigT. Cut the FB opening too deep for the new baffle so I cut a strip off the section of the bell and added it back in. Then realized I didn’t account for the the throat baffle in the smaller opening. Had to add steel back in and cut some corners off and rewelded a bunch of crap. Measured twice, cut 3 times, welded some stuff back in, cut again ... FML!
Measure Twice.....Cut Three Times.
-
dacolson
Re: Standard Offset Trailer Build
Haven’t had a ton of time to work but snuck some time in evenings this week to weld up the fire box.
-
tinspark
- Expert
- Posts: 607
- Joined: February 20th, 2020, 3:08 pm
- Title: Papa Oso
- Location: West Coast USA
Re: Standard Offset Trailer Build
Looks good Dave,
Off to a really good start. Noticed U chopped the short trailer tongue off
R U planning on lengthening it a bit?
Off to a really good start. Noticed U chopped the short trailer tongue off
R U planning on lengthening it a bit?
Regards,
"tinspark's" build links below:
Last build-GF:https://smokerbuilder.com/forums/viewto ... 30#p114730
First build- Santa Maria Smoker: https://smokerbuilder.com/forums/viewto ... 7a614a230a
Santa Maria Rebuild: viewtopic.php?f=17&t=7533&p=112344&hili ... 34#p112344
"tinspark's" build links below:
Last build-GF:https://smokerbuilder.com/forums/viewto ... 30#p114730
First build- Santa Maria Smoker: https://smokerbuilder.com/forums/viewto ... 7a614a230a
Santa Maria Rebuild: viewtopic.php?f=17&t=7533&p=112344&hili ... 34#p112344
-
dacolson
Re: Standard Offset Trailer Build
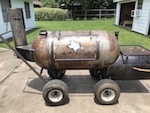
Yup. Got 2 x 6’ lengths of 2x4 channel for a new tongue and hitch.
Got a quote for $200 to sandblast the trailer today. Worth it?
-
andysmoked

- Big Time SmokerBuilder

- Posts: 185
- Joined: April 15th, 2020, 11:42 pm
Re: Standard Offset Trailer Build
Looking good Dave. I really like that baffle.
Sent from my iPhone using Tapatalk
Sent from my iPhone using Tapatalk
-
dacolson
Re: Standard Offset Trailer Build
thx andysmoked. hopefully it worksandysmoked wrote: ↑September 11th, 2020, 2:04 amLooking good Dave. I really like that baffle.
Sent from my iPhone using Tapatalk
-
SheffSmoker

- Expert
- Posts: 393
- Joined: June 12th, 2020, 11:45 am
- Title: Junk Fettler
- BBQ Comp Team Name: Not competing, normally too drunk.
- Location: UK
Re: Standard Offset Trailer Build
Awesome stuff as always, Dave. Is there a reason you chose two doors over a single one?
You can never have too many hammers.
-
tinspark
- Expert
- Posts: 607
- Joined: February 20th, 2020, 3:08 pm
- Title: Papa Oso
- Location: West Coast USA
Re: Standard Offset Trailer Build
That all depends on what you your time is worth. Most wouldn't notice the transition between the slight bump between raw steel and new steel. I might save the $200 and sand a little between the two, which would get rid of the paint transition, Also If you have a DA sander you could also rough up the paint without making swirl marks like a sanding disc might do, which would help the new paint to stick. I think you can make it look just as good by spending an hour or so on it. If you don't have a Dual Action sander you can buy one at a local building store for around $60 > Home depot. Then you would have it for the next build too. IMO and 2cents
Regards,
"tinspark's" build links below:
Last build-GF:https://smokerbuilder.com/forums/viewto ... 30#p114730
First build- Santa Maria Smoker: https://smokerbuilder.com/forums/viewto ... 7a614a230a
Santa Maria Rebuild: viewtopic.php?f=17&t=7533&p=112344&hili ... 34#p112344
"tinspark's" build links below:
Last build-GF:https://smokerbuilder.com/forums/viewto ... 30#p114730
First build- Santa Maria Smoker: https://smokerbuilder.com/forums/viewto ... 7a614a230a
Santa Maria Rebuild: viewtopic.php?f=17&t=7533&p=112344&hili ... 34#p112344

Re: Standard Offset Trailer Build
Looking good!.
$200 for just the trailer?......meh, I know it's lots of works blasting all the nooks and crannies so the labor is there.....you either scuff it yourself or pay.....I would get a quote to blast the completed rig and make up my mind there.....
Since I cannot keep paint on my rig I have given up caring how it looks...as long as it's not rotting away I'm good with a little rust.
-
dacolson
Re: Standard Offset Trailer Build
Lol. Love it.towtruck wrote: ↑September 11th, 2020, 2:31 pmLooking good!.
$200 for just the trailer?......meh, I know it's lots of works blasting all the nooks and crannies so the labor is there.....you either scuff it yourself or pay.....I would get a quote to blast the completed rig and make up my mind there.....
Since I cannot keep paint on my rig I have given up caring how it looks...as long as it's not rotting away I'm good with a little rust.
-
tinspark
- Expert
- Posts: 607
- Joined: February 20th, 2020, 3:08 pm
- Title: Papa Oso
- Location: West Coast USA
Re: Standard Offset Trailer Build
Also, since it sounds like you have been duking it out with your buddy on firebox construction and 1 door vs. 2 doors, you may want his input, especially if he's paying for everything. You might mention that if he doesn't get that orange off, the top paint may flake or chip in spots and show the orange. If you paint it black and the orange starts coming through, he would have a Halloween theme LOL! < kidding aside.
I built and painted a utility trailer 20 plus yrs ago and still own it, and it still hasn't lost much paint even with using spray paint. It has faded some though. I primed it first then painted flat black.. But it was all new channel iron, and back then the paint may have been better because of the newer EPA standards.
If he doesn't want to spend the money and in 5 years the orange shows, then you gave him the decision, but you may not wanna bear that when someone sees it and he say's, "Yeah Dave built it".. Ha!
I would just leave it and touch it up with a spray can if it was mine though. But that's easy for me to say, because I am not building a smoker for a buddy, or for sale, and my name is not attached to it........ So.............?
Pros and cons to both. Just saves $200 clams the one way.
Towtrucks idea idea is good also
But you may want to also get a quote from another sand blaster along with the first one, and then have something to compare to. The original one may just automatically bump it up based on your request for an add item
Regards,
"tinspark's" build links below:
Last build-GF:https://smokerbuilder.com/forums/viewto ... 30#p114730
First build- Santa Maria Smoker: https://smokerbuilder.com/forums/viewto ... 7a614a230a
Santa Maria Rebuild: viewtopic.php?f=17&t=7533&p=112344&hili ... 34#p112344
"tinspark's" build links below:
Last build-GF:https://smokerbuilder.com/forums/viewto ... 30#p114730
First build- Santa Maria Smoker: https://smokerbuilder.com/forums/viewto ... 7a614a230a
Santa Maria Rebuild: viewtopic.php?f=17&t=7533&p=112344&hili ... 34#p112344
-
dacolson
Re: Standard Offset Trailer Build
Thx Dirtytires and Tinspark. Helpful.
So ... I wanted to get the trailer done before I put the pit on and that made the sanding vs blasting decision for me. No blasting shops could get it done in time for me to paint it before the temps drop too far. And ... I really need to get back to work on the pit. So I picked up a pile of 3” paint removing pads for my air grinder and hit the whole thing. I didn’t take it down to steel unless it was flaking. Just knocked the edges down and took the top layer off. Then I hit it with the wire wheel to rough it up. First coat of primer went on this evening. And if it flakes, I live in MN and he lives in TN. Hahaha
So ... I wanted to get the trailer done before I put the pit on and that made the sanding vs blasting decision for me. No blasting shops could get it done in time for me to paint it before the temps drop too far. And ... I really need to get back to work on the pit. So I picked up a pile of 3” paint removing pads for my air grinder and hit the whole thing. I didn’t take it down to steel unless it was flaking. Just knocked the edges down and took the top layer off. Then I hit it with the wire wheel to rough it up. First coat of primer went on this evening. And if it flakes, I live in MN and he lives in TN. Hahaha
-
Rodcrafter

- Moderator
- Posts: 8488
- Joined: July 21st, 2012, 5:46 pm
- Title: Member
- BBQ Comp Team Name: Not competing yet...
- Location: Orlando, Florida
Re: Standard Offset Trailer Build
I'm glad he went with the square FB. On that point why is the FB to CC opening so big? I'm not criticizing just wondering if you are using the same Pit Calculator number as when you were going to have the warming cabinet on the opposite end. Typically the opening is well below the center line of the CC. This would allow for a shadow plate and BP below the bottom rack, if you were going to have those.
I have made almost the same build of the original drawing and modified it to something much different. I always try crazy stuff, with the idea of making it the best.
I have made almost the same build of the original drawing and modified it to something much different. I always try crazy stuff, with the idea of making it the best.
Current Smokers: Backyard RF Offset and Hybrid RF Offset trailer rig with Cowboy cooker and fish fryer, always room for more........
-
dacolson
Re: Standard Offset Trailer Build
Hey Rodcrafter - glad to get your input. The opening is from the pitcalc recommendation. I rounded the numbers up/down per below to 20x10x5:Rodcrafter wrote: ↑September 17th, 2020, 8:00 amI'm glad he went with the square FB. On that point why is the FB to CC opening so big? I'm not criticizing just wondering if you are using the same Pit Calculator number as when you were going to have the warming cabinet on the opposite end. Typically the opening is well below the center line of the CC. This would allow for a shadow plate and BP below the bottom rack, if you were going to have those.
I have made almost the same build of the original drawing and modified it to something much different. I always try crazy stuff, with the idea of making it the best.
I do like crazy designs, but this one will be pretty straight forward after the initial requests settled down. No warming cabinet at the opposite end and sticking with the square FB. I did find some old round Ford hubcaps to throw on there lol
-
Rodcrafter
- Moderator
- Posts: 8488
- Joined: July 21st, 2012, 5:46 pm
- Title: Member
- BBQ Comp Team Name: Not competing yet...
- Location: Orlando, Florida
Re: Standard Offset Trailer Build
I see now, when I saw the opening on the CC I thought the whole thing was going to be throat. Interesting idea to help direct the heat/smoke even though it takes that path anyway. It's going to be a nice rig. Good job!
Current Smokers: Backyard RF Offset and Hybrid RF Offset trailer rig with Cowboy cooker and fish fryer, always room for more........
-
dacolson
Re: Standard Offset Trailer Build
Thx Rodcrafter. Hope so.Rodcrafter wrote: ↑September 17th, 2020, 9:27 amI see now, when I saw the opening on the CC I thought the whole thing was going to be throat. Interesting idea to help direct the heat/smoke even though it takes that path anyway. It's going to be a nice rig. Good job!
-
dacolson
Re: Standard Offset Trailer Build
Hoping for two effects. 1. better/more even top-down heat from convection. 2. less microwave action right there at the FB end of the grate. I'll do some testing before it goes on it's way to TN.dacolson wrote: ↑September 17th, 2020, 9:30 amThx Rodcrafter. Hope so.Rodcrafter wrote: ↑September 17th, 2020, 9:27 amI see now, when I saw the opening on the CC I thought the whole thing was going to be throat. Interesting idea to help direct the heat/smoke even though it takes that path anyway. It's going to be a nice rig. Good job!
-
dacolson
Re: Standard Offset Trailer Build
Finished up the trailer painting today and started on the firebox door while I let the paint dry and harden up. Used a Rustoleum Rust Reformer and then hit it with Rustoleum Undercoating on the bottom.
On the door, I'm drilling and hole weld the strapping on. This is a the first attempt. Gonna have to do it over. I drilled the holes too small. The welds are already popping. Good news is that the strapping stayed flat on the doors while they lasted LOL. I do like the riveted look.
-
- Similar Topics
- Replies
- Views
- Last post
-
- 1 Replies
- 6746 Views
-
Last post by tinspark
-
- 1 Replies
- 6117 Views
-
Last post by Dirtytires
-
- 1 Replies
- 3535 Views
-
Last post by Dirtytires
-
- 13 Replies
- 7704 Views
-
Last post by Dirtytires
-
- 56 Replies
- 17927 Views
-
Last post by Barrion2018