Made some great progress over the past few days. Got the CC door cut, hinged and flanged. I went for inside flanges. The tank is thin enough though that the tank tweaked a bit when I welded in the baffle plate. Gonna see if I can bend it back so the doors lay flat again. If not, I may switch to exterior flanges on the doors. Here’s a rundown:
Doors cut with the interior flanges. You can see the baffle plate tacked in here:

Here’s a shot of the shadow plate I put in before I put the baffle plate in. It’s about 12” long and 2” below where the BP will go.

Shot of the door hinges. I used the spec plate from the tank as the door stop. Hinges are 1/2” round stock and DOM:

Added a little bump out in the BP gap. Not as dramatic as I’d hoped it would be:

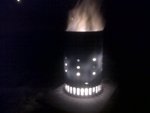
Built out the smoke collector and stack as well. Same design as the TN smoker I just finished:

Still need to finish handles for the FB and CC, racks, log rack/ash pan, prep shelf and finish work. I can do a test burn now but I think I’ll wait till it’s completely built out.
Sent from my iPhone using Tapatalk