I began this project over in the introduction section. You can see more pictures and see where this thing came from there.
viewtopic.php?f=48&t=5717
I decided on a RF design for this build after some brainstorming and research.
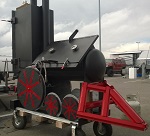
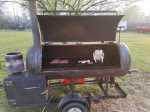
You can see in the below pictures what I am working with. There are many inlets and outlets and tabs on the exterior of the smoker that i will be cutting off and sealing up. On the inside I am hoping that the baffle plate will be able to sit right on the already existing supports welded in. Does anyone know if those being there will negatively affect the draft?
Next up is to figure out this pit calculator and determine the size of the firebox and of the exhaust stack.
Also you can get an idea of the size by looking at the drums behind it. Those are standard 55 gallon drums.
The Swine Furnace

-
ajfoxy

- Expert

- Posts: 2364
- Joined: April 12th, 2016, 8:07 pm
- Title: Neophyte Smoker Bldr
- BBQ Comp Team Name: Not competing yet...
- Location: Brisbane, Queensland, Australia
Re: The Swine Furnace
She's big 'n heavy. This is definitely going to be an interesting build.
It would be nice if you could use those top brackets for the BP. Are the centre ones able to be removed? The plate with 12 pieces of pipe. Do those pipes go all the way through? That would be a bugger if they do. If they do, perhaps incorporate them or some of them into the fat drain system.
It would be nice if you could use those top brackets for the BP. Are the centre ones able to be removed? The plate with 12 pieces of pipe. Do those pipes go all the way through? That would be a bugger if they do. If they do, perhaps incorporate them or some of them into the fat drain system.
Learning generally boils down to "Repetition or the avoidance of pain", some people learn by doing, some by watching and some just have to pee on the electric fence.
Whether you think that you can, or that you can't, you are usually right. Henry Ford
Whether you think that you can, or that you can't, you are usually right. Henry Ford
-
KingSmoke

- Just Got in trouble for buying tools

- Posts: 49
- Joined: December 13th, 2016, 3:16 pm
- Title: Member
- BBQ Comp Team Name: Not competing yet...
- Location: Spartanburg SC
Re: The Swine Furnace
The plate on the bottom is hanging on by the one weld that hasn't cracked, the tubes are just welded onto the plate. That will be one of the first cuts I make. The only openings into this thing are the flanged input/outputs, which also means I have to cut or drill a hole for the fat drain.ajfoxy wrote:She's big 'n heavy. This is definitely going to be an interesting build.
It would be nice if you could use those top brackets for the BP. Are the centre ones able to be removed? The plate with 12 pieces of pipe. Do those pipes go all the way through? That would be a bugger if they do. If they do, perhaps incorporate them or some of them into the fat drain system.
-
Pete Mazz

- Administrator

- Posts: 3399
- Joined: February 16th, 2013, 8:19 am
- Title: Meathead
- Location: Bucks County, PA
Re: The Swine Furnace
Based on your dims it's ~175 gallon tank. With a throat area of ~111 you'll need to have the BP at ~6.25" high.
If it's tourist season, how come I can't shoot 'em?
Don't speak the language? Try this: Smoker Terminology
Try my SmokerBuilder Calculators
Don't speak the language? Try this: Smoker Terminology
Try my SmokerBuilder Calculators
-
KingSmoke
- Just Got in trouble for buying tools
- Posts: 49
- Joined: December 13th, 2016, 3:16 pm
- Title: Member
- BBQ Comp Team Name: Not competing yet...
- Location: Spartanburg SC
Re: The Swine Furnace
This is exactly what I needed to know. I'll of course double check My measurements of this thing but that seems about right as far as volume. I just checked out your calculators, great resource, thanks!Pete Mazz wrote:Based on your dims it's ~175 gallon tank. With a throat area of ~111 you'll need to have the BP at ~6.25" high.
-
KingSmoke
- Just Got in trouble for buying tools
- Posts: 49
- Joined: December 13th, 2016, 3:16 pm
- Title: Member
- BBQ Comp Team Name: Not competing yet...
- Location: Spartanburg SC
Re: The Swine Furnace
I went back over some of my notes and measurements and plugged everything into the pit calc. How do these numbers look? (Attachment at bottom) Is there any general consensus regarding whether a shorter wider diameter chimney or taller smaller diameter chimney is better? Is that just a can of worms?
I will probably play around with the firebox width and height to get it to where it fits the cooker appropriately but from what I have read the volume % is about right?
I will probably play around with the firebox width and height to get it to where it fits the cooker appropriately but from what I have read the volume % is about right?
- Attachments
-
-
Big T

- Moderator

- Posts: 6897
- Joined: September 1st, 2013, 2:40 pm
- Title: Go Getter
- BBQ Comp Team Name: Backyard Boys
- Location: Lower Alabama
Re: The Swine Furnace
Your FB volume is in the right range, normally between 105%-110% for most guys. I like the stack tall enough to keep the smoke out of my eyes but not too tall to fit through the garage door. Some guys have removable stacks because of the overall height.
Measure Twice.....Cut Three Times.
-
KingSmoke
- Just Got in trouble for buying tools
- Posts: 49
- Joined: December 13th, 2016, 3:16 pm
- Title: Member
- BBQ Comp Team Name: Not competing yet...
- Location: Spartanburg SC
Re: The Swine Furnace
Man I just keep getting more ideas to add to this build. Thanks.Big T wrote:Your FB volume is in the right range, normally between 105%-110% for most guys. I like the stack tall enough to keep the smoke out of my eyes but not too tall to fit through the garage door. Some guys have removable stacks because of the overall height.
I wish I could go ahead and just buy everything I need as I could probably have it operational in a week, but I will be working on it slowly due to schedule and being somewhat on a budget.
-
temurf
- Expert
- Posts: 916
- Joined: May 12th, 2016, 7:37 pm
- Title: Train Driver
- BBQ Comp Team Name: Rednecks con Fuego
- Location: El Paso, Texas
Re: The Swine Furnace
Yer gonna like what we've been smokin'.
-
Miketheforester

- Expert
- Posts: 352
- Joined: November 4th, 2012, 7:55 pm
Re: The Swine Furnace
This is going to be an awesome project. I saw you discussing whether or not to close off the flanges, I have an illness with having to be unique, those flanges and the opening end definitely make that vessel unique. The flanges are not ideally located, but I think you could possibly make the end one work for your stack. The first reverse flow I ever saw had the stack all the way at the bottom of the cooker with the idea that it would force smoke to hit your racks and eliminate the chance of it bypassing all of your food. The owner said it worked well and the food was certainly good so I built mine similarly but nearly centered my stack in the height of the cook chamber. It works fine, but I have had suspicions before that it flows a little less than optimally especially at start up until you get the stack up to temp and it starts drawing air. Anyway, I figured as a guy that has actually mounted a stack low I would give you my 2 cents worth.
Sent from my iPhone using Tapatalk
Sent from my iPhone using Tapatalk
-
KingSmoke
- Just Got in trouble for buying tools
- Posts: 49
- Joined: December 13th, 2016, 3:16 pm
- Title: Member
- BBQ Comp Team Name: Not competing yet...
- Location: Spartanburg SC
Re: The Swine Furnace
I appreciate your input, I really hate to cut them off too. I haven't ruled out using the end one for the stack yet. I don't want this thing to be super tall which is why I want to go with an 8" stack. Problem being is if I do seal the existing flanges off, I have to cut an 8" hole in the top of this thing, through 2 layers of at least .25" stainless. That in itself is no easy task with the tools I have to work with.Miketheforester wrote:This is going to be an awesome project. I saw you discussing whether or not to close off the flanges, I have an illness with having to be unique, those flanges and the opening end definitely make that vessel unique. The flanges are not ideally located, but I think you could possibly make the end one work for your stack. The first reverse flow I ever saw had the stack all the way at the bottom of the cooker with the idea that it would force smoke to hit your racks and eliminate the chance of it bypassing all of your food. The owner said it worked well and the food was certainly good so I built mine similarly but nearly centered my stack in the height of the cook chamber. It works fine, but I have had suspicions before that it flows a little less than optimally especially at start up until you get the stack up to temp and it starts drawing air. Anyway, I figured as a guy that has actually mounted a stack low I would give you my 2 cents worth.
Sent from my iPhone using Tapatalk
Maybe someone can help me with this question. So when the pit calculator determines the chimney stack length, is that the height above the top of the CC, or is that the total length required for proper draw? Meaning, If I were to use the existing output flange at the rear, do I need to factor in the horizontal length of that piece plus the elbow and vertical tube? Or would I still need to have the vertical stack run the 14" above the CC?
-
KingSmoke
- Just Got in trouble for buying tools
- Posts: 49
- Joined: December 13th, 2016, 3:16 pm
- Title: Member
- BBQ Comp Team Name: Not competing yet...
- Location: Spartanburg SC
Re: The Swine Furnace
temurf wrote:
This is gonna be a really sweet cooker. I can't wait to see how she develops. I do like the idea of a reverse flow with slide out racks.
I have always liked the idea of the reverse flow smokers. It just makes sense. plus the first big cooker I ever had experience was a big 6'x6'x8' front loading vertical cabinet cooker, in a restaurant. Thing was awesome, and it's what started my love of BBQ.
-
temurf
- Expert
- Posts: 916
- Joined: May 12th, 2016, 7:37 pm
- Title: Train Driver
- BBQ Comp Team Name: Rednecks con Fuego
- Location: El Paso, Texas
Re: The Swine Furnace
From what I can tell by the pics, it looks like that flange on the opposite end from the door is dead center. If that is the case, then that should put it at or above the level of the lowest cooking grate.
While I am certainly no expert, my opinion is that you should be able to make it work for your stack.
My understanding is that as far as the calculations, you should measure the length of the stack from the top of the cook chamber regardless of where it comes out.
I expect the experts around here will correct me if I am wrong.
Yer gonna like what we've been smokin'.
-
KingSmoke
- Just Got in trouble for buying tools
- Posts: 49
- Joined: December 13th, 2016, 3:16 pm
- Title: Member
- BBQ Comp Team Name: Not competing yet...
- Location: Spartanburg SC
Re: The Swine Furnace
You are correct, it is dead center and would be right above the bottom cooking rack. I thought I had a nice score today with a double flanged stainless elbow, but it is 6" and not 8". I will either have to still cut the rear flange off and weld on a short radius elbow, or find/make a flanged elbow to mate up to the existing one. Large diameter pipe fittings are ridiculously expensive. I need to go hit the local scrap metal places and see what I can find.temurf wrote:From what I can tell by the pics, it looks like that flange on the opposite end from the door is dead center. If that is the case, then that should put it at or above the level of the lowest cooking grate.
While I am certainly no expert, my opinion is that you should be able to make it work for your stack.
My understanding is that as far as the calculations, you should measure the length of the stack from the top of the cook chamber regardless of where it comes out.
I expect the experts around here will correct me if I am wrong.
-
Miketheforester
- Expert
- Posts: 352
- Joined: November 4th, 2012, 7:55 pm
Re: The Swine Furnace
The stack length spit out by the calculator is the total length necessary to creat the proper volume to draw properly, the volume is the key number. Having said that, I have never heard anyone alter the length of their stack due to the volume created by the elbow? That is a pretty good question.
Sent from my iPhone using Tapatalk
Sent from my iPhone using Tapatalk
-
Big T
- Moderator
- Posts: 6897
- Joined: September 1st, 2013, 2:40 pm
- Title: Go Getter
- BBQ Comp Team Name: Backyard Boys
- Location: Lower Alabama
Re: The Swine Furnace
I measure the stack from the top of the elbow to the end of the stack.
Measure Twice.....Cut Three Times.
-
KingSmoke
- Just Got in trouble for buying tools
- Posts: 49
- Joined: December 13th, 2016, 3:16 pm
- Title: Member
- BBQ Comp Team Name: Not competing yet...
- Location: Spartanburg SC
Re: The Swine Furnace
I would imagine just a short radius elbow doesn't make much of a difference, but in my situation It's a little different. From the back of the CC to the end of the existing flanged output is 9". Add to that a flanged elbow and were talking almost 2 feet of horizontal before it even goes vertical. I cant imagine that being a good thing, but I could be wrong. Plus I think it might look a little goofy. Right now I think I am going to cut it off and weld on a short radius elbow and then the appropriate length vertical stack and call it good. If down the road it just doesn't draw right, or I have problems, then Ill cut it off, patch it, and cut a hole in the top. I guess I could just tack it in place and do a test run after I get my firebox welded in.Miketheforester wrote:The stack length spit out by the calculator is the total length necessary to creat the proper volume to draw properly, the volume is the key number. Having said that, I have never heard anyone alter the length of their stack due to the volume created by the elbow? That is a pretty good question.
Sent from my iPhone using Tapatalk
Insulated fireboxes. I have seen some people do them and some not. Reasons for them seem to be more efficient burn rates, less chance of getting burned by the outside surfaces, and less radiant heat, especially during the summer. The way I am doing my setup, the firebox will be on the trailer. It's not ideal but it is what it is. I want the hatch of the CC to be accessible from the rear of the trailer. The FB door will be on the side so I can access it easier. I plan on using 1/4" steel for it. Is insulating it really going to make that much of a difference?
I really appreciate all the advice and help you guys have given me. Trying to do this build without this site would probably result in a failure of a smoker! As soon as I get some time to work on it I will post up some more pictures.
-
pr0wlunwoof
- Expert
- Posts: 382
- Joined: March 13th, 2017, 12:54 pm
-
KingSmoke
- Just Got in trouble for buying tools
- Posts: 49
- Joined: December 13th, 2016, 3:16 pm
- Title: Member
- BBQ Comp Team Name: Not competing yet...
- Location: Spartanburg SC
Re: The Swine Furnace
I have a plasma cutter, but I am pretty sure it will not even sever this stainless. So most likely a 4 1/2" angle grinder and some smith and arrow cut-off wheels. It's gonna be a bear, i imagine i may throw out some choice words at her at some point, but at least its just the throat. I shouldn't have to worry about warpage because of the thickness and even if it does a little, it wont matter.pr0wlunwoof wrote:What are you planning on cutting the tank with?
-
pr0wlunwoof
- Expert
- Posts: 382
- Joined: March 13th, 2017, 12:54 pm
Re: The Swine Furnace
It will be a beast that is for sure. I have a LTD5000 but it will barely sever 1/2". you will definitely not have to worry about warping the cooking chamber.
-
KingSmoke
- Just Got in trouble for buying tools
- Posts: 49
- Joined: December 13th, 2016, 3:16 pm
- Title: Member
- BBQ Comp Team Name: Not competing yet...
- Location: Spartanburg SC
Re: The Swine Furnace
I still don't even know how thick each wall is. I won't know until I cut or drill into it. My guess is .25" for each one.pr0wlunwoof wrote:It will be a beast that is for sure. I have a LTD5000 but it will barely sever 1/2". you will definitely not have to worry about warping the cooking chamber.
-
pr0wlunwoof
- Expert
- Posts: 382
- Joined: March 13th, 2017, 12:54 pm
-
KingSmoke
- Just Got in trouble for buying tools
- Posts: 49
- Joined: December 13th, 2016, 3:16 pm
- Title: Member
- BBQ Comp Team Name: Not competing yet...
- Location: Spartanburg SC
Re: The Swine Furnace
It is double walled, it's actually a jacket. water was run into that jacket to help cool it. Even the door is double walled.pr0wlunwoof wrote:Is the tank double walled? It looks solid in the picture.
-
pr0wlunwoof
- Expert
- Posts: 382
- Joined: March 13th, 2017, 12:54 pm
Re: The Swine Furnace
I did a lot of research on the insulated firebox. I opted to go ahead and do it because this is a lifetime investment and making it as efficient as possible will pay dividends in the future. I also use 1/8" steel so i felt the insulation would help the outer box stay pristineKingSmoke wrote:Miketheforester wrote: Insulated fireboxes. I have seen some people do them and some not. Reasons for them seem to be more efficient burn rates, less chance of getting burned by the outside surfaces, and less radiant heat, especially during the summer. The way I am doing my setup, the firebox will be on the trailer. It's not ideal but it is what it is. I want the hatch of the CC to be accessible from the rear of the trailer. The FB door will be on the side so I can access it easier. I plan on using 1/4" steel for it. Is insulating it really going to make that much of a difference?
- Attachments
-
-
-
-
-
Pete Mazz
- Administrator
- Posts: 3399
- Joined: February 16th, 2013, 8:19 am
- Title: Meathead
- Location: Bucks County, PA
Re: The Swine Furnace
If you cap the end of the opening you could add a stack using a saddle cut behind the flange.
If it's tourist season, how come I can't shoot 'em?
Don't speak the language? Try this: Smoker Terminology
Try my SmokerBuilder Calculators
Don't speak the language? Try this: Smoker Terminology
Try my SmokerBuilder Calculators