Gravity feed burner on a offset shaped cooking chamber
-
Big T

- Moderator

- Posts: 6897
- Joined: September 1st, 2013, 2:40 pm
- Title: Go Getter
- BBQ Comp Team Name: Backyard Boys
- Location: Lower Alabama
Re: Gravity feed burner on a offset shaped cooking chamber
You have to watch out for the charcoal bridging in a square chute. Most guys use a tapered chute and some use a pipe.
Measure Twice.....Cut Three Times.

-
ajfoxy

- Expert

- Posts: 2364
- Joined: April 12th, 2016, 8:07 pm
- Title: Neophyte Smoker Bldr
- BBQ Comp Team Name: Not competing yet...
- Location: Brisbane, Queensland, Australia
Re: Gravity feed burner on a offset shaped cooking chamber
Oh crap, time to get my eyes tested. 
And what Big-T says... a taper is a good thing... but I'm guessing that boat has sailed as you have already cut and tacked the steel. Just be aware of when cooking though.
And what Big-T says... a taper is a good thing... but I'm guessing that boat has sailed as you have already cut and tacked the steel. Just be aware of when cooking though.
Learning generally boils down to "Repetition or the avoidance of pain", some people learn by doing, some by watching and some just have to pee on the electric fence.
Whether you think that you can, or that you can't, you are usually right. Henry Ford
Whether you think that you can, or that you can't, you are usually right. Henry Ford


Re: Gravity feed burner on a offset shaped cooking chamber
Nahh its fine, in a chute that size, I dont anticipate a problem. There is a company over here making commerical cabinet smokers with sqauare chutes and they did a lot of testing of their design and have never had a problem. I think its more an issue in smaller chutes where one or two lumps are as wide as the chute is.
If it turns out that is a problem, I will just laser cut some wedges and weld them to the inside to help stop blockages, but with a chute this size, I don't see it as a problem (I did think about it
If it turns out that is a problem, I will just laser cut some wedges and weld them to the inside to help stop blockages, but with a chute this size, I don't see it as a problem (I did think about it
-
Rodcrafter

- Moderator
- Posts: 8488
- Joined: July 21st, 2012, 5:46 pm
- Title: Member
- BBQ Comp Team Name: Not competing yet...
- Location: Orlando, Florida
Re: Gravity feed burner on a offset shaped cooking chamber
You may want to beef up the FB area of the chute. Ask Tom about how his 1/4" FB on his GF distorted.
JM2CW
JM2CW
Current Smokers: Backyard RF Offset and Hybrid RF Offset trailer rig with Cowboy cooker and fish fryer, always room for more........
Re: Gravity feed burner on a offset shaped cooking chamber
The firebox is thicker steel, but I think thicker steel is even more likely to distort, as long as the heat goes in evenly, I think it should be ok. I'm gonna bolt some joints too to allow expansion.
Pete
Pete
Re: Gravity feed burner on a offset shaped cooking chamber
Bit more progress today, made the fire grate. The grate is 316 stainless, 12mm rod. I chose to make this from stainless as I have seen some commercial GF smokers corode their mild steel grates. These parts get so hot, and they have air flowing past, they are more prone to corroding away very quickly, which is something I have seen in my other smokers, so stainless feels worth it.
I tig welded the bars together, as I don't have any 316 wire for the mig. I used a paper template made from the 3D model to help align, and slip gauges to get the distances right. I need to go and do full welds on the bars as they are just tacked at the moment.
The bars were bent in a big press brake before I started welding them up.
im going to weld the grate into the bottom of the chute. I thought about having it removable, but its such a massively important critical part, I felt it was best to securely mount it in with welding. I am doing it in such a way where it can be cut out and replaced if necessary.
I also did one seem weld on the chute, I need to do the other three tomorrow.
-
Rodcrafter
- Moderator
- Posts: 8488
- Joined: July 21st, 2012, 5:46 pm
- Title: Member
- BBQ Comp Team Name: Not competing yet...
- Location: Orlando, Florida
Re: Gravity feed burner on a offset shaped cooking chamber
So using this type of fire grate, when you finish cooking and shut down the rig how will you empty the chute and re light for your next cook? I just asked this to try and help. I know you probably already have a plan but if not this would be the time to modify your design.
Making memories!
Making memories!
Current Smokers: Backyard RF Offset and Hybrid RF Offset trailer rig with Cowboy cooker and fish fryer, always room for more........
Re: Gravity feed burner on a offset shaped cooking chamber
Yeah Ive wondered that. I plan on using the correct amount of charcoal so there is none left. If there is any left, I would probably re light it next time using a roofing torch or something. To fill the chute you will need a ladder as it's going to be about 7 feet off the ground, so no chance of reaching in there and pulling charcoal out bit by bit.
This is a high commitment smoker. lol
This is a high commitment smoker. lol
-
ajfoxy
- Expert
- Posts: 2364
- Joined: April 12th, 2016, 8:07 pm
- Title: Neophyte Smoker Bldr
- BBQ Comp Team Name: Not competing yet...
- Location: Brisbane, Queensland, Australia
Re: Gravity feed burner on a offset shaped cooking chamber
She appears to be a big un. You might need to build a conveyer system to load the charcoal... 
Learning generally boils down to "Repetition or the avoidance of pain", some people learn by doing, some by watching and some just have to pee on the electric fence.
Whether you think that you can, or that you can't, you are usually right. Henry Ford
Whether you think that you can, or that you can't, you are usually right. Henry Ford
-
Squiggle

- Expert
- Posts: 2611
- Joined: December 19th, 2015, 5:04 pm
- Title: Reformed non-smoker!
- BBQ Comp Team Name: Not competing yet...
- Location: Mole Creek, Tasmania
Re: Gravity feed burner on a offset shaped cooking chamber
Yeah, RC posed a great question, I have a removable grate in my mini & I wasn't removing it after each cook, just dumped more lump in & fired it up on the next cook. I found that there was a build up of ash on top of the grate & in between the charcoal at the bottom of the chute & that was causing problems when firing it up again, even with a roofing torch. It would be slow to light & slow to get up to temp. Now I drop the charcoal every time & reuse any unburnt stuff, the difference in both starting & getting up to temp is like chalk & cheese, so much faster & easier now. 
Other than that, the grate looks super awesome!
Other than that, the grate looks super awesome!
Formerly known as "Hey you there in the bushes!"
Re: Gravity feed burner on a offset shaped cooking chamber
Well my grate is round bars, and I suspect yours is a flat plate with holes cut in? I think the ash is less likely to sit on top of the round bars.
I can always jab a pokey pole between the bars and give it a good waggle.
The whole charcoal chute is removable so it can always be taken off and turned upside down for a full clean.
Also thinking of making a smaller chute too so they are interchangeable for shorter cooks.
Pete
I can always jab a pokey pole between the bars and give it a good waggle.
The whole charcoal chute is removable so it can always be taken off and turned upside down for a full clean.
Also thinking of making a smaller chute too so they are interchangeable for shorter cooks.
Pete
Re: Gravity feed burner on a offset shaped cooking chamber
Here is what the 3D models currently look like. The firebox is 400x400mm from the back (thats 16 inches) and its a bit deeper to accommodate the tube that will take the heat into the chamber.


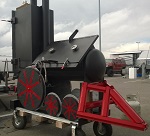
For reference, and to give you an idea of size, this is the tank as it sits now. I need to hinge the ends fairly soon.

For reference, and to give you an idea of size, this is the tank as it sits now. I need to hinge the ends fairly soon.
Re: Gravity feed burner on a offset shaped cooking chamber
A bit more progress today. The laser cutting I ordered appeared four days early, so I put the hinges together, ready to mount the doors properly tomorrow.
Also got the sides of the firebox, which were laser cut as they have a radius in the corner to fit snuggly to the cooking chamber, and im pleased to say, i totally nailed the radius. It matches perfectly.


And lastly, doing a bit of basket weave pattern tig on the hinges. Looks pretty but too faffy to do for all of them.

Also got the sides of the firebox, which were laser cut as they have a radius in the corner to fit snuggly to the cooking chamber, and im pleased to say, i totally nailed the radius. It matches perfectly.
And lastly, doing a bit of basket weave pattern tig on the hinges. Looks pretty but too faffy to do for all of them.
-
Squiggle
- Expert
- Posts: 2611
- Joined: December 19th, 2015, 5:04 pm
- Title: Reformed non-smoker!
- BBQ Comp Team Name: Not competing yet...
- Location: Mole Creek, Tasmania
Re: Gravity feed burner on a offset shaped cooking chamber
Formerly known as "Hey you there in the bushes!"
-
ajfoxy
- Expert
- Posts: 2364
- Joined: April 12th, 2016, 8:07 pm
- Title: Neophyte Smoker Bldr
- BBQ Comp Team Name: Not competing yet...
- Location: Brisbane, Queensland, Australia
Re: Gravity feed burner on a offset shaped cooking chamber
Very nice. Serious hinges those. The build is coming along nicely... 
Learning generally boils down to "Repetition or the avoidance of pain", some people learn by doing, some by watching and some just have to pee on the electric fence.
Whether you think that you can, or that you can't, you are usually right. Henry Ford
Whether you think that you can, or that you can't, you are usually right. Henry Ford
-
Big T
- Moderator
- Posts: 6897
- Joined: September 1st, 2013, 2:40 pm
- Title: Go Getter
- BBQ Comp Team Name: Backyard Boys
- Location: Lower Alabama
Re: Gravity feed burner on a offset shaped cooking chamber
Nice bead!! That's a heck of a hinge you've got there
Measure Twice.....Cut Three Times.
-
Pete Mazz

- Administrator

- Posts: 3399
- Joined: February 16th, 2013, 8:19 am
- Title: Meathead
- Location: Bucks County, PA
Re: Gravity feed burner on a offset shaped cooking chamber
If it's tourist season, how come I can't shoot 'em?
Don't speak the language? Try this: Smoker Terminology
Try my SmokerBuilder Calculators
Don't speak the language? Try this: Smoker Terminology
Try my SmokerBuilder Calculators
Re: Gravity feed burner on a offset shaped cooking chamber
A bit more work today. Got the hinges sorted. Was hoping to get the firebox done but the metal shop didn't have any 6mm sheet in stock, so, next week is the earliest.
Had a little issue whilst welding, the gas ran out and so I ended up with one hideous weld. I swapped to pure argon, but it didn't go very well. The tip and nozzle ont he torch need replacing. Anyway, I finished off with the tig, which is fine on pure argon.

Using some aluminium ti wire to set a consistent gap, which will be filled with the seal later.

Bottom half of the hinge welded on.

Perfect alignment with the end cap... fluke.


One end done.

End 2 was a bit of a pain. The top hinge section did not align as well as the first one did. I had to fill a massive gap with tig rod, but it looks OK.


TADAAAA!!!!!!!!!
Had a little issue whilst welding, the gas ran out and so I ended up with one hideous weld. I swapped to pure argon, but it didn't go very well. The tip and nozzle ont he torch need replacing. Anyway, I finished off with the tig, which is fine on pure argon.
Using some aluminium ti wire to set a consistent gap, which will be filled with the seal later.
Bottom half of the hinge welded on.
Perfect alignment with the end cap... fluke.
One end done.
End 2 was a bit of a pain. The top hinge section did not align as well as the first one did. I had to fill a massive gap with tig rod, but it looks OK.
TADAAAA!!!!!!!!!
-
Rodcrafter
- Moderator
- Posts: 8488
- Joined: July 21st, 2012, 5:46 pm
- Title: Member
- BBQ Comp Team Name: Not competing yet...
- Location: Orlando, Florida
Re: Gravity feed burner on a offset shaped cooking chamber
You are going along nicely Pete. In your last post I noticed you are looking to get 6 mm steel for the FB. I don't want to be a pain only wanting to help. The FB I first mentioned was actually the bottom portion of the chute you made. Where the grate is. That's the portion that will be the hottest. The part below that is really the ash box and the crossover tube. The crossover tube will be very hot as well as it is where the flames hit from the FB. This is a very interesting design.
Making memories!
Making memories!
Current Smokers: Backyard RF Offset and Hybrid RF Offset trailer rig with Cowboy cooker and fish fryer, always room for more........
Re: Gravity feed burner on a offset shaped cooking chamber
Well, thing is, the GF burner is so freaking big, I have a feeling its not going to break much of a sweat to keep the smoker running. The firebox itself has 50mm of space on all sides to add a 25mm thick (one inch) insulation board if I need to.
If the chute does melt through, it is interchangeable, so I can just remove it by undoing a few screws and make a new one with thicker steel.
As for the tube, the thickest metal that my friendly steel place can shear is 6mm, if we need 8mm it has to be flame/plasma/laser cut and it gets expensive. Its gonna be a major challenge to line up the crossover tube anyway, its the biggest challenge in this build. Gotta plan ahead...!
Pete.
-
ajfoxy
- Expert
- Posts: 2364
- Joined: April 12th, 2016, 8:07 pm
- Title: Neophyte Smoker Bldr
- BBQ Comp Team Name: Not competing yet...
- Location: Brisbane, Queensland, Australia
Re: Gravity feed burner on a offset shaped cooking chamber
Definitely looking good. This is a very interesting build and you are doing it brilliantly. 
Learning generally boils down to "Repetition or the avoidance of pain", some people learn by doing, some by watching and some just have to pee on the electric fence.
Whether you think that you can, or that you can't, you are usually right. Henry Ford
Whether you think that you can, or that you can't, you are usually right. Henry Ford
-
temurf
- Expert
- Posts: 916
- Joined: May 12th, 2016, 7:37 pm
- Title: Train Driver
- BBQ Comp Team Name: Rednecks con Fuego
- Location: El Paso, Texas
Re: Gravity feed burner on a offset shaped cooking chamber
I am definitely going to stay tuned.
Yer gonna like what we've been smokin'.
-
Squiggle
- Expert
- Posts: 2611
- Joined: December 19th, 2015, 5:04 pm
- Title: Reformed non-smoker!
- BBQ Comp Team Name: Not competing yet...
- Location: Mole Creek, Tasmania
Re: Gravity feed burner on a offset shaped cooking chamber

Formerly known as "Hey you there in the bushes!"
Re: Gravity feed burner on a offset shaped cooking chamber
Just realised, in my excitement for the doors opening, I forgot to take any photos of it with the doors closed. And most of the time its going to be seen with the doors shut, so....

-
- Similar Topics
- Replies
- Views
- Last post
-
- 1 Replies
- 6421 Views
-
Last post by Dirtytires
-
- 1 Replies
- 7118 Views
-
Last post by tinspark
-
- 1 Replies
- 3586 Views
-
Last post by Dirtytires