My Center Feed Smoker Build
-
ajfoxy

- Expert

- Posts: 2364
- Joined: April 12th, 2016, 8:07 pm
- Title: Neophyte Smoker Bldr
- BBQ Comp Team Name: Not competing yet...
- Location: Brisbane, Queensland, Australia
Re: My Center Feed Smoker Build
Yep, pretty nice that. Almost looks industrial.
Learning generally boils down to "Repetition or the avoidance of pain", some people learn by doing, some by watching and some just have to pee on the electric fence.
Whether you think that you can, or that you can't, you are usually right. Henry Ford
Whether you think that you can, or that you can't, you are usually right. Henry Ford

-
Weyrider

- Just Got in trouble for buying tools

- Posts: 47
- Joined: November 1st, 2017, 3:56 pm
- Title: Member
- BBQ Comp Team Name: Not competing yet...
Re: My Center Feed Smoker Build
Well this week I have been doing a lot of thinking on how I should proceed on things like door handles and such. I got the Cooking chamber doors done and I like the look. Its different and its home made, but best of all it works. I also got the exhaust stacks done and although it didn't come out as I wanted in the first place, they are functional which was my goal in the first place. Today I should finish the door on my firebox which has the same design of setup as the CC doors, but not exactly the same pieces.
- Attachments
-
-
-
Dirtytires

- Expert
- Posts: 3845
- Joined: November 24th, 2015, 12:36 am
- Title: It ain't broke...yet
- BBQ Comp Team Name: Dont compete...cook for events once in a while
- Location: Phoenix, Az
Re: My Center Feed Smoker Build
It's nice to see all that work come to a point that it looks like what you intended to build in the first place....or more simply.....looks good!
-
Weyrider
- Just Got in trouble for buying tools
- Posts: 47
- Joined: November 1st, 2017, 3:56 pm
- Title: Member
- BBQ Comp Team Name: Not competing yet...
Re: My Center Feed Smoker Build
Ok all the welding on the outside of the Cooking chamber is done. The top half of the frame is attached to the Cooking chamber as well. Going to use that huge cherry picker in the background to lift the top half and get it set to weld the legs from the top part to the bottom. Then weld the shadow plate inside and then the baffle plate, then the racks. If everything goes to plan, I will test fire this monster up and check out the burn before I take it apart to sand and paint it. The frame is going to be Chevy engine orange and the Firebox-Cooking Chamber will be a matte black. I have the rattle cans at the ready.lol
- Attachments
-
-
-


-
Rodcrafter

- Moderator

- Posts: 8488
- Joined: July 21st, 2012, 5:46 pm
- Title: Member
- BBQ Comp Team Name: Not competing yet...
- Location: Orlando, Florida
Re: My Center Feed Smoker Build
Oh yeah
Making memories!
Making memories!
Current Smokers: Backyard RF Offset and Hybrid RF Offset trailer rig with Cowboy cooker and fish fryer, always room for more........
-
Dirtytires
- Expert
- Posts: 3845
- Joined: November 24th, 2015, 12:36 am
- Title: It ain't broke...yet
- BBQ Comp Team Name: Dont compete...cook for events once in a while
- Location: Phoenix, Az
Re: My Center Feed Smoker Build
Is that a typo on the firebox size? It looks like you typed 67%. I think you are going to get a big hot spot in the center back where your opening is. What are you doing to ensure the heat flows forward to the front of the chamber and fully distributes the heat?
I might suggest you don’t weld your baffle plate down till you test it some. Besides adjusting the end gaps I feel you may need to install a few shadow plates and doing so after the plate is in would be all but impossible with your setup.
I am interested to see how your build progresses as it is truely unique.
-
Weyrider
- Just Got in trouble for buying tools
- Posts: 47
- Joined: November 1st, 2017, 3:56 pm
- Title: Member
- BBQ Comp Team Name: Not competing yet...
Re: My Center Feed Smoker Build
Dirtytires;
You did read correctly, my firebox is 67% of what the calculator said a reverse flow smoker should have. My throat size is 36 sq. in. ( 12 x 3 ) where as the recommended throat size was 27.648 or (9 x 3). The throat opening is direct center of the cooking chamber. I also made a shadow plate that is 18 x 4 x 1/4 " which is 72 sq. in. and twice the area of my throat size, and will be mounted up from the throat by 1.5". This should eliminate any hot spots that may arise. I am going to fire this critter up and see just how well the flow is after the construction is done. My baffle plate is mounted 2' above the shadow plate as well. I will use high heat silicone for the baffle plate until I get a good flow and the temps rise and fall with a good rate up and down. Now granted I built this as an experiment into heat and smoke flow. I premise is this, by building the firebox underneath, and heat rising, I should be able to burn a longer fire with less fuel as the heat loss from running from one end to the other and back again with the smoke and heat path. My design sees that path cut in half, so hopefully the heat loss is greatly reduced. I also built 2 intakes and 2 exhausts, on the belief it would give me greater control of my burn. But I also realize I may be blowing smoke up my derriere. Once the temps can be controlled to my satisfaction, the experiment will continue until they are or its marked as a failure. But I have faith that this should work as I want it to. .
You did read correctly, my firebox is 67% of what the calculator said a reverse flow smoker should have. My throat size is 36 sq. in. ( 12 x 3 ) where as the recommended throat size was 27.648 or (9 x 3). The throat opening is direct center of the cooking chamber. I also made a shadow plate that is 18 x 4 x 1/4 " which is 72 sq. in. and twice the area of my throat size, and will be mounted up from the throat by 1.5". This should eliminate any hot spots that may arise. I am going to fire this critter up and see just how well the flow is after the construction is done. My baffle plate is mounted 2' above the shadow plate as well. I will use high heat silicone for the baffle plate until I get a good flow and the temps rise and fall with a good rate up and down. Now granted I built this as an experiment into heat and smoke flow. I premise is this, by building the firebox underneath, and heat rising, I should be able to burn a longer fire with less fuel as the heat loss from running from one end to the other and back again with the smoke and heat path. My design sees that path cut in half, so hopefully the heat loss is greatly reduced. I also built 2 intakes and 2 exhausts, on the belief it would give me greater control of my burn. But I also realize I may be blowing smoke up my derriere. Once the temps can be controlled to my satisfaction, the experiment will continue until they are or its marked as a failure. But I have faith that this should work as I want it to. .
-
Rodcrafter
- Moderator
- Posts: 8488
- Joined: July 21st, 2012, 5:46 pm
- Title: Member
- BBQ Comp Team Name: Not competing yet...
- Location: Orlando, Florida
Re: My Center Feed Smoker Build
I agree the fire can be smaller the fuel less and burn longer at the same temp. I'm not sure about the connection to the CC/FB but the more the FB touches the CC the more radiant heat you will get to support your theory.
jm2cw
jm2cw
Current Smokers: Backyard RF Offset and Hybrid RF Offset trailer rig with Cowboy cooker and fish fryer, always room for more........
-
Dirtytires
- Expert
- Posts: 3845
- Joined: November 24th, 2015, 12:36 am
- Title: It ain't broke...yet
- BBQ Comp Team Name: Dont compete...cook for events once in a while
- Location: Phoenix, Az
Re: My Center Feed Smoker Build
You may just be on to something....please continue to share so we can learn as well. It will be interesting to see how the actual air flow pattern works out.
-
Weyrider
- Just Got in trouble for buying tools
- Posts: 47
- Joined: November 1st, 2017, 3:56 pm
- Title: Member
- BBQ Comp Team Name: Not competing yet...
Re: My Center Feed Smoker Build
Rodcrafter ;
You brought up a point that I hadn't thought of, radiant heat. Although my throat cutout is 12 x 3 my contact area between my firebox and cooking chamber is 24 x 3. Now this gets more interesting by the day.
You brought up a point that I hadn't thought of, radiant heat. Although my throat cutout is 12 x 3 my contact area between my firebox and cooking chamber is 24 x 3. Now this gets more interesting by the day.
-
Weyrider
- Just Got in trouble for buying tools
- Posts: 47
- Joined: November 1st, 2017, 3:56 pm
- Title: Member
- BBQ Comp Team Name: Not competing yet...
Re: My Center Feed Smoker Build
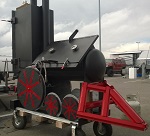
ITS ABOUT TIME!!!!!!!!!!!!!! We have a roller, The Critter is on wheels. Also welded the shadow plate to the cooking chamber. Tomorrow we place baffle plate and goop it down with heat resistant silicone. I got to ask the owners of the farm if its ok to light the smoker in the shed. If not I will wait till its warm enough and do it outside.
- Attachments
-
-
-
-
-
temurf
- Expert
- Posts: 916
- Joined: May 12th, 2016, 7:37 pm
- Title: Train Driver
- BBQ Comp Team Name: Rednecks con Fuego
- Location: El Paso, Texas
Re: My Center Feed Smoker Build
That is looking good!!
Can't wait to see how she works.
Can't wait to see how she works.
Yer gonna like what we've been smokin'.
-
Dirtytires
- Expert
- Posts: 3845
- Joined: November 24th, 2015, 12:36 am
- Title: It ain't broke...yet
- BBQ Comp Team Name: Dont compete...cook for events once in a while
- Location: Phoenix, Az
Re: My Center Feed Smoker Build
I hadn’t realized your door hinges are on the bottom. Thought you just had it upside down to weld more easily. What was your inspiration for that idea?
-
Cole
- SmokerBuilder Addict

- Posts: 154
- Joined: November 7th, 2017, 8:20 pm
- Title: Member
- BBQ Comp Team Name: Not competing yet, Family and Friends!
- Location: Ohio / Michigan Border
Re: My Center Feed Smoker Build
Be careful when opening the doors. How much cooking area will you have? Looks big.
-
Rodcrafter
- Moderator
- Posts: 8488
- Joined: July 21st, 2012, 5:46 pm
- Title: Member
- BBQ Comp Team Name: Not competing yet...
- Location: Orlando, Florida
Re: My Center Feed Smoker Build
I thought the same thing as DT. Not that it won't work, I would put an drip edge above the doors so rain didn't run in the crack at the top of the doors. I think most people like the doors going up so they move out of the way. This will reduce what goes on the top rack but it will allow more air moving across the rack.
Custom is the only way to get this different function.
Custom is the only way to get this different function.
Current Smokers: Backyard RF Offset and Hybrid RF Offset trailer rig with Cowboy cooker and fish fryer, always room for more........
-
Weyrider
- Just Got in trouble for buying tools
- Posts: 47
- Joined: November 1st, 2017, 3:56 pm
- Title: Member
- BBQ Comp Team Name: Not competing yet...
Re: My Center Feed Smoker Build
When I designed this smoker, I wanted two exhausts, kinda like duals on a car. I had two old exhausts off of my Harley and decided what the heck, lets use them. Now I had to place them just right so they would 1) function, and 2) look good. When I cut my doors I thought of cutting just one big door and using a counter weight. Then I saw that the door would surely hit the exhaust stacks constantly and my luck break something so I made the decision to make two doors and saw that they would still hit the exhaust stacks, so I decided rather than to make two really small doors like 18" wide, I would make them to swing down. I also have never seen a smoker that has the doors swing down like mine is so I thought what the heck lets try it. But I also have never seen an oven that the door swung upwards on either. Now if you look back to a picture of the mufflers, you will see a slot with an opening for a bolt head in each one. I am going to build a shelf that will spread the length of the chamber to hold various tools, thermometers , cooking foil, etc. I am going to make it wide enough that It will cover the door openings. I don't have to worry about the wind slamming the door on my head as knowing my luck that would happen. I know its different and goes against all normal practices, but so does this whole smoker. Tomorrow time to put the gasket material in the doors. And since the owners of the shop don't want me firing up the smoker in the shop, I am going to wait till there's a nice day with no wind and light it up outside. Don't know when that will be, as I live in Minnesota. 
Cole: My estimated cooking area is 1176 sq. in. I will be using 4 racks that will measure 21 x 14.
Cole: My estimated cooking area is 1176 sq. in. I will be using 4 racks that will measure 21 x 14.
-
Cole
- SmokerBuilder Addict
- Posts: 154
- Joined: November 7th, 2017, 8:20 pm
- Title: Member
- BBQ Comp Team Name: Not competing yet, Family and Friends!
- Location: Ohio / Michigan Border
Re: My Center Feed Smoker Build
I love smoking in the winter! Keep that fire rolling, I also will get a fire going in the pit. Now I'm getting hungry!
-
Dirtytires
- Expert
- Posts: 3845
- Joined: November 24th, 2015, 12:36 am
- Title: It ain't broke...yet
- BBQ Comp Team Name: Dont compete...cook for events once in a while
- Location: Phoenix, Az
Re: My Center Feed Smoker Build
Interesting thoughts....we can’t wait till spring so see if it works so I need to remind you that the colder it is outside, the easier it is to control a smoker. My point is you need to get your parka and boots on tomorrow and roll it outside!
-
Weyrider
- Just Got in trouble for buying tools
- Posts: 47
- Joined: November 1st, 2017, 3:56 pm
- Title: Member
- BBQ Comp Team Name: Not competing yet...
Re: My Center Feed Smoker Build
Well we loaded it up and we hauled it home. Right now its still in the back of the pickup as I am waiting on a friend to bring his fork lift so we can unload it. I told him not to make a special trip over but if he has it out and if he wouldn't mind I would appreciate it. But I did learn a few things along this journey.
1) when I draw out plans, I need to draw the frame out on it as well. I had to re-cut my frame and weld it over as my lack of planning bit me in the behind.
2) I had a hard time welding this beast, I would get a good bead running and then it turned to chicken scratches. I was using a Lincoln welder and even the workers at the shop preferred the Miller welder over this machine. My Jackson welding helmet is also worrisome to me, but I will call the manufacturer and run through the episodes with them. When I put my single shade Forney helmet on I saw I could see the weld puddle much better.
3) The one thing good about this experiment is everything but the firebox metal, the wheels, and the door trim, was free. Every piece that you see on the smoker was scrounged from farmers metal piles. I figure I have spent no more than $300.00 on this smoker and that will include the thermometers and the gasket material I am getting.
4) I appreciate all the comments that everyone has posted. It made me stop and look at what you all were saying and made me think more about what you were saying.
5) if I ever do another smoker, Everything will be pre-cut, all new metal and smaller. My friend was a bit upset he didn't get to weld on it, so next time he gets to do a bunch of it.
Once thank you to those that left comments on this post and Yes I understand that it ain't over till I post a "Q" shot
-
Dirtytires
- Expert
- Posts: 3845
- Joined: November 24th, 2015, 12:36 am
- Title: It ain't broke...yet
- BBQ Comp Team Name: Dont compete...cook for events once in a while
- Location: Phoenix, Az
Re: My Center Feed Smoker Build
Oh....it ain’t over by a long shot!
New material is a huge time saver. I absolutely hate reusing material if it means I have to clean rust and crud off it first. Till you factor in time and flap wheels, I’m not convinced free used material is cheaper than new purchased steel. Pre-cut is nice but it prevents you from customizing as the build progresses.
Great project...still interested to see how it burns.
-
Cole
- SmokerBuilder Addict
- Posts: 154
- Joined: November 7th, 2017, 8:20 pm
- Title: Member
- BBQ Comp Team Name: Not competing yet, Family and Friends!
- Location: Ohio / Michigan Border
Re: My Center Feed Smoker Build
On my Mini currently in process I have enjoyed cutting it, some a little challenging for a garage operation but fun!
-
- Similar Topics
- Replies
- Views
- Last post
-
- 7 Replies
- 4997 Views
-
Last post by JH1973
-
- 11 Replies
- 6240 Views
-
Last post by Dirtytires
-
- 13 Replies
- 7665 Views
-
Last post by Dirtytires
-
- 56 Replies
- 17824 Views
-
Last post by Barrion2018
-
- 3 Replies
- 4543 Views
-
Last post by Dirtytires