
Smoke Stacks
I put together the smoke stacks. According to the pit calculator, the stack needed to be 37+ inches tall. I made double stacks. Each stack is 19” taller than the top of the CC. I used 16 gauge 3 inch square tubing.
I built an apparatus that allowed me to adjust the exit point(s) from the CC. I anticipate using the lower exhaust ports that spans from 1” below the cooking grate to 2” above the grate. However, the adjustable feature will allow me to experiment some. It was now or never so I added the feature. Only time will tell if it was worth the extra effort.
New Build Thread: Uncle Charlie – Short and Full of Fire

Re: New Build Thread: Uncle Charlie–Short and Full of Fire
Before I could install the stacks, I had to complete the area immediately beneath them. I welded sheet metal across the ends so that the area would be boxed in. I also drilled a small hole through the bottom of the rear piece of sheet metal. In theory, this boxed in area will be water tight, but just in case water finds its way in, it will have an exit point. The exit hole is protected from rain water intrusion by the top sheet metal cover which extend another +/- 2 inches beyond the end piece.
I installed 2 layers of 1” 6 lb ceramic wool. It was extremely easy to cut with a utility knife. Scissors also worked but might have compressed the material some, so the utility knife was a better choice.
I installed 2 layers of 1” 6 lb ceramic wool. It was extremely easy to cut with a utility knife. Scissors also worked but might have compressed the material some, so the utility knife was a better choice.
- Attachments
-
- wool in place
Re: New Build Thread: Uncle Charlie – Short and Full of Fire
The square stacks were to be welded against the end plate of the CC. That plate was no longer flat but was concaved. To cover the gap, I welded ½ x ¼ flat bar to the end plate of the CC.
- Attachments
-
- 1/4" flat bar
-
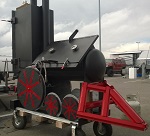
- Stacks in place. Waiting for wind to die down
-
Big T

- Moderator

- Posts: 6897
- Joined: September 1st, 2013, 2:40 pm
- Title: Go Getter
- BBQ Comp Team Name: Backyard Boys
- Location: Lower Alabama
Re: New Build Thread: Uncle Charlie – Short and Full of Fire
Adjustable stack exit points, I like it  I've seen guys use sheet metal rolled up to extend their stacks down into the CC but I don't think I've ever seen one quite like this one.
Measure Twice.....Cut Three Times.
-
Squiggle

- Expert

- Posts: 2611
- Joined: December 19th, 2015, 5:04 pm
- Title: Reformed non-smoker!
- BBQ Comp Team Name: Not competing yet...
- Location: Mole Creek, Tasmania
Re: New Build Thread: Uncle Charlie – Short and Full of Fire
 well done dude, nice work!
 Formerly known as "Hey you there in the bushes!"
-
Rodcrafter

- Moderator
- Posts: 8488
- Joined: July 21st, 2012, 5:46 pm
- Title: Member
- BBQ Comp Team Name: Not competing yet...
- Location: Orlando, Florida
Re: New Build Thread: Uncle Charlie – Short and Full of Fire
Cool idea
Making memories!
Making memories!
Current Smokers: Backyard RF Offset and Hybrid RF Offset trailer rig with Cowboy cooker and fish fryer, always room for more........
Re: New Build Thread: Uncle Charlie – Short and Full of Fire
SPRUNG DOOR
The curvature of the door does not match the curvature of the pipe. I cut the door off the pit and tried the jack and chain procedure. I used my neighbors 2.5 ton floor jack. I was able to improve the match quite a bit but not completely. I came to a point where although I could pump the jack, the hydraulic cylinder did not move. I was afraid that I would blow a seal in the jack. Also, I was pinching the door only where the chain cross the edges. I remedied this somewhat by putting angle iron between the door and the chain.
The door fits much better but is still sprung out almost 1/8th inch. Anyone have any ideas? A stronger jack?
- Attachments
-
-
-
temurf
- Expert
- Posts: 916
- Joined: May 12th, 2016, 7:37 pm
- Title: Train Driver
- BBQ Comp Team Name: Rednecks con Fuego
- Location: El Paso, Texas
Re: New Build Thread: Uncle Charlie – Short and Full of Fire
I like the concept of your adjustable exit points on the stacks.
Yer gonna like what we've been smokin'.
-
Big T
- Moderator
- Posts: 6897
- Joined: September 1st, 2013, 2:40 pm
- Title: Go Getter
- BBQ Comp Team Name: Backyard Boys
- Location: Lower Alabama
Re: New Build Thread: Uncle Charlie – Short and Full of Fire
A stronger jack is an option, I used a 20 ton floor jack on my 3/8'' door and wasn't able to get it as close as you did. I welded 1/4''x1'' flat bar around the door and used 3/8'' rope gasket and I don't have any leaks. I was able to radius the door strap enough that the gap is not noticeable. Be careful because I've seen guys try too hard and get their doors out of shape to where they couldn't use them.
Measure Twice.....Cut Three Times.
-
mp4

- Expert
- Posts: 1263
- Joined: September 2nd, 2014, 6:28 pm
- Title: Independent Thinker
- BBQ Comp Team Name: Just a few backyard for fun competitions.
- Location: Central Wisconsin
Re: New Build Thread: Uncle Charlie – Short and Full of Fire
When all else fails you can bring it to a fab shop and have the roll it for you. That's what I did to fix mine.
-
Gizmo

- Founder

- Posts: 6135
- Joined: July 23rd, 2011, 11:55 am
- Title: Member
- BBQ Comp Team Name: Edna's Kids Comp Team - KCBS Certified Judge
- Location: Kearney, NE
Re: New Build Thread: Uncle Charlie – Short and Full of Fire
As long as your strap frame seal around the door is mated to the pipe you'll be fine. Some firerope and the seal will be solid. Leave the 1/8" gap between the strap frame and the door for a slightly heavy weld bead - as sloppy as my welds are that's no problem for a welder like me to fill up... 
And on the eighth day God created barbecue …. because he DOES love us and he wants us to be happy.
Current smokers: Egor (trailered RF) and Easybake (tabletop pellet drive)
Current smokers: Egor (trailered RF) and Easybake (tabletop pellet drive)
Re: New Build Thread: Uncle Charlie – Short and Full of Fire
I am still plodding along on this build.
CC DOOR WORK
I was able to improve the fit of the door. I used a 20 ton bottle jack to curve the door some more. I also had to hammer back the inside flanges a bit to allow the door to close completely. I got one side to fit almost perfectly and the other side was off only 1/16th.
I built some new hinges that would allow me to add 1.25” flange to the outside of the door. The hinges are made out of ¼” scrap. The temporary hinge pins are 3/8”stainless bolts. I’ll reshape the hinges and swap out the hinge pins at a later date. I welded the outside flange to the door. To reduce the chance of warpage, I spot welded the flange at full power, then turned the power down and filled in the gaps between the spot welds. I am happy with the results.
- Attachments
-
-
-
-
Re: New Build Thread: Uncle Charlie – Short and Full of Fire
FIREBOX/GRILL WORK
I purchased two large toggle latches for the firebox. I decided that I should anchor them to something other than the 14 gauge skin so I built some ¼” latch mounts. I also added some angle to help mount the skin. Doesn't look like much but sure took a lot of time.
I purchased two large toggle latches for the firebox. I decided that I should anchor them to something other than the 14 gauge skin so I built some ¼” latch mounts. I also added some angle to help mount the skin. Doesn't look like much but sure took a lot of time.
- Attachments
-
-
Pete Mazz

- Administrator

- Posts: 3399
- Joined: February 16th, 2013, 8:19 am
- Title: Meathead
- Location: Bucks County, PA
Re: New Build Thread: Uncle Charlie – Short and Full of Fire
Nice! Isn't it amazing how long the details take?
If it's tourist season, how come I can't shoot 'em?
Don't speak the language? Try this: Smoker Terminology
Try my SmokerBuilder Calculators
Don't speak the language? Try this: Smoker Terminology
Try my SmokerBuilder Calculators
-
Rodcrafter
- Moderator
- Posts: 8488
- Joined: July 21st, 2012, 5:46 pm
- Title: Member
- BBQ Comp Team Name: Not competing yet...
- Location: Orlando, Florida
Re: New Build Thread: Uncle Charlie – Short and Full of Fire
Oh yeah! Nice work
Making memories!
Making memories!
Current Smokers: Backyard RF Offset and Hybrid RF Offset trailer rig with Cowboy cooker and fish fryer, always room for more........
-
temurf
- Expert
- Posts: 916
- Joined: May 12th, 2016, 7:37 pm
- Title: Train Driver
- BBQ Comp Team Name: Rednecks con Fuego
- Location: El Paso, Texas
Re: New Build Thread: Uncle Charlie – Short and Full of Fire
Uncle Charlie is coming along nicely.
Yer gonna like what we've been smokin'.
Re: New Build Thread: Uncle Charlie–Short and Full of Fire
Not much to say except it is a slow grind towards completion. I've been working on insulating the firebox. Here are a few pics.
To my gulf coast body, it is too cold to work on the smoker. It was 34 in the garage this morning. It is suppose to be in the 70's by Tuesday. I'll gladly wait a few days and avoid handling metal in the cold.
I did manage a few nice flounder.
To my gulf coast body, it is too cold to work on the smoker. It was 34 in the garage this morning. It is suppose to be in the 70's by Tuesday. I'll gladly wait a few days and avoid handling metal in the cold.
I did manage a few nice flounder.
- Attachments
-
- two layers of 1"ceramic wool, 6 lb density
-
-
- air intake has downward slope to prevent water intrusion
-
- 24&3/8"
-
p3ripperfw
- Big Time SmokerBuilder

- Posts: 208
- Joined: December 13th, 2016, 11:02 pm
- Title: Member
- BBQ Comp Team Name: Not competing yet...
- Location: Waxahachie, Texas
-
Big T
- Moderator
- Posts: 6897
- Joined: September 1st, 2013, 2:40 pm
- Title: Go Getter
- BBQ Comp Team Name: Backyard Boys
- Location: Lower Alabama
Re: New Build Thread: Uncle Charlie – Short and Full of Fire
It's getting there slowly but surely. Nice flat fish! What part of the coast are you on?
Measure Twice.....Cut Three Times.
-
Squiggle
- Expert
- Posts: 2611
- Joined: December 19th, 2015, 5:04 pm
- Title: Reformed non-smoker!
- BBQ Comp Team Name: Not competing yet...
- Location: Mole Creek, Tasmania
Re: New Build Thread: Uncle Charlie – Short and Full of Fire
Formerly known as "Hey you there in the bushes!"
Re: New Build Thread: Uncle Charlie – Short and Full of Fire
Been working on insulating the Firebox. It is almost completed. I am installing 2 layers of 1” ceramic blanket. The outer skin is 14 gauge.
I inserted a piece of 2” square tubing across the bottom of the FB. This will give me a strong area to place a jack or blocks if I need to lift the smoker off its cart. Also, I only stich welded the bottom skin. The plan is that no water would enter the insulation area between the FB and the skin. However, should water somehow get in, I wanted it to be able to drain out.
THE DOOR
The door is done. It took a considerable bit of work fitting all the pieces. I fortified the door with 1” X 5/16” flat bar. Hopefully, the ribs will prevent the door from warping. It all fits pretty well at the moment. We’ll see what happens after we fire it up. A word of advice to anyone building an insulated FB: Make the door ¼” wider than the skin. I didn’t and the hinges interfered with the skin. To make the door water tight, I had to build boxes around the hinges. The door skin is completely welded on 3 sides and should be watertight. However, I still left openings in the bottom panel so water could get out.
- Attachments
-
-
- Sorry for the sideways picture
-
-
-
ajfoxy

- Expert
- Posts: 2364
- Joined: April 12th, 2016, 8:07 pm
- Title: Neophyte Smoker Bldr
- BBQ Comp Team Name: Not competing yet...
- Location: Brisbane, Queensland, Australia
Re: New Build Thread: Uncle Charlie – Short and Full of Fire
Coming along nicely. Looking very solid and good. Nice work.
Learning generally boils down to "Repetition or the avoidance of pain", some people learn by doing, some by watching and some just have to pee on the electric fence.
Whether you think that you can, or that you can't, you are usually right. Henry Ford
Whether you think that you can, or that you can't, you are usually right. Henry Ford
-
Squiggle
- Expert
- Posts: 2611
- Joined: December 19th, 2015, 5:04 pm
- Title: Reformed non-smoker!
- BBQ Comp Team Name: Not competing yet...
- Location: Mole Creek, Tasmania
Re: New Build Thread: Uncle Charlie – Short and Full of Fire
Awesome work dude, very cool indeed! 
Formerly known as "Hey you there in the bushes!"
-
- Similar Topics
- Replies
- Views
- Last post
-
- 13 Replies
- 7714 Views
-
Last post by Dirtytires
-
- 56 Replies
- 17975 Views
-
Last post by Barrion2018
-
- 7 Replies
- 5056 Views
-
Last post by JH1973
-
- 2 Replies
- 3281 Views
-
Last post by Tower870
-
- 11 Replies
- 6284 Views
-
Last post by Dirtytires